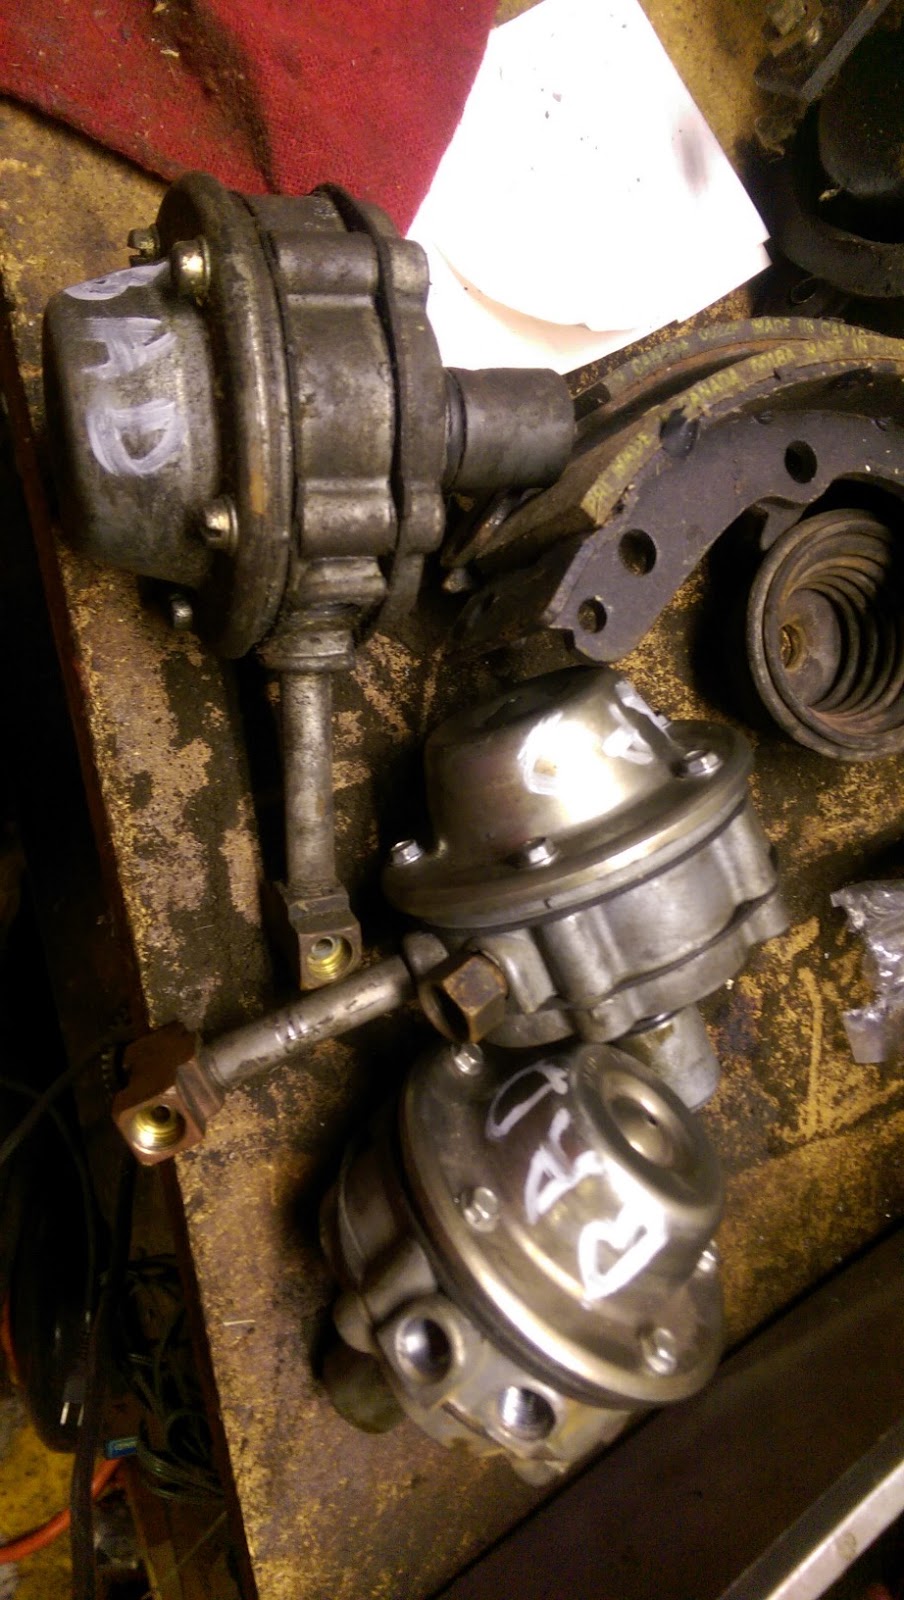
With Scarlett still occupying the garage, work on getting Ringo back on the road had to take place in the twenty-something degree discomfort of the driveway. I had quick to point the finger at a carburetor, but a Facebook posting by my Corvair-buddy Geoff reminded me of the saying, “95% of fuel problems are electrical.” So, the first thing I did after donning layers of grungies was hook up the dwell meter and crank the engine. Dwell was still reading 32, but I went ahead and put back on the previous point’s plate with a GUP set of points with the contacts slightly sanded. Since the cold battery didn’t have enough oomph left to set the dwell by cranking with the starter, I went old-school and set the point gap. As I was turning the engine with a wrench to get the point’s rubbing block on top of a cam, I noticed gas dripping from the fuel pump. Irr. I pulled off the offending part and replaced it with the newish-looking one off Scarlett. After a little gas went into each carb, the engine fired right up and settled into a nice idle … for about a twenty seconds before dying. Irr. Figuring the supposedly functional fuel pump wasn’t so functional, I cracked open one of the fuel line fittings and cranked the engine – sure enough, no gas. Off came that pump and I immediately marked it BAD. On went the next newish-looking pump from the stash. After attaching the inlet tube, I poured a little gas down each carb, started the engine, and crossed my fingers that I’d see pulses of fuel come out of the outlets. Nothing. Another pump gets BAD written on it. The final pump from my stash was seized, so I had no choice but to put the original back on. With all the fitting tightened, I started the engine and tightened the pump’s screws to stem the drops to just a slow ooze. The dwellmeter indicated my gap-setting, while good enough to get the engine running, wasn’t quite where it needed to be. A tweak or two with a screwdriver and dwell was back to about 32 degrees. That was followed by a re-setting of the timing to 12 degrees BTDC.
At that point my fingers were too cold to continue. Replacing the muffler had to wait until another evening – hopefully one with temps at least in the thirties.
Showing posts with label ignition. Show all posts
Wednesday, January 6, 2016
Tuesday, October 20, 2015
Three Steps Closer to a For Sale Sign
This weekend I was actually able to spend a lot of time working on cars (some Corvairs even) while still completing the major house project I had committed to. Saturday I spent a couple hours redoing Ringo’s rear brakes. This was one of those projects where one thing led to another which led to another. First, as I was disassembling the right rear to install the GUP e-brake cable, I noticed the shoe linings were in pretty rough, cracked shape, so I went to the box of GUP EM brake parts and pulled out two forward and two rear shoes to use. Once I got the right side put back together I moved over to the left. There I found the liners in even worse shape (had it been that long since I’d changed them?). Anyway, I put the parts back together including lubricating and turning down nearly all the way the adjusting wheel. Next, putting the hub on was much more difficult than it should have been. I made a closer inspection to ensure nothing was amiss with my work and I found the rear shoe wouldn’t retract completely to the post. Close inspection showed the one piston was seized in the wheel cylinder. A few persuasive taps with a hammer and the piston retracted and seemed freed up. I completed the brake reassembly, mounted the tires, and dropped his rear off the jackstands. After firing up the engine using the hotwire under the hood, I let the engine warm up thoroughly while I put away tools. Next, I backed him up onto the ramps so I could properly adjust the emergency brake cable length. Once that was done to my satisfaction, I drove him back down, and moved on to the more pressing project of the day – the new kitchen.
The next afternoon I’d promised my buddy, Jonathan, I’d come over to see if we could, together, solve his Corsa’s starting woes. Of late, the engine won’t consistently crank when the key was turned – the starter would spin, but the pinion of the Bendix drive wasn’t always engaging the ring -gear on the pressure plate. Additionally, the last time he’d tried to crank the engine, the solenoid got stuck in the start position and the starter just spun away. The only way to stop it was to disconnect power to the starter. We did a bit of checking of the wiring and everything seemed to be in good stead (12 volts to the purple wire when the key is in the Start position, power to the engine with the key in the On position, etc.). After those checks and reconnecting all the leads, lo-and-behold the starter stopped its incorrect spinning and responded to the turn of the key again. We hadn’t, however, fixed the inconsistent cranking. The engine would only turn on every fifth or so turn of the key, and once it did start cranking it wouldn’t even make it a full revolution before the pinion would pop out of engagement and the starter would uselessly spin freely. Jonathan removed the starter and we connected it directly to the car’s battery and watched the Bendix as I shorted the S terminal to 12V. Strangely, the pinion would pop out upon the starter being energized, but it would not stay in the full out position. After a second or two it would begin to slowly draw back into it’s at rest position even though the starter motor was still spinning away. Hmmm. Bad starter perhaps? He’s going to go get another rebuilt one and we’ll keep our fingers crossed.
After returning home, still wearing grungies, I went back to work on Ringo and replaced the balky ignition switch (seemed to be the theme for the day).
The last task for him was to replace the front seat belts. The ones he'd been sporting since Ariel and I put him on the road came out of my LeMans and allowing them to disappear with his sale would no do. The shelf contained a number of replacements, but I chose a set of new (although probably circa 1975), brown ones from Pep Boy's. I'd bought these at part's auction a few years back.
Now Ringo sits at the curb awaiting a round-the-neighborhood test drive and transmission fill before a few days of daily-driving. Once I'm sure the bugs are worked out, the Craigslist ad goes up.
The next afternoon I’d promised my buddy, Jonathan, I’d come over to see if we could, together, solve his Corsa’s starting woes. Of late, the engine won’t consistently crank when the key was turned – the starter would spin, but the pinion of the Bendix drive wasn’t always engaging the ring -gear on the pressure plate. Additionally, the last time he’d tried to crank the engine, the solenoid got stuck in the start position and the starter just spun away. The only way to stop it was to disconnect power to the starter. We did a bit of checking of the wiring and everything seemed to be in good stead (12 volts to the purple wire when the key is in the Start position, power to the engine with the key in the On position, etc.). After those checks and reconnecting all the leads, lo-and-behold the starter stopped its incorrect spinning and responded to the turn of the key again. We hadn’t, however, fixed the inconsistent cranking. The engine would only turn on every fifth or so turn of the key, and once it did start cranking it wouldn’t even make it a full revolution before the pinion would pop out of engagement and the starter would uselessly spin freely. Jonathan removed the starter and we connected it directly to the car’s battery and watched the Bendix as I shorted the S terminal to 12V. Strangely, the pinion would pop out upon the starter being energized, but it would not stay in the full out position. After a second or two it would begin to slowly draw back into it’s at rest position even though the starter motor was still spinning away. Hmmm. Bad starter perhaps? He’s going to go get another rebuilt one and we’ll keep our fingers crossed.
After returning home, still wearing grungies, I went back to work on Ringo and replaced the balky ignition switch (seemed to be the theme for the day).
The last task for him was to replace the front seat belts. The ones he'd been sporting since Ariel and I put him on the road came out of my LeMans and allowing them to disappear with his sale would no do. The shelf contained a number of replacements, but I chose a set of new (although probably circa 1975), brown ones from Pep Boy's. I'd bought these at part's auction a few years back.
Now Ringo sits at the curb awaiting a round-the-neighborhood test drive and transmission fill before a few days of daily-driving. Once I'm sure the bugs are worked out, the Craigslist ad goes up.
Monday, August 24, 2015
I Love the Smell of Ignition in the Morning
Late last week Glinda became undriveable. The tach needle was jumping around and the engine wouldn’t idle only staying running if I kept the rpms above 2500. I limped her home thinking the issue was with the dying ignition switch. I surmised that the contacts inside the switch were failing and the engine was not getting enough electricity to run properly. The replacement GUP switch from the Corvair Ranch showed up in Saturday’s mail, and I installed it that night. Upon first firing up the engine, it was still running rough – crap, not the switch. I hopped out to look at the engine, but it died before I could get the lid open. I wiggled all the electrical connections that may be causing the issue – nothing appeared amiss. I hopped back behind the wheel and turned the key. A single backfire and the engine was running smoothly again. I took her for a spin around the neighborhood and everything seemed normal.
Yesterday morning I turned my attention to Ringo. I finished sanding the Bondo, blew off all the dust, wiped down the area with cleaner, masked off and shot the entire area with three coats of red sandable primer. I’ll let it cure for a day or so before wet-sanding the primer in preparation for some coats of Black Cherry Pearl.

This morning I grabbed the keys to Glinda, buckled up behind her steering wheel, and turned the key. Her engine reluctantly fired into a stumbling idle – crap. I let the engine warm up a little with my foot finessing the throttle, but to no avail. To determine if it was a carb blockage, I pulled off the air cleaner and peered down the venturis while blipping the throttle – healthy squirts of fuel indicated the issue was ignition. I confirmed that when I fetched the timing light, hooked it up, and cranked the engine – no spark. Off came the distributor cap, rotor, and dust shield exposing the points. Using the remote starter (jumper wire from the purple wire connector to the positive on the battery), I watched the points move, but saw no spark. I was at a fork in the road – either replace the points with an unknown GUP or reinstall the electronic ignition module and coil. I opted for the later. Fifteen minutes or so later, I had everything in place and hooked up. The momentous turn of the key was immediately followed by a smoothly running engine. I let it warm up as I put some of the tools away and then plugged the vacuum line, adjusted the idle speed to around 500 rpm, and checked the timing. It was reading a little above 16 BTDC, so I loosened the distributor’s hold-down nut, bumped it a bit to get to get it to around 15 BTCD, and then tightened the nut. After reconnecting the vacuum advance tube, I set the idle speed to 800 rpm, and shut off the engine. I put away the rest of the tools, washed my hands, and inspected my work clothes to make sure I hadn’t leaned against something untoward (must be why I wear black slacks a lot of the time). When I finally pulled away from the curb, I’d only lost an hour of my day. The drive to work was wonderful with Glinda’s engine pulling strongly in all gears well above 4000 rpm – yes, that’s over 80 mph. Bonus, I can cross an item off the To-Do list.
Yesterday morning I turned my attention to Ringo. I finished sanding the Bondo, blew off all the dust, wiped down the area with cleaner, masked off and shot the entire area with three coats of red sandable primer. I’ll let it cure for a day or so before wet-sanding the primer in preparation for some coats of Black Cherry Pearl.

This morning I grabbed the keys to Glinda, buckled up behind her steering wheel, and turned the key. Her engine reluctantly fired into a stumbling idle – crap. I let the engine warm up a little with my foot finessing the throttle, but to no avail. To determine if it was a carb blockage, I pulled off the air cleaner and peered down the venturis while blipping the throttle – healthy squirts of fuel indicated the issue was ignition. I confirmed that when I fetched the timing light, hooked it up, and cranked the engine – no spark. Off came the distributor cap, rotor, and dust shield exposing the points. Using the remote starter (jumper wire from the purple wire connector to the positive on the battery), I watched the points move, but saw no spark. I was at a fork in the road – either replace the points with an unknown GUP or reinstall the electronic ignition module and coil. I opted for the later. Fifteen minutes or so later, I had everything in place and hooked up. The momentous turn of the key was immediately followed by a smoothly running engine. I let it warm up as I put some of the tools away and then plugged the vacuum line, adjusted the idle speed to around 500 rpm, and checked the timing. It was reading a little above 16 BTDC, so I loosened the distributor’s hold-down nut, bumped it a bit to get to get it to around 15 BTCD, and then tightened the nut. After reconnecting the vacuum advance tube, I set the idle speed to 800 rpm, and shut off the engine. I put away the rest of the tools, washed my hands, and inspected my work clothes to make sure I hadn’t leaned against something untoward (must be why I wear black slacks a lot of the time). When I finally pulled away from the curb, I’d only lost an hour of my day. The drive to work was wonderful with Glinda’s engine pulling strongly in all gears well above 4000 rpm – yes, that’s over 80 mph. Bonus, I can cross an item off the To-Do list.
Friday, June 5, 2015
Hit the Road Jack
I awoke today to a misty morning. Regardless, I wanted to do all I could to bring a decently performing Corvair to tomorrow’s track event, so I backed Glinda up to the open garage door and pulled all six spark plugs from the engine. They were all black with soot. I’m going to attribute this condition to the forty or so miles I drove before swapping out the Ignitor II. I cleaned all the plugs and checked gaps before reinstalling. I’m still hoping I don't need to swap carbs and plugs Saturday at the track.
With the drizzle dampening only my grungies, I continued to gather and pack tools, parts, and supplies as I crossed off items on my checklist. The truck-bed's contents now includes three nearly full five gallon jugs of 93 octane, two spare tires (borrowed from Luna), a bulging bag of tools, a couple milk crates filled with assorted parts and fluids, jack and jackstands, and a couple large pieces of cardboard. Most of these items I pray will stay in the bed for the entire weekend.
I attached Glinda to the tow-bar and the tow-bar to the truck’s hitch before pulling out onto the road. Thanks to the text from the lovely Loriann I forgot the sunscreen I’d put on the dining room table. I pray that’s all I’ve forgot.
With the drizzle dampening only my grungies, I continued to gather and pack tools, parts, and supplies as I crossed off items on my checklist. The truck-bed's contents now includes three nearly full five gallon jugs of 93 octane, two spare tires (borrowed from Luna), a bulging bag of tools, a couple milk crates filled with assorted parts and fluids, jack and jackstands, and a couple large pieces of cardboard. Most of these items I pray will stay in the bed for the entire weekend.
I attached Glinda to the tow-bar and the tow-bar to the truck’s hitch before pulling out onto the road. Thanks to the text from the lovely Loriann I forgot the sunscreen I’d put on the dining room table. I pray that’s all I’ve forgot.
Thursday, June 4, 2015
A Success Of Sorts
While I was driving Glinda home from work yesterday, I noticed the tachometer needle would jump up while accelerating (even slight acceleration). The needle jumps up a few hundred rpm and then quickly falls back. It happened quite frequently and it appeared to have a slight miss when it did it. Soon after arriving home, I grabbed my tablet and posted my problem on Virtual Vairs. Within minutes, I received a reply from Mark Durham positing a faulty points plate. As soon as dinner was over, I donned grungies and headed out to the driveway where Glinda awaited.
Diving into the distributor, I pulled the plate and confirmed it was unmodified – no provisions to improve grounding. Ringo gave up his points plate – one that a ‘vair vendor had modified with a wire brush around the pivot to improve grounding. Before installing the replacement plate I cleaned the points with a quick swipe of fine sandpaper. Once the plate was in place, I adjusted the dwell to 32 degrees, put the rest of the distributor together, and set the timing to 16 degrees BTDC.
The subsequent test drive showed smooth action by the tach needle – success. There was still some hesitation under WOT at higher rpms in third gear. It wasn’t until this morning’s commute that I could check out the performance in fourth gear. There's still hesitation in fourth gear preventing me from getting much above four grand in the short bursts available to me.
Also somewhat disconcerting is the steady drop of the fuel gauge needle. Granted I’m doing a lot of WOT runs, but I’m still thinking the engine’s running rich. While I’ll be taking a pair of carburetors with me to New York, it’s doubtful I’ll do the swap until after the weekend.
Diving into the distributor, I pulled the plate and confirmed it was unmodified – no provisions to improve grounding. Ringo gave up his points plate – one that a ‘vair vendor had modified with a wire brush around the pivot to improve grounding. Before installing the replacement plate I cleaned the points with a quick swipe of fine sandpaper. Once the plate was in place, I adjusted the dwell to 32 degrees, put the rest of the distributor together, and set the timing to 16 degrees BTDC.
The subsequent test drive showed smooth action by the tach needle – success. There was still some hesitation under WOT at higher rpms in third gear. It wasn’t until this morning’s commute that I could check out the performance in fourth gear. There's still hesitation in fourth gear preventing me from getting much above four grand in the short bursts available to me.
Also somewhat disconcerting is the steady drop of the fuel gauge needle. Granted I’m doing a lot of WOT runs, but I’m still thinking the engine’s running rich. While I’ll be taking a pair of carburetors with me to New York, it’s doubtful I’ll do the swap until after the weekend.
Wednesday, June 3, 2015
Better, But Not Great
Going against the best evidence (crappy gas mileage, sooty spark plugs), I decided I’d focus on ignition (Ignitor II) over the fuel (rich carburetors).
Last night I backed Glinda up to the open garage door with the intention of reverting back to stock points to see if the poor performance can be remedied. After removing the distributor cap, rotor, and dust cover, I took out the two screws holding the Ignitor II in place, and zip-tied it out of the way. The stock points plate took its place and the rest of the distributor assembly was buttoned up. I borrowed the new-looking coil from Scarlett and zip-tied it to the engine for temporary testing purposes. With the leads in place, I fired up the engine and checked the timing. Since it was close to twelve degrees BTDC, I called it good enough for my purposes.
The subsequent test drive indicated the engine would pull in first and second gears without hesitation. Problem solved. Back to the driveway.
I removed and stored the Ignitor II and Flame-thrower coil and bolted the stock coil into place. After re-hooking up the wiring, I shut the engine lid and went inside for dinner.
This morning, once on the highway, I did a few WOT runs in 4th. Sadly, all was not well. As the rpms went up, the tach needle started occasionally bouncing around and the engine didn't seem to be pulling as hard. I was, however, able to get up to around 4000 rpm, but not much more. I still need to check the plugs (sooty or not) and tweak the timing, but I'm disappointed. I'll be taking different carburetors with me to the track. I don't want to swap carbs while at the track, but I'll try anything now.
Last night I backed Glinda up to the open garage door with the intention of reverting back to stock points to see if the poor performance can be remedied. After removing the distributor cap, rotor, and dust cover, I took out the two screws holding the Ignitor II in place, and zip-tied it out of the way. The stock points plate took its place and the rest of the distributor assembly was buttoned up. I borrowed the new-looking coil from Scarlett and zip-tied it to the engine for temporary testing purposes. With the leads in place, I fired up the engine and checked the timing. Since it was close to twelve degrees BTDC, I called it good enough for my purposes.
The subsequent test drive indicated the engine would pull in first and second gears without hesitation. Problem solved. Back to the driveway.
I removed and stored the Ignitor II and Flame-thrower coil and bolted the stock coil into place. After re-hooking up the wiring, I shut the engine lid and went inside for dinner.
This morning, once on the highway, I did a few WOT runs in 4th. Sadly, all was not well. As the rpms went up, the tach needle started occasionally bouncing around and the engine didn't seem to be pulling as hard. I was, however, able to get up to around 4000 rpm, but not much more. I still need to check the plugs (sooty or not) and tweak the timing, but I'm disappointed. I'll be taking different carburetors with me to the track. I don't want to swap carbs while at the track, but I'll try anything now.
Monday, June 1, 2015
A Fork In The Road
Saturday morning I was out in the driveway early attacking Glinda’s carburetors. I pulled the right one off the engine first. A hex wrench twisted out the plug giving me access to remove the jet. Once out, I could read the “52” stamped on the head. I’d thought I’d see a “53”. Knowing I needed to make a significant change, I screwed in a #50 jet, reinstalled the plug with some pipe sealant, and placed the carb base back on then engine. The same operations were performed on the other carb before pouring some gas into both bases. The the lids in place and the linkage all connected, I turned the key and the engine started right up and settled into a 600 rpm loping idle. Throttle response seemed acceptable with each blip of the throttle, so I left the engine running while I lowered the front end off the jackstands. Unusually, the driveway was clear, so I rolled Glinda off the ramps and out onto the street for a quick spin around the neighborhood. Sadly, the wide-open-throttle performance is still lacking – won’t pull strongly above 3500 rpm. I’ve driven the car a few times since (about 40 miles) and the gas gauge needle is already indicating I’ve burned about 4 gallons. Easy to do the math to see that estimated ten miles per gallon isn’t acceptable.
What to do now? I could still try to go against my belief that the carburetors are to blame and focus on the ignition. That would mean swapping out the used Ignitor II and new Flamethrower coil for the stock points and an old coil – roughly an hour of my time. Or I could go with all the evidence and replace the modified carbs with either Ringo’s proven ones or Scarlett’s recently rebuilt ones – again about an hour of work. Neither of the replacement sets of carbs have had the jets relocated. If the swap cures the mileage and WOT issues, I’ll still be faced with fuel cutout after high speed turns – and there are seven of them at the track I’m heading to in a few days. With rain in the forecast for this evening, I’ve got another day to make the decision.
Monday, May 11, 2015
The Jury’s Out
Only had a couple hours during this last, very busy weekend to work on cars. Saturday morning I got Mikhaila out to the garage for some Scarlett-time before she had to go to work. We wanted to verify that Scarlett’s distributor and coil would play together and make sparks. First, we borrowed Ringo’s battery, hooked it up, and spun the engine to get the timing mark lined up with the 8 degree BTDC mark. We then checked to see if the distributor’s rotor was pointing to the #1 plug post. It wasn’t so we pulled the distributor out, twisted its shaft a few degrees, and then twisted the oil pump shaft the same amount, and poked the distributor back in place. After installing the new spark plug cables, Mikhaila hooked up the timing light. With the key on, I spun the distributor while she held the light’s trigger closed and watched for a light – nothing. At that point she had to leave, but I wasn’t ready to quit. I got out the feeler gauges and set the point gap to .016 inch. I twisted the distributor with the cap off and could see sparks each the points opened. When I was happy with the location of the distributor, I tightened the hold-clamp nut and turned off the key.
With a little time left before having to get ready for date night with the lovely Loriann, I grabbed tools and headed to the curb where Glinda was waiting to have the floats in her carbs adjusted. The last fill up showed she was only getting a little over 14 mpg, and that would not do for a daily-driver that demands high-octane. I pulled the cover off each cover and re-set each float to be parallel at needle closed position (about 1 1/4” measures) and 1 3/4” at full drop. With everything back together I took her for a spin around the neighborhood – still a nice throttle response. Hopefully, this will get her mileage back into the high-teens. I drove the truck this morning, but plan on putting the miles on Glinda during the rest of the week.
Labels:
Carburetor,
Glinda,
ignition,
mileage,
Scarlett
Monday, May 4, 2015
These are the Times that Try My Soul
Going backwards is not fun, but that’s what’s been happening. When last I blogged, Glinda was nearing roadworthiness, and by the end of Friday night I’d hooked up the rest of the underside linkages and hoses, and drove her down off the ramps. After a spin around the neighborhood, I was confident I’d fixed the two major issues of clunking/catching clutch and stumbling engine. I even went ahead and put the electronic ignition stuff back in before calling it a night.
Saturday morning Mikhaila and I spent a frustrating couple of hours testing, removing, rebuilding, and reinstalling Scarlett’s blinker switch assembly. While we were successful in our endeavor, it was a shame we spent all her garage time on one small task. Next on the list is bolting on the exhaust and starting up the engine. Maybe we’ll make that momentous milestone some evening this week rather than wait until the weekend.
After she went in the house, I crossed another item off the to-do list when I undid the oil gauge line at the back of the gauge, pushed the tiny ferrule back up the nylon tubing, cut off a half-inch from the end, and reattached the fitting to the gauge. After firing up and revving the engine, I was satisfied that I had a drip-less connection, so I cleaned the oil spot from front carpet. I then removed the non-functioning backup lights (the switch on the transmission was never hooked up), and replaced them with factory blank plates. These were only offered on ’65 Model 500s, but I somehow ended up with them.

One sad thing happened when I went to turn the car on that afternoon – the spring in the ignition switch broke. I now need to manually turn the key from the Start to the On position once the engine is running. Not a big deal, but it’s just one more thing that needs to be dealt with. Irr #1.
Sunday morning I had a very enjoyable windows-down drive to and from church, winding out Glinda’s 110 at each shift and loving the sound and performance. I could hear a slight exhaust leak, so, after changing into grungies, I backed her up onto the ramps again. With the engine still running, I slid under the engine and began tightening nuts on the exhaust pipe flanges. Just about the time I got rid of the leaks, the engine’s rpm increased and then, almost immediately, stopped. I got out and cranked the engine only to now discover the fuel pump wasn’t getting gas to the carbs. Irrr #2. I pushed the car off the ramps and primed the carbs directly with gas out of a can – no luck, still no gas being moved by the pump. A quick R&R with a GUP off the shelf and the engine was running again.
Irr #3 (and it’s a big one) occurred yesterday evening when I was driving the car home from a church event. The clunk/catch came back. When I got home, I told the lovely Loriann that I’m through. The level of frustration I felt after all those hours on working the drivetrain ended up being for naught was too much. I am NOT going through it again. I’ve decided I will drive the car as-is and if something breaks, at least I’ll then know what was causing the problem. If nothing breaks, I’ll learn to live with the clunk/catch. Oh yeah, here's a photo of the relocated oil pressure gauge setup.
Saturday morning Mikhaila and I spent a frustrating couple of hours testing, removing, rebuilding, and reinstalling Scarlett’s blinker switch assembly. While we were successful in our endeavor, it was a shame we spent all her garage time on one small task. Next on the list is bolting on the exhaust and starting up the engine. Maybe we’ll make that momentous milestone some evening this week rather than wait until the weekend.
After she went in the house, I crossed another item off the to-do list when I undid the oil gauge line at the back of the gauge, pushed the tiny ferrule back up the nylon tubing, cut off a half-inch from the end, and reattached the fitting to the gauge. After firing up and revving the engine, I was satisfied that I had a drip-less connection, so I cleaned the oil spot from front carpet. I then removed the non-functioning backup lights (the switch on the transmission was never hooked up), and replaced them with factory blank plates. These were only offered on ’65 Model 500s, but I somehow ended up with them.

One sad thing happened when I went to turn the car on that afternoon – the spring in the ignition switch broke. I now need to manually turn the key from the Start to the On position once the engine is running. Not a big deal, but it’s just one more thing that needs to be dealt with. Irr #1.
Sunday morning I had a very enjoyable windows-down drive to and from church, winding out Glinda’s 110 at each shift and loving the sound and performance. I could hear a slight exhaust leak, so, after changing into grungies, I backed her up onto the ramps again. With the engine still running, I slid under the engine and began tightening nuts on the exhaust pipe flanges. Just about the time I got rid of the leaks, the engine’s rpm increased and then, almost immediately, stopped. I got out and cranked the engine only to now discover the fuel pump wasn’t getting gas to the carbs. Irrr #2. I pushed the car off the ramps and primed the carbs directly with gas out of a can – no luck, still no gas being moved by the pump. A quick R&R with a GUP off the shelf and the engine was running again.
Irr #3 (and it’s a big one) occurred yesterday evening when I was driving the car home from a church event. The clunk/catch came back. When I got home, I told the lovely Loriann that I’m through. The level of frustration I felt after all those hours on working the drivetrain ended up being for naught was too much. I am NOT going through it again. I’ve decided I will drive the car as-is and if something breaks, at least I’ll then know what was causing the problem. If nothing breaks, I’ll learn to live with the clunk/catch. Oh yeah, here's a photo of the relocated oil pressure gauge setup.
Tuesday, April 21, 2015
A Weekend of Work, But all Lights are Still Mighty Small
Those would be the lights at the end of the tunnels called Glinda and Scarlett.
Friday evening I backed Glinda up onto ramps and slid underneath to try and figure out what was causing the clicking linkage clicking. I disconnected the cable from the pivot arm being careful to keep tension on the cable so its other end didn’t come off the pedal arm inside the car (a zip-tie did the job). Next I removed the small cover that closes off the clutch volume inside the bellhousing. That gave me access to jiggle and push the clutch fork around. Lo and behold, I got a clip-related click when I pushed the fork inboard. Problem solved? Only putting everything back together and taking the car out on a test drive would verify. That’s what I did, and before I could complete my couple miles and stop-and-go, the clunk had returned. By the time the car was back on the ramps, the whole area under the car was too hot to handle, so I gave up for the night.
The other sad outcome of the test drive was the unsolved rough running. I’d thought (hoped) the problem had been a failed Pertronix electronic ignition, so I was confident (mis-guided) that putting the stock points plate back in would result in a free-revving 110. Pedal to the metal in first and second gear and the tach needle would never go above four thousand. It’s so sad (there’s that word again) that I can’t get the work on this car going in the right direction. Mikhaila and I spent a solid six hours in the garage last weekend trying to make some headway with her car. What did we have to show for it? Three crusty brake lines lying on the floor and a better understanding of Scarlett’s electrical issues.


As to the first, Saturday was brake day. I had high hopes we’d get the final brake pieces installed and the system bled of air. After bending and screwing in the last piece of brake line, I went around and made sure all bleed valves were tight. Sadly, when I got to the right front (with the new wheel cylinder), I found I could not get a wrench on the valve. It looks like I mistakenly used a LM cylinder. Irr. We dug Scarlett’s original cylinder out of the box of brake parts, punched out the old guts, cleaned it in the parts washer, honed the inside, blew it clean, and stuffed it with a GUP rebuild kit. The newly rebuilt cylinder then replaced the incorrect and we were good-to-go. We topped off the master cylinder and began the dance of Press-Press-Hold. She would press the brake pedal twice and hold it on the third pump while I cracked open the bleed valve to let out the air. After a few minutes of this, I looked under the car and saw significant amounts of brake fluid dripping onto the cardboard. Irr (there’s that word again). We both grabbed paper towels and wiped up the mess. We then removed the front underside tunnel covers and confirmed the back-to-front brake line was rotted through in a couple spots. The rear tunnel cover came off next followed by the humped cover under the dash. That gave us access to remove the entire line. As I lay under the rear of the car looking at the crusty left and right rear lines, it was easy to make the call and remove them too. I’ll get the replacement lines from Napa sometime this week for installation next Sunday.
The next day, we hooked up a 12 volt supply to the ends of the battery cables and began a thorough check out of Scarlett’s electrical systems. The connectors for the right rear taillight showed 12V with the headlight switch pulled, but the left side was dead. We moved to the front and found both headlight plugs were powerless. A quick check showed we’d never returned the dimmer switch after painting the floor. With one pulled from GUP stock, cleaned up, checked, and plugged in, we had 12V at both contacts of both plugs. Yay! We then plugged the connectors to send the juice to the headlights, pulled the switch, but were rewarded with all four beams staying dark. Dead bulbs – no problem. Sadly (there’s that word again), though a continuity check showed all bulbs were still fine. We spent the next hour or so swapping switches and cleaning contacts until we finally got all the bulbs to burn brightly. TYL. We moved on to the blinkers, and, the left side checked out as did the front right side, but there was no electricity making it back to the right rear plug. I’m thinking the issue is in the blinker switch assembly – a little cleaning and adjusting is called for. Finally, I had Mikhaila connect the two brake light wires (the ones that plug into the brake light switch), so we could check out that circuit. Result – right works, left doesn’t. Again, the blinker switch is probably the culprit.
Friday evening I backed Glinda up onto ramps and slid underneath to try and figure out what was causing the clicking linkage clicking. I disconnected the cable from the pivot arm being careful to keep tension on the cable so its other end didn’t come off the pedal arm inside the car (a zip-tie did the job). Next I removed the small cover that closes off the clutch volume inside the bellhousing. That gave me access to jiggle and push the clutch fork around. Lo and behold, I got a clip-related click when I pushed the fork inboard. Problem solved? Only putting everything back together and taking the car out on a test drive would verify. That’s what I did, and before I could complete my couple miles and stop-and-go, the clunk had returned. By the time the car was back on the ramps, the whole area under the car was too hot to handle, so I gave up for the night.
The other sad outcome of the test drive was the unsolved rough running. I’d thought (hoped) the problem had been a failed Pertronix electronic ignition, so I was confident (mis-guided) that putting the stock points plate back in would result in a free-revving 110. Pedal to the metal in first and second gear and the tach needle would never go above four thousand. It’s so sad (there’s that word again) that I can’t get the work on this car going in the right direction. Mikhaila and I spent a solid six hours in the garage last weekend trying to make some headway with her car. What did we have to show for it? Three crusty brake lines lying on the floor and a better understanding of Scarlett’s electrical issues.


As to the first, Saturday was brake day. I had high hopes we’d get the final brake pieces installed and the system bled of air. After bending and screwing in the last piece of brake line, I went around and made sure all bleed valves were tight. Sadly, when I got to the right front (with the new wheel cylinder), I found I could not get a wrench on the valve. It looks like I mistakenly used a LM cylinder. Irr. We dug Scarlett’s original cylinder out of the box of brake parts, punched out the old guts, cleaned it in the parts washer, honed the inside, blew it clean, and stuffed it with a GUP rebuild kit. The newly rebuilt cylinder then replaced the incorrect and we were good-to-go. We topped off the master cylinder and began the dance of Press-Press-Hold. She would press the brake pedal twice and hold it on the third pump while I cracked open the bleed valve to let out the air. After a few minutes of this, I looked under the car and saw significant amounts of brake fluid dripping onto the cardboard. Irr (there’s that word again). We both grabbed paper towels and wiped up the mess. We then removed the front underside tunnel covers and confirmed the back-to-front brake line was rotted through in a couple spots. The rear tunnel cover came off next followed by the humped cover under the dash. That gave us access to remove the entire line. As I lay under the rear of the car looking at the crusty left and right rear lines, it was easy to make the call and remove them too. I’ll get the replacement lines from Napa sometime this week for installation next Sunday.
The next day, we hooked up a 12 volt supply to the ends of the battery cables and began a thorough check out of Scarlett’s electrical systems. The connectors for the right rear taillight showed 12V with the headlight switch pulled, but the left side was dead. We moved to the front and found both headlight plugs were powerless. A quick check showed we’d never returned the dimmer switch after painting the floor. With one pulled from GUP stock, cleaned up, checked, and plugged in, we had 12V at both contacts of both plugs. Yay! We then plugged the connectors to send the juice to the headlights, pulled the switch, but were rewarded with all four beams staying dark. Dead bulbs – no problem. Sadly (there’s that word again), though a continuity check showed all bulbs were still fine. We spent the next hour or so swapping switches and cleaning contacts until we finally got all the bulbs to burn brightly. TYL. We moved on to the blinkers, and, the left side checked out as did the front right side, but there was no electricity making it back to the right rear plug. I’m thinking the issue is in the blinker switch assembly – a little cleaning and adjusting is called for. Finally, I had Mikhaila connect the two brake light wires (the ones that plug into the brake light switch), so we could check out that circuit. Result – right works, left doesn’t. Again, the blinker switch is probably the culprit.
Labels:
brakes,
Carburetor,
clutch,
electrical,
Glinda,
ignition,
Scarlett
Monday, April 6, 2015
It Was Glinda Time Yesterday
Yesterday afternoon, while Ariel and Victoria were cooking a delicious Easter dinner, I was out in the driveway working on Glinda.
Before diving into discussing the work accomplished over the weekend, I need to share a couple events in Glinda’s life. I thought I’d already blogged about them, but a quick search proved a complete lack of documentation. First is an air cleaner modification. Back in the days of Lucy, I’d bought PVC couplers that were supposed to fit between the air cleaners and the carburetors to increase the straightaway the incoming air travelled before entering the carb. That modification lasted about a week when I found the air cleaners sitting askew atop the carbs. I reverted back to stock and squirreled away the PVC pieces. With some time to kill a few weekends back, I installed extensions between each of Glinda’s two carburetors and the associated end of the air cleaner cross-tube. In order to accommodate the increased height of the air-filter housing, I needed to increase the length of the stud that retains the cover. To do this, I ran two of the correct-sized nuts together onto a piece of all-thread and welded two nuts together. After letting the fabrication cool, I unscrewed it from the all-thread and installed it part-way onto the existing stud. Into the open end of the welded nuts, I then screwed in a 4” long piece of all-thread and snugged it against the end of the stud to lock it in place. It was the perfect length for the top wing-nut to hold the air cleaner cover in place. Zip-ties held the ends of the crossover tube to the carburetors.
The other undocumented work was the voltage regulator I’d mentioned in my last post. Well, it arrived from Amazon, and, once installed, actually increased the voltage reading rather than reducing it. It went back to Amazon, and I’ve chastised myself (again) for not supporting a Corvair parts’ vendor. The old regulator is back in place and borrowing Luna’s for another test is on the to-do list.
Now back to yesterday’s activities – which were focused on Glinda.
First issue to address was her clunking clutch. After backing her up onto the ramps, I tried all the linkage adjustments I could from one extreme to the other. Sadly, it was all for naught. Here’s a video of the issue as it now stands: https://www.youtube.com/edit?video_id=xOwfakkv-8o. I posted my problem on VirtualVairs and the first few responses I got all point to the clutch fork incorrectly installed. One responder’s sharp eye spotted a slight sideways movement of the rod that pushes the fork right as the clunk occurs. That, to me, is an excellent clue the fork’s got an installation issue. This wouldn’t surprise me since, at one point in my working on this car, I accidentally popped the fork off the pivot ball. I’d thought, at the time, that I’d properly popped it back into place, but that sounds doubtful now. Sadly, I don’t think it’s possible to access the fork’s attachment point through the small hole in the bell-housing. I think, however, I can drop the drivetrain enough to slide the engine rearward to access the clutch area. My hope and prayer is that I do NOT need to disconnect axles and control arms. There’s rain in the forecast and taxes to be done, so this project, however involved it gets, will have to wait a week.
The second issue I addressed was the stumbling performance under heavy acceleration. In keeping with my bad luck with Pertronix, I swapped out the Ignitor II for Glinda’s original points’ plate and made the necessary dwell and timing adjustments. The whole clutch thing will keep me from finding out if I’ve solved the problem until that’s resolved.
The third issue I fixed was the sticking throttle. I'd installed one of the new engine carburetor linkage pieces too close to it's neighbor and they were binding at wide-open-throttle. I moved the part slightly and the binding is history.
The final thing I did was finally install the last throttle linkage pivot subassembly. This was a piece I got a while ago, but was unable to use as-is since I couldn’t use the later transmission. The maker of this fine product, Roger Parent, sent me an adapter bracket that accommodates bolting his pivot onto the early transmission, so that’s just what I did. It looks and works wonderfully - nice and smooth actuation.
Before diving into discussing the work accomplished over the weekend, I need to share a couple events in Glinda’s life. I thought I’d already blogged about them, but a quick search proved a complete lack of documentation. First is an air cleaner modification. Back in the days of Lucy, I’d bought PVC couplers that were supposed to fit between the air cleaners and the carburetors to increase the straightaway the incoming air travelled before entering the carb. That modification lasted about a week when I found the air cleaners sitting askew atop the carbs. I reverted back to stock and squirreled away the PVC pieces. With some time to kill a few weekends back, I installed extensions between each of Glinda’s two carburetors and the associated end of the air cleaner cross-tube. In order to accommodate the increased height of the air-filter housing, I needed to increase the length of the stud that retains the cover. To do this, I ran two of the correct-sized nuts together onto a piece of all-thread and welded two nuts together. After letting the fabrication cool, I unscrewed it from the all-thread and installed it part-way onto the existing stud. Into the open end of the welded nuts, I then screwed in a 4” long piece of all-thread and snugged it against the end of the stud to lock it in place. It was the perfect length for the top wing-nut to hold the air cleaner cover in place. Zip-ties held the ends of the crossover tube to the carburetors.
The other undocumented work was the voltage regulator I’d mentioned in my last post. Well, it arrived from Amazon, and, once installed, actually increased the voltage reading rather than reducing it. It went back to Amazon, and I’ve chastised myself (again) for not supporting a Corvair parts’ vendor. The old regulator is back in place and borrowing Luna’s for another test is on the to-do list.Now back to yesterday’s activities – which were focused on Glinda.
First issue to address was her clunking clutch. After backing her up onto the ramps, I tried all the linkage adjustments I could from one extreme to the other. Sadly, it was all for naught. Here’s a video of the issue as it now stands: https://www.youtube.com/edit?video_id=xOwfakkv-8o. I posted my problem on VirtualVairs and the first few responses I got all point to the clutch fork incorrectly installed. One responder’s sharp eye spotted a slight sideways movement of the rod that pushes the fork right as the clunk occurs. That, to me, is an excellent clue the fork’s got an installation issue. This wouldn’t surprise me since, at one point in my working on this car, I accidentally popped the fork off the pivot ball. I’d thought, at the time, that I’d properly popped it back into place, but that sounds doubtful now. Sadly, I don’t think it’s possible to access the fork’s attachment point through the small hole in the bell-housing. I think, however, I can drop the drivetrain enough to slide the engine rearward to access the clutch area. My hope and prayer is that I do NOT need to disconnect axles and control arms. There’s rain in the forecast and taxes to be done, so this project, however involved it gets, will have to wait a week.
The second issue I addressed was the stumbling performance under heavy acceleration. In keeping with my bad luck with Pertronix, I swapped out the Ignitor II for Glinda’s original points’ plate and made the necessary dwell and timing adjustments. The whole clutch thing will keep me from finding out if I’ve solved the problem until that’s resolved.
The third issue I fixed was the sticking throttle. I'd installed one of the new engine carburetor linkage pieces too close to it's neighbor and they were binding at wide-open-throttle. I moved the part slightly and the binding is history.
The final thing I did was finally install the last throttle linkage pivot subassembly. This was a piece I got a while ago, but was unable to use as-is since I couldn’t use the later transmission. The maker of this fine product, Roger Parent, sent me an adapter bracket that accommodates bolting his pivot onto the early transmission, so that’s just what I did. It looks and works wonderfully - nice and smooth actuation.
Friday, December 19, 2014
Yeah, It HAS Been a While
It's been aver a month since I last had something postable. Since then, it’s been work, work, work … on a bathroom. Finally, last weekend, the lovely Loriann informed me I had completed the renovation work I was responsible for – she’d do the rest. So with the installation of the marble threshold I was free to work on cars again.
I wanted working with Mikhaila on her car to be the first project I got back to, but that wasn’t to be – she was sick Sunday. Instead, I spent the afternoon re-hanging Glinda’s muffler, replacing an exhaust clamp, installing the Pertronix Ignitor II and Flamethrower II, and adjusting the clutch linkage. Now I just need to get her back on the street and see how much of an improvement those changes made.
In preparation for the holiday time-off I’ve got in a week, I bought some parts from Clark’s and Amazon. I’ve got a bunch of carpet and convertible top samples on their way as well as heater/defroster hoses. Since Clark’s was out of POR-15, I got the quart of semi-gloss from Amazon instead. My hope is that, by the end of the year, Mikhaila and I will have the engine running and the interior ready for carpet.
I wanted working with Mikhaila on her car to be the first project I got back to, but that wasn’t to be – she was sick Sunday. Instead, I spent the afternoon re-hanging Glinda’s muffler, replacing an exhaust clamp, installing the Pertronix Ignitor II and Flamethrower II, and adjusting the clutch linkage. Now I just need to get her back on the street and see how much of an improvement those changes made.
In preparation for the holiday time-off I’ve got in a week, I bought some parts from Clark’s and Amazon. I’ve got a bunch of carpet and convertible top samples on their way as well as heater/defroster hoses. Since Clark’s was out of POR-15, I got the quart of semi-gloss from Amazon instead. My hope is that, by the end of the year, Mikhaila and I will have the engine running and the interior ready for carpet.
Subscribe to:
Posts (Atom)

