
Wednesday, December 22, 2010
Lucy's Fixed Fuel Issue
Yesterday evening I bundled up to face the cold and then went out to get Lucy running again. Just to rule out something easy, I cranked the engine with the coil wire’s end off to make sure I had spark. It sparked nicely, so it must be fuel. I unscrewed the fuel line at the left carburetor and cranked the engine again with the coil wire disconnected. While I should have seen pretty healthy squirts of fuel with each engine revolution, all I got was repeated dribbles. I swapped fuel pumps with the one I’d recently removed from Ringo’s engine, and retested. Nice gushes of gas just like it was supposed to. All’s good-to-go and she drove fine today.
Tuesday, December 21, 2010
Which Do You Want First?
The bad news or the bad news?
During my morning commute, I got about a mile from home when Lucy's engine died like she'd run out of gas. I coasted to a stop a hundred feet short of a gas station and hopped out to verify the fuel issue. Even though the gage read about half full, there was little to no gas squirting into the left side carb (the one I exposed) when I blipped the throttle. I thought that maybe the gas gage was wrong since I haven’t been driving the car, I wasn’t sure when it was filled with gas last. Using the starter, I “drove” the last feet to the gas station and filled the tank. Only 5 gallons, so there’s plenty of gas in the tank.
I called the house and asked Ariel to come rescue me. I returned to Lucy with the towbar in the back of the Suburban and towed her home. Now I have something to do this evening (like finding something to do with my evenings is a problem).
Thank You Lord this didn't happen when Ariel was driving back from school.
On the other negative note, I got a call from Jeff at the Corvair Ranch yesterday. While I had measured, with my crude instruments, the diameters of Ringo’s cylinders and found them to be within spec, his machinist, with much more accurate instruments and skills, found them to be unsuitable for just honing. That means this engine rebuild is going to run me an additional $300 or so. Ouch!
I do have a possible option. Bolted into Betty’s engine bay is a 95 HP engine of unknown condition. I do know it starts and runs, but I don’t know what kind of compression each cylinder has. This engine came out of Old Betty before I hauled her up to the ranch. Before I commit to spending the $$$ on rebuilding Ringo’s engine, I’m going to check out Betty’s old engine. If the compression checks out for all cylinders, I’m not averse to playing musical motors again.
Thursday, December 16, 2010
It's Cold Out There
Last night, I braved the frigid weather and went out to the garage to finish disassembly of Ringo’s engine. I was able to easily get the final five rod caps off. It must’ve been the cold temps that made them more cooperative. Then I scraped the gaskets and cleaned off the workbench until 9. At that point it was time to go inside in and defrost. Since I knew I wasn’t going to be out there that long, I’d only lit one of the kerosene heaters.
Monday, December 13, 2010
A Tale of Two Corvairs
On the drive home from school Friday, Ariel told me that Lucy's TEMP/PRESS light was on for most of the drive and complained that his engine wouldn’t idle. Every time she put him in neutral, the engine would die. Saturday evening I fired him up and immediately saw that the right side was the culprit. While there was visible steamy exhaust out the left tailpipe, the right side was just blowing cold air. I put my hand over the top of the right carb and the idle smoothed out – big vacuum leak in the carburetor. I pulled that carb and installed one of my racing carbs, re-fired the engine, and it idled smoothly. After balancing the carbs using my clear piece of tubing and adjusting the linkage, he was good-to-go. Ariel confirmed success when she told me last evening the light had stayed off during her entire drive back to school and he idled properly. I guess the right side was running VERY lean and actually WAS too hot.
On the negative side, Glinda spent Saturday afternoon in the heated garage with a new, extensive layer of Silicone around the windshield and backlight. After feeling cured to the touch, I put him out in the rain. After a few hours, I checked, and all seemed dry. But then Victoria took him out to run some errands and found some dark, wet spots on the front carpet. I am majorly bummed about that.
On the negative side, Glinda spent Saturday afternoon in the heated garage with a new, extensive layer of Silicone around the windshield and backlight. After feeling cured to the touch, I put him out in the rain. After a few hours, I checked, and all seemed dry. But then Victoria took him out to run some errands and found some dark, wet spots on the front carpet. I am majorly bummed about that.
Thursday, December 9, 2010
Glinda's Got Her Own Carbs Back
Yesterday afternoon Victoria shared with me that Glinda had died a couple times at stop signs. Knowing how bad the gas mileage has been, I decided last night was the time to address these issues. After donning thermal underwear under jeans and a sweatshirt, I braved the cold. No heated garage this time since I’d be running the car and didn’t wish to prematurely cause my own death. I pulled the carbs off and removed the six spark plugs. They all looked pretty good, but I cleaned and re-gapped them anyway. After bolting on and hooking up Glinda’s recently rebuilt original carburetors, I started up the engine and checked the dwell. It was supposed to be 31 to 34 degrees, but was reading 28. I adjusted the point gap and got it to read 31 at idle, but as soon as I blipped the throttle, the dwell needle swung ten degrees from 31 – an indicator of distributor slop caused by worn bushings. Irr. From the shelf I pulled my one GUP distributor and, after swapping points plates, it was installed in place of the old one. While it too had some slop, the re-set dwell’s change off idle was only a couple degrees. At this point, the engine had warmed up, so I balanced the two carburetors by turning the idle speed screws on each until a slight turn of either screw affected the engine’s rpm. With idle speed at 600 rpm (with the transmission in Drive) and vacuum advance line disconnected and plugged, I set the timing to roughly 11 degrees BTDC (before top dead center). The factory says to make it 12, but I’m concerned about pinging so I went slightly less. When I’d set the timing initially (months ago), I’d gone for 6 degrees and I’m sure that contributed to the bad gas mileage. With all the adjustments complete, I put the air cleaner assembly back on and took it for a test drive around the neighborhood. It runs and idles smoothly, and according to Victoria’s recent report didn’t die on her today.
I still have the whole windshield sealing issue, but Glinda roadification to-do list has shrunk significantly.
I still have the whole windshield sealing issue, but Glinda roadification to-do list has shrunk significantly.
Tuesday, December 7, 2010
CPotD #192 (This Car is Funny)
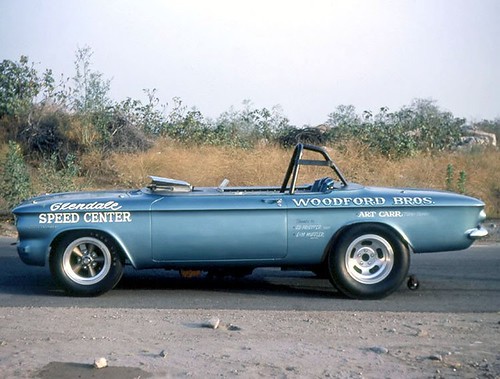
This EM ‘vert drag racer is so awesome. The geometry of this funny car is amazing. Some of the truly interesting features include: the front engine-rear drive is really a mid-engine; the driver is sitting in the back seat; the windshield is only a few inches high; and the wheelie bars are located just behind the rear axle. This CPotD-worthy photo was posted on a thread about drag racing Corvairs on the CorvairCenter Forum.
Monday, December 6, 2010
Kerosene Heaters Kept Me Functional
I burned through quite a bit of kerosene this weekend. It was brutally cold in Baltimore, so all three heaters were pumping out the warmth to keep things comfortable in my un-insulated garage. I spent quite a bit of time out there, but only a relatively small portion was Corvair related. Friday evening was spent trying to get Ringo’s pistons separated from the crank. I started with the #3 since it was closest to being in the best spot to access the two rod nuts. With the nuts almost all the way off, I carefully tapped the ends to pop the cap loose. I got it about halfway off, but no more. I remember having this fun when I replaced Heidi’s pistons. Since I want to re-use all these parts, I’m going to have to be more careful with Ringo’s engine. After about thirty minutes of frustration, I gave up for the evening.
Yesterday evening was my next opportunity to service the fleet. Victoria had shared with me that Glinda was making a metal scraping noise when she drove her last. Given the extreme cold we’re seeing, I immediately assumed the fan bearing needed greasing. I gave Gary (Baltimore Corvair guru) a call to see if I could borrow his special tool that’s used to force grease into that bearing. He said I was welcome to it, so I made plans to stop by their later in the afternoon. Before making the drive I decided to see what else could be an issue. When starting up Glinda’s engine, I expected to hear the bearing noise, but instead exhaust noises assaulted my ears. I looked under the car and discovered the exhaust gasket had failed on the driver’s side. Easy fix, I have the gaskets, and no need to borrow a tool. After calling Gary and cancelling, I put Glinda into the garage and up on the ramps. After turning all the heaters up, I took an hour off to have dinner and let the garage heat back up. Once I was back out, I thanked God the bolts and nuts retaining the pipe ends came free without breaking – always a concern when working on old exhaust systems. With the pipe/muffler assy off the car, I chipped away at the old gasket residue and wire brushed the interface clean. Everything went back together cleanly, and firing up the engine, I verified that all the hardware was tight and the gaskets were doing the job properly.
Yesterday evening was my next opportunity to service the fleet. Victoria had shared with me that Glinda was making a metal scraping noise when she drove her last. Given the extreme cold we’re seeing, I immediately assumed the fan bearing needed greasing. I gave Gary (Baltimore Corvair guru) a call to see if I could borrow his special tool that’s used to force grease into that bearing. He said I was welcome to it, so I made plans to stop by their later in the afternoon. Before making the drive I decided to see what else could be an issue. When starting up Glinda’s engine, I expected to hear the bearing noise, but instead exhaust noises assaulted my ears. I looked under the car and discovered the exhaust gasket had failed on the driver’s side. Easy fix, I have the gaskets, and no need to borrow a tool. After calling Gary and cancelling, I put Glinda into the garage and up on the ramps. After turning all the heaters up, I took an hour off to have dinner and let the garage heat back up. Once I was back out, I thanked God the bolts and nuts retaining the pipe ends came free without breaking – always a concern when working on old exhaust systems. With the pipe/muffler assy off the car, I chipped away at the old gasket residue and wire brushed the interface clean. Everything went back together cleanly, and firing up the engine, I verified that all the hardware was tight and the gaskets were doing the job properly.
CPotD #191 (To Each Their Own)
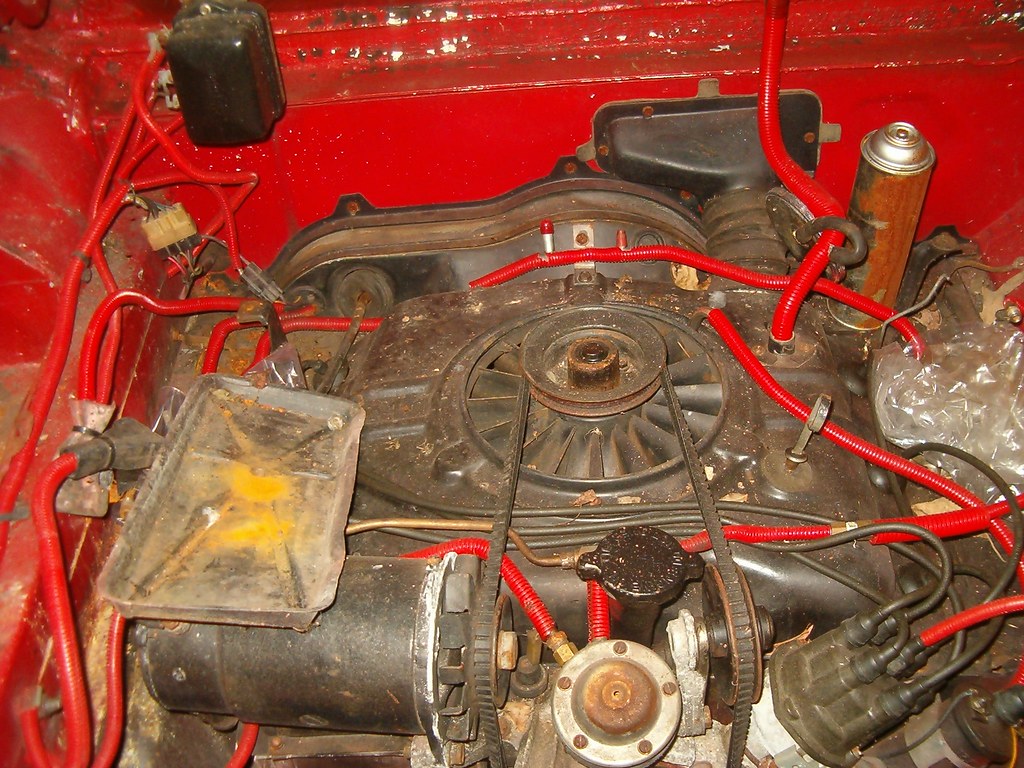
Maybe it’s the engineer in me that prefers not cover up functional items. I’m not a fan of the current fad of using a huge piece of molded plastic to cover up engines and their rat’s nest of hoses, pipes, and wires. I think the auto manufacturers are doing it to keep from confusing today’s car owner. Heaven forbid, we should have to hunt for a dipstick – about the only drivetrain items accessible anymore.
The real purpose of today’s CPotD is to highlight what one of Lucy’s previous owners thought was a cool feature to add to the engine compartment. They carefully cut and installed the red plastic covers over every wire, tube, and hose under her hood. What must have taken someone an hour or so, I had ripped off and discarded in about five minutes. One of the reasons I’m into old cars is because everything is so accessible. Covering it up with pieces of molded plastic just doesn’t work for me.
Friday, December 3, 2010
Not So Good News
Victoria filled Glinda’s gas tank last evening, so I was finally able to get an idea of the gas mileage she’s been achieving. Fifteen. Only fifteen. Not good. So this weekend I’ll bump up the timing and replace the carburetors. The former will bring it closer to factory spec since I’ve got it currently retarded to prevent pinging. Since it’s gotten colder, I feel okay about bumping it up a few degrees. The latter will reinstall her original carburetors in place of my racing carbs. These should be jetted smaller so the mileage should go up. We shall see.
CPotD #190 (And The Chrome Lives On)

It appears from today’s CPotD, that chromed bumpers will outlive every other part of a FC once it’s been parked in a junkyard. This came from Flickr poster forwardlookguy’s Chevrolet Trucks set. He’s uploaded a ton of junkyard photos. Fun to look through.
Thursday, December 2, 2010
It’s Good News
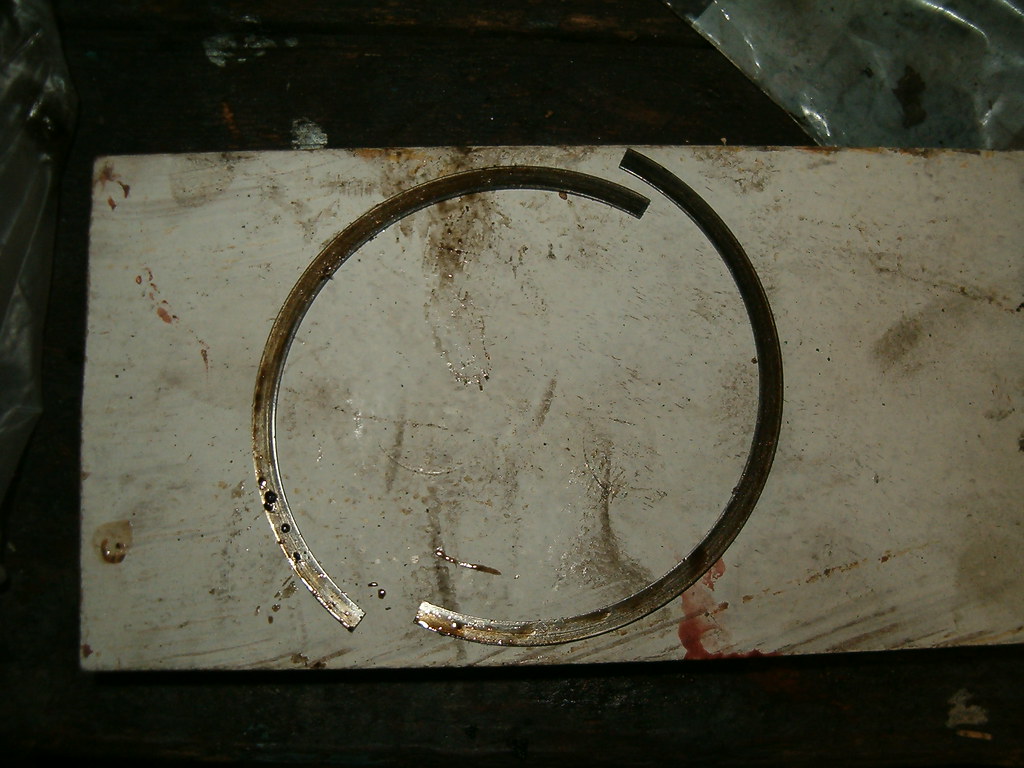
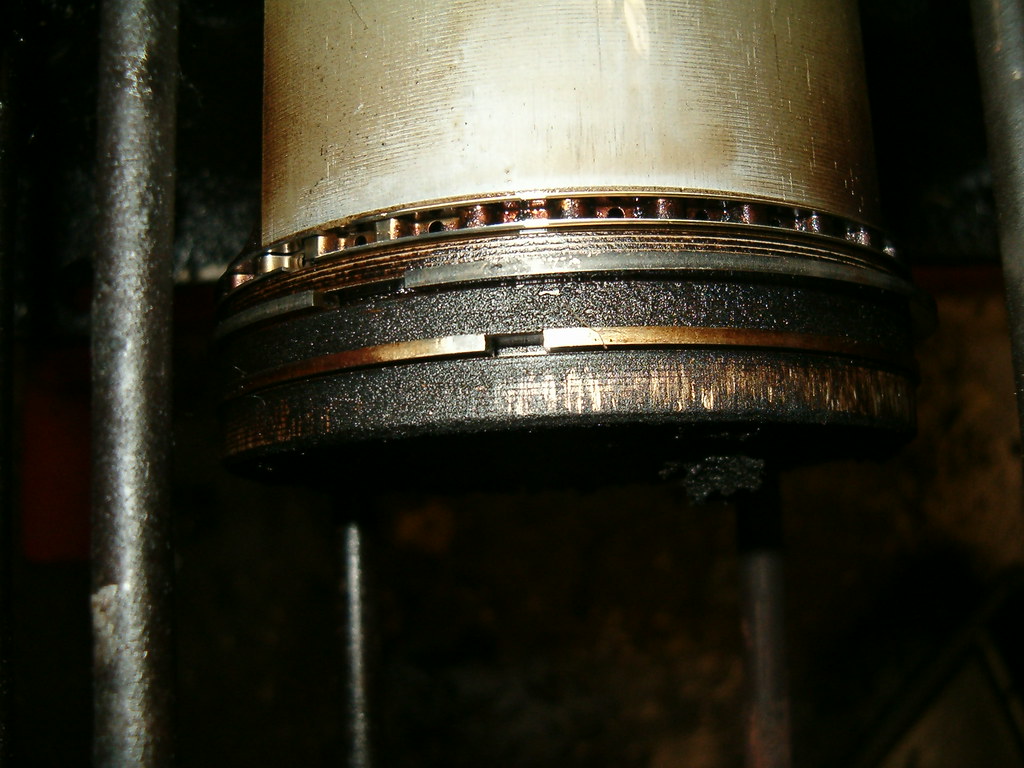
While the photo above shows something ugly, last night activities all pointed to the positive. After marking each cylinder jug, I removed, cleaned, and measured each bore three places (top, middle, and bottom). All measurements were within spec – yeah! As I was pulling off the #3 cylinder, I discovered the outer compression ring had broken in half (see above photo). Fortunately, neither that cylinder nor any of the others showed any evidence of scratching, so since they’re not oversized, I’ll be able to re-use them and the current pistons. As mentioned before, however, they’ll need a re-hone to re-establish the cross-hatch that allows proper lubrication of the walls.


Wednesday, December 1, 2010
Ringo's Rank Cylinders
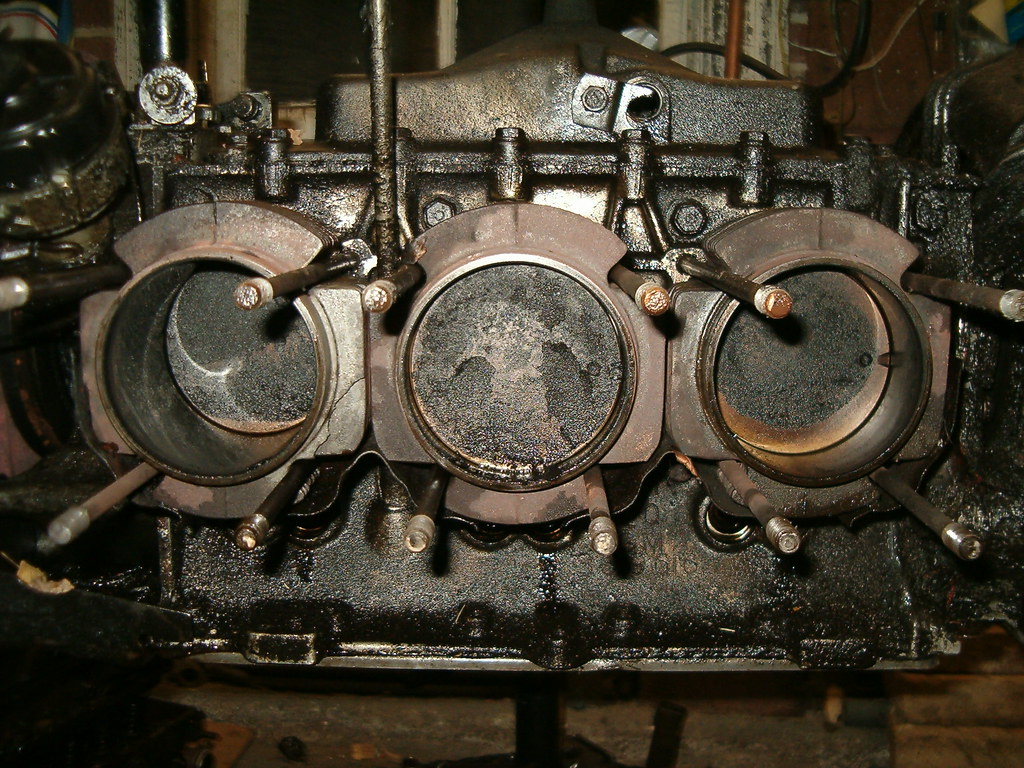
A couple of hours in the garage last and I could peer into each cylinder. What I saw, while rather unpleasant, was not as bad as it could have been. While there was oil and crispy burnt oil residue in at least four of the cylinders, I didn’t see any scratching on the cylinder walls. This evening’s task is to remove and mark each cylinder jug, measure the bore’s condition in each and determine if replacement is required or if a simple honing of each will get the job done properly.
To get to the point of removing the heads so I could see down in the cylinders, I had to remove the generator, fuel pump, all the sheetmetal, the fan, and the oil cooler before pulling off the valve covers, unbolting the rocker arms, removing and carefully storing the pushrods and rockers in a box with each rod poked through its position in the lid to ensure each went back into its original location. With the rockers off, the studs (which are the lower head nuts) came off followed by upper nuts. I had a couple of studs that wanted to come out with the nuts, but a well-placed vise-grips kept them from turning. By jiggling each head, it eventually slid off over the studs and the associated photos could be taken. Nasty, huh? More photos here.

CPotD #189 (Get Me To The Hospital ASAP)

Not surprisingly I couldn't find a posting where I've featured a Greenbrier converted for ambulance duty. Today’s CPotD, from a posting to the CorvairCenter forum entitled “Ambulance Corvai in Hungary,” has changed that.
Yes Hungary! First, I’m amazed there were Greenbrier’s there, and second, that some company chose to convert one into an ambulance. This one certainly has all the correct features.

 Much thanks to Lior Baruch for providing me with these photos and story. Visit his Back On Two website for some great photos of his cars and motorcycles.
Subscribe to:
Posts (Atom)