Monday, April 18, 2011

Glinda’s Reward


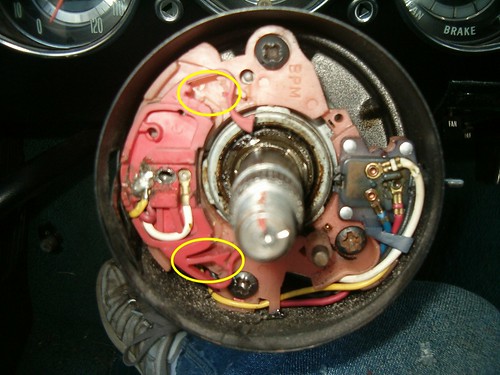
Yesterday Glinda finally got some of my attention. I was tied up with fun stuff with the lovely Loriann until early in the evening, but I did get a few hours of quality time with the ’68. First I removed the steering wheel to determine the issue with the turn signal switch (it won’t latch for a right turn – Victoria has to hold it in place). I found one of the tiny tangs had broken off (see yellow circled areas in the above photo). A Superglue repair wasn’t going to last, so after taking a picture and tightening the lever screw, I put it all back together. I’ll give Jeff at the Corvair Ranch a call and order a replacement part. Clark’s has this piece reproduced, so a GNP will be the best for this application.

While sitting in her driver’s seat, I was reminded of how crappy the rearview looks – lots of the corrosion around the edges. This will be added to the Corvair Ranch order.

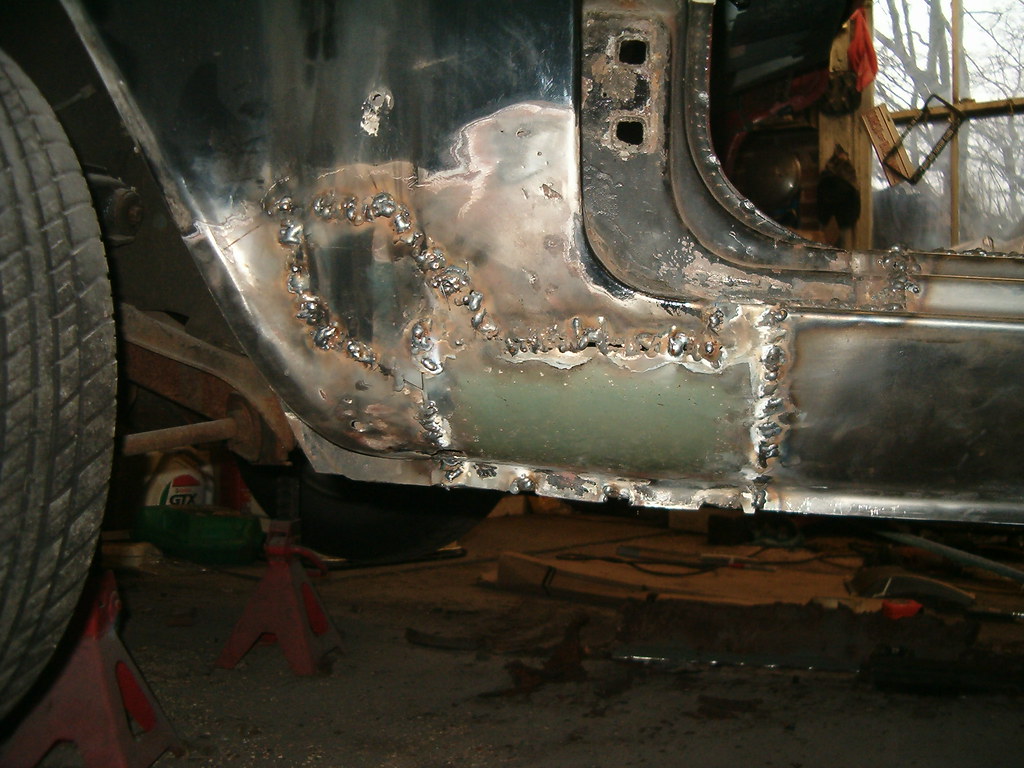
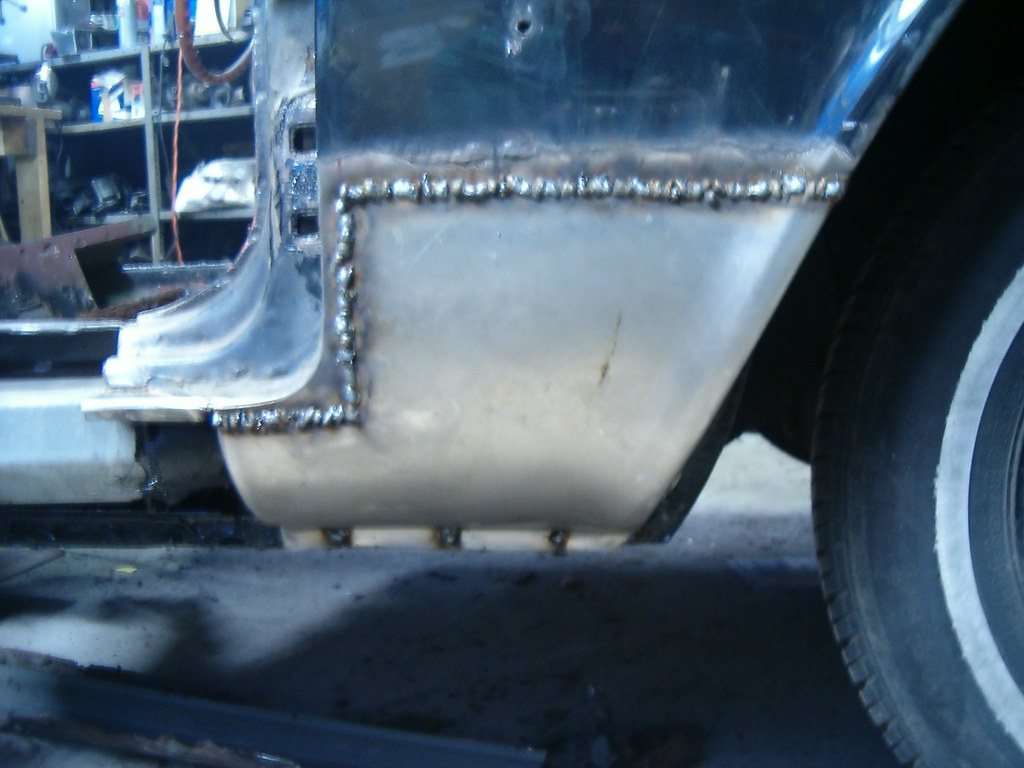
Next, was replacing the muffler. I backed the car up onto the ramps and said a prayer that I’d be able to remove the exhaust system without breaking anything. With God’s help and positive properties of the anti-seize, I dropped the exhaust pipe-muffler-tail pipe assembly with the only casualty being a ripped rear mounting plate. It’s the plate that retains the muffler strap. This was easily remedied by drilling a new hole near the old one, and in a more solid portion of the plate. After a quick dinner, I was back on my back in the driveway and about an hour later, the replacement assembly was bolted in place. I turned the car on with it back end still stuck in the air, so I could check for leaks. Not finding any, I drove her off the ramps and took her for a spin around the neighborhood. I really like the throttle response of this engine. If only I could succeed in squeezing a few more MPGs out of it, I’d be satisfied.

While I had the engine lid open, I did a cursory glance check of things. With the oil level at the add mark, I had Victoria put a quart of oil in the crankcase this morning. I checked the belt tension and it was fairly loose, so I given the lateness of the hour, I decided to put that adjustment off until the next evening. BIG MISTAKE! Late this morning, I got the call from Victoria, “Dad, the GEN/FAN light is on. I’ve pulled off the road and shut the engine off.” After having her verify that the belt had failed, I told her I’d be there as soon as I could. When I arrived, I found that one end of the broken belt had gone past the fan and been forced into finned volume under the top cover. It took a bit of doing, but I was able to spin the fan and yank on the belt until it came out. I inspected the vanes on the fan and found them undamaged. Whew. As I was installing a spare belt, I explained the process to Victoria and made sure she watched what I was doing. She had pulled three belts out of her trunk, two that had failed and needed to be thrown away and a third that was too long - hmm wonder what that one goes to. I popped Lucy’s trunklid and took out her spare. Too many minutes later, we had the new belt on and the two guards in place – yeah, the guards that were supposed to prevent a belt from popping off. I had Victoria start up the engine only to immediately see the idler pulley was not spinning. With the engine back off, I did a quick diagnosis and found the guard at that location was binding on the pulley wheel diameter. After loosening the hold down nuts and adjusting the guard and retightening the nuts, she was good-to-go.

Now I can add two fanbelts to the Corvair Ranch shopping list. As to what’s causing the problem, I found the two pulley wheel retaining nuts did not seem tight, so I’m going with a loosening of the pulley wheel. Regardless, I told Victoria that we’re to check tension on that belt weekly. I’m also going to do a thorough cleaning of the four pulley grooves to ensure they are rust free. When the belt was off, I made sure the fan, alternator, and pulley wheel all spun freely and silently – they did.

Finally Moving on to the Floor

Saturday was Ringo time in the garage. I welded in the last two exterior patches and moved on to the interior. I cut out the inside piece to close off the rocker panel on the passenger’s side. After drilling 5/16ths holes for the plug welds, I went at that patch with the MIG welder, and a dozen plug welds later, it was solidly in place. With the cutoff wheel in my grinder, I removed the rest of the rusty floor pieces from the passenger’s side floor. Then, with the new rear floorpan sitting in place, I was able to see what other pieces I needed to install to fill in the gaps. The inboard edge will rest on top of the tunnel which is still solid metal, while the rear edge welds into solid vertical metal. The outboard edge needs to rest on a small shelf that is attached to the inside surface of the rocker. For that piece, I cut out a roughly two foot long section from the center crease of the scrap LM hood. That gave me a nice start for the right angle bend I next put into the picece. After drilling a few holes for the plug welds, I made more molten metal and the piece was in place. At that point, it was time for dinner and the end of my garage time.

Friday, April 15, 2011

You Snooze, You Lose


Especially when talking about a busy Pick-n-Pull. A little over a month ago, I visited Crazy Ray’s and discovered a couple items of interest. First, was an old gauge set that I thought would be real cool in the LeMans, and second, was a set of Pontiac Rally II wheels that a Corvair guy was interested in. With nasty weather and a busy work schedule, today was the first day I was able to get back out there, and wouldn’t you know it both cars had been crushed. I am really bummed, but it reminded me of an old adage – he who hesitates will lose the wheels (or something like that).

Thursday, April 14, 2011

Now For Something Completely Different


No bodywork yesterday evening. Engine work for a change. I’d told Gary (local Corvair guru) that I’d be by Saturday to return his ring groove scrapers he’d loaned me a month or so ago. That meant I actually had to use them on the assortment of pistons I have lying around. I started with the six that came out of Ringo’s former engine (an assumed 1964 110HP). It took a bit to figure out the most effective way to use the tool, but I was finally able to get the knack without breaking anything. The next six out of the Old Betty’s ’66 vintage 95 HP went much easier. I then went looking for the six pistons that were in the York engine (if I remember correctly, the code indicated a 110 HP LM engine). While digging through the shelves of parts, I discovered the box with that engine’s cylinders. Just for kicks, I pulled it off the shelf, removed a cylinder, and gave the bore a quick look. What? No ridge? I took the entire box over to the workbench and began measuring and inspecting to see if these could be the elusive set of cylinders that could be re-used with only a light hone. First, using a bore gauge, I determined the bore diameter of one of the set measured right around Chevy’s desired 3.4375”. Next, I inserted a saved compression ring into the bore at the same location I’d just measured. After making sure it sat level in the bore, I used feeler gages to measure the gap between the ends of the ring. I could get .060” to slide in, but not .062”. I slid the ring down to roughly the center point of the stroke in the cylinder and got the same gap measurement. The gap measured the same at the lowest point of the stroke. No taper. This was awesome, but I was skeptical that it would hold true for all the cylinders. Fifteen identical gap measurements later, I was convinced these cylinders had seen very little miles. While finding or trading for a running engine will probably still be the least expensive approach to getting Ringo his replacement engine, I now have the hard parts necessary for a fairly affordable fallback rebuild of the 95 HP engine.

Wednesday, April 13, 2011

Why Do Patches Take So Long To Prepare

I had high hopes of getting a lot done last night. I was able to get out to the garage before 7, and, after pushing Betty into the driveway, set to work cutting out the patch to fit in front of the right rear wheelwell. I had the piece I cut out as a starting point for a template, so I traced the cut edges onto Betty’s scrap hood that I’m using for material. Then, using stiff paper, I rubbed the outline of the curved edge onto the paper. After cutting out the paper, I added its outline to the one on the hood, thus completing the patch’s perimeter. A few minutes with the cutoff wheel on my grinder and the patch was free. It took another thirty minutes of careful grinding away before the patch properly fit the opening. And then out came the heat gun to remove the old blue paint and over to the bench grinder to wire brush the rust off the backside. One patch down and I was back on the ground to measure for the tiny patch that will fill the gap left at the rocker panel. Once that was cut and cleaned, I sprayed the surfaces of the two patches that will face inside with galvanizing primer and pushed Betty back in before calling it a night.

Monday, April 11, 2011

A Litany of Frustrations


Frustration number one was dealing with making room for Betty in the garage. I was able to squeeze her in by spending much of yesterday afternoon moving stuff around, putting Ringo up on the car dollies, and pushing him over against the shelves. As you can see in the above graphic, it’s a tight squeeze, and I’ll need to roll Betty out whenever I want to work on Ringo. Fortunately, it’s Corvair (not Cadillac) Fleet Management. Those few hours would have been much better spent welding patches. As it was, I only got about an hour to work on him. In that hour, however, I finished stripping the rusted passenger door of its hinges and weatherstripping (which is still soft enough to re-use), and completed the welds on the rocker panel patch. Still left are a tiny wedge of metal at the rear of the aforementioned patch, and the complex patch along the front edge of the rear wheel opening.


Frustration number two came from the situation with trading Betty for a good, running 110 HP engine. I’m waiting for a guy to close a deal on a car with this engine that he’ll in turn trade to me. He’s being jerked around by the sellers, so was unable to close his deal again this weekend. I’d really like to move on with this engine thing, so I can reinstall Ringo’s drivetrain and free up some more space in the garage.

Frustration number three has to do with a backup to the previous engine deal. If there’s an issue with the 110 HP engine, I’m not going to go through with the deal, so I need to line up what I’ll do in case that happens. The other day, I decided to use SearchTempest to see what’s out there that I could spend my birthday cash on. In my search I came upon an ad for Corvair parts - $500. I opened up the link and found that a guy is selling a ’68 Monza convertible project with a recently rebuilt 140 HP engine. I called him and, after discussing things, left him my mobile number so his wife could send me photos taken with her iPhone. It’s been five days and a couple phone conversations later, and still no photos. The last few times I’ve called the number there’s been no response. Very frustrating.

The final frustration has to do with posting photos on Twitpic. As another outlet for my limitless creativity (haha – I make myself laugh) is writing Haikus as caption for car photos I’ve taken over the years. I’ve been posting these on Facebook and Twitpic. The latter using their e-mail option. Lately, that method has been highly unreliable. I’ve been dealing with their tech support and they fix the problem only to have it break a few days later.

Oh well, four-for-four sounds good.

Friday, April 8, 2011

VIOLATION


“Respondent is charged with violation(s) of the following law(s) or regulation(s)”

That was the beginning of the certified letter I received yesterday from the City of Baltimore. There were more words to it, like, “Amount of Fine: $60.00,” and, “Abatement Date: April 11, 2011.” While talking with the inspector this morning, I was told that I could just move the car into the garage. That may be a temporary solution, but as long as I’m working on Ringo, I’ll have to roll Betty in and out of the garage each time I want to work on him. The bottom line is I need to find a new home for Betty, and soon.

I’ve been in negotiation with a guy in PA to trade her for a running 110 HP engine that I could then install in the Ringo. This may all work out since he’s supposed to be going to get the engine this weekend. We’ll wait and see. In the meantime, I’ve posted on the CorvairCenter forum that she’s available for $500, and I’m motivated. Worst comes to worst, I tow Betty up to the Corvair Ranch. Who knows, I may go up and haul her back someday.

Thursday, April 7, 2011

A Nice Way to Spend My Birthday Evening


After dinner yesterday, I ventured out to the garage to continue the bodywork on Ringo’s passenger side. A couple years ago, while backing out of the garage and maneuvering around obstacles in the driveway, I managed to rub Ringo’s side panel against the garage door opening, thus denting it. Fortunately, there was not a lot of damage, but before I could finish patching the area in front of the right rear wheelwell, I needed to hammer the panel back into its correct shape. First, though, I had to get access to the backside of the panel, which I gained, by removing the window crank and ashtray and then carefully popping the panel off without breaking off any of the delicate panel clips. With hammer and dolly, I pounded on the metal until I made an approximate curve from the flattened fender. It will need a skim coat of Bondo and some sanding to be perfect again, and with Ariel deciding to keep him black, it will need to be perfect.

With the pounding completed, I moved on to cutting the rocker panel patch to fit the cut away opening. When I cut out the rusted sheetmetal, I tried to make my cuts horizontal or vertical. Doing this kept the measurement fairly straightforward and the cuts fairly easy to make. In less than an hour I had the patch cut to shape and the 5/16ths holes ready drilled for the lower plug welds. Next, I grabbed the Lucy’s extinguisher, donned my welding garb, closed the garage door to keep out drafts, and went at it. There were some matching issues between creases in the body and those in the panel at the door opening, so I had to decide what to line up. I decided the sealing face for the door weatherstrip was the critical surface, so I worked off that. I’ll be able to blend the mismatched surfaces, and since they don’t affect door fitment, it’s not a problem.

I got the panel tacked in, the plug welds completed, and was working on filling in between the tacks, when I decided to knock off for the night.

Monday, April 4, 2011

Carbs and Patches


Saturday afternoon, with the rain falling outside, I sequestered myself in the kerosene warmth of my garage. The grotty carburetor I’d given an overnight soak to last week was at the top of my weekend work list. I really wanted to remove and clean out the jet, but it would not budge from its home at the bottom of the carb bowl. Not wanting to destroy the jet, I stopped short of taking the stubborn assembly to the drill press. Instead, I took the chance that the soaking had cleaned out the jet sufficiently, and put the carb back together with fresh gaskets, needle and seat, and accelerator pump cup. I also segregated a couple carbs that I would send back to Phil (the source of the rusty 4-door who’s been patiently waiting for me to return the carbs that came with the engine I’d borrowed from him). The final carburetor callisthenic I went through was making sure the needle-and-seat in one of Ringo’s carbs had been replaced with a functioning one.

It was then time to don the nitrile gloves and apply POR-15 to the metal surfaces that would soon be covered by passenger side rocker panel and front fender patches. I only had to race into the house twice to remove small black splatters from my face before they cured to irremovable, unexplainable black freckles.

Yesterday, with the weather’s cooperation, I was finally able to get Lucy’s engine running smoothly again. It took three trips to carry tools and carburetors out to the curb where Lucy waited. I first swapped the recently rebuilt carb onto the right-side head. The engine started right up and fast-idled without the previous whooshing sound. Sadly, the right side never heated up which indicated the carb was not functioning properly – probably the jet was indeed clogged. Next up was the Ringo carb I’d put the new needle-and-seat into. It oozed gas all over, so there’s still something wrong with it. Finally, I bolted on the racing carb that had been on the car when she was running right. As expected, everything worked fine again. The reason I'd left that one until the end was I don’t like the slight hesitation I get with that carb when I accelerate. I was really hoping the rebuilt one would perform properly, so I didn’t have that irritation to still deal with. With the carbs re-balanced and the idel set to 700 rpm, I shut Lucy’s engine lid and toted tools and carbs back to the garage.

After playing musical carburetors I closed myself in the garage for more bodywork games. I cut down the front fender patch and was surprised to find it fit perfectly. I then loaded my welder with a fresh spool of .023 wire, and about two hours later, I had welded on four patches – three on the drivers side and one on the passenger side. There is a LOT of grinding in my future.