A short list of car tasks completed. Lucy got the most attention since I thought Brianna and Nich were going to take her back to Virginia (they didn’t, but took a Suburban full of Brianna’s stuff instead). I vacuumed the heater/defrost ducting, cleaned the windows, repaired the glove-box cardboard, installed Velcro to hold the package tray carpet in place, and checked the balance of the carburetors. The latter was accomplished using a 20’ length of clear plastic ¼” tubing with a couple teaspoons of Marvel’s Mystery Oil. I draped part of the tubing over the two rear corners of the raised engine lid forming a u in between with the oil sitting at the lowest point. Then, with the engine warmed up, I connected the open ends of the tubing to the vacuum ports on the base of each carb. The oil did not budge until I moved the throttle shaft slightly. With that little blip of the throttle, the oil started moving to the right. This showed me there is looseness in the left carburetor linkage allowing the right carb before the left one. I released the shaft. I then pulled slightly on the left carb’s linkage, and the oil started moving that direction. After releasing, the oil moved back to the center. All good signs indicating the carbs are balanced.
Ariel brought Ringo home for the long weekend, so I was able to replace the now-broken muffler strap with a new one I’d ordered from the Corvair Ranch.
Finally, Victoria and I worked hard to remove the main front-to-back brake line. This required us to take off the two tunnel covers and the air duct. I’m still amazed by how many differences there are between EMs and LMs.

Monday, November 30, 2009
CPotD #5 (I Love a Nice Purple Car)
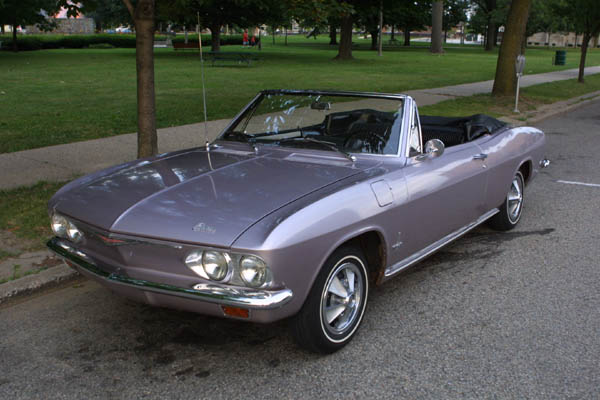
This lovely 1965 Monza convertible is painted one of my favorite colors. Even though the car is extremely desirable, this post is more about its color than the car. Evening Orchid (in Chevy-speak) was their special, one-year only, color for 1965. Pontiacs of that year could also be had in this color if the buyer checked the Iris Mist box.
In addition to the cars in my Corvair fleet, I own a black ’65 Pontiac LeMans convertible that’s patiently waiting to be restored. Because I’ll never be able to get the bodywork perfect enough to repaint in its original, imperfection enhancing color, I threaten to paint it Iris Mist. I say “threaten” because my best friend (next to my lovely wife) gives me flack about Iris Mist being a feminine color. Oh well, living with so many females was bound to have an effect.
This photo is found on Norm Witte’s wonderful website that includes, among other topics, pictures of Corvairs in nearly every color offered for every year. The Corvair community greatly appreciates Norm’s efforts on this project – it’s a great resource.
Saturday, November 28, 2009
CPotD #4 (Wagons Rock)
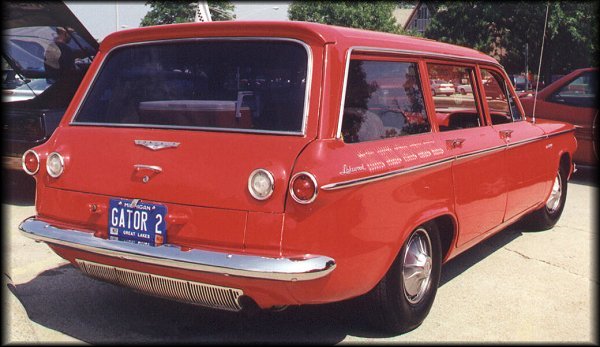
I have always, strangely enough, loved station wagons. Maybe it was all those rides to church in the way-back of the Gunnink's Mercury Colony Park. At car shows, I find myself lingering the longest at the wagons. Fortunately, for me, GM produced a typical wagon for the Corvair line, albeit for only two years, 1961 and 1962. They also called their Greenbrier (produced from 1961 through 1965) a sportwagon, even though today we'd consider it a mini-van. For 1961, the station wagon model was called a Lakewood, while in 1962 they dropped that moniker and boringly replaced it with Monza Station Wagon. The above picture is courtesy of Gary Aube's fantastic CorvairCorsa website.
At the last Corvair car show we attended, Loriann spied a wagon and told me she thought it was really nice looking. There's an in - maybe the fleet will include a Corvair station wagon one day.
Friday, November 27, 2009
CPotD #3 (This Rampside is NOT Stock)
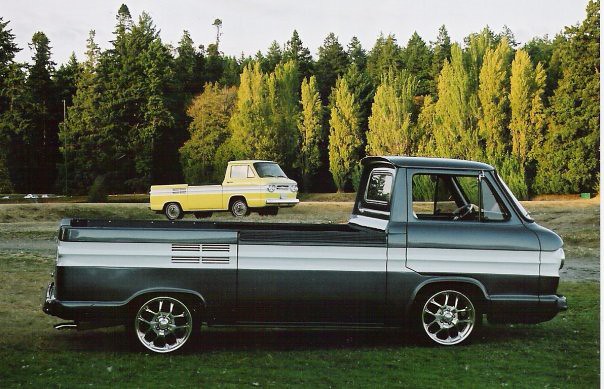
FCs or Forward Controls form a unique arm of the Corvair family. The following photo of Shawn's Rampside was snagged off the CorvairCenter's Forum Thread called "SO WHO HAS THE BEST LOOKING CORVAIR?". I think this was the best looking FC submitted.
Thursday, November 26, 2009
Thick is Better Than Thin

I finally tried out my new (to me) MIG welder today with mixed success. I had two different thicknesses of sheetmetal to practice on. I could make the nice bzzzzzzzz-ing noise welding on the thicker piece, but laying a good bead on the thinner one was a bit of a challenge. Until I turned the voltage setting down to 2, I did a lot of blowing out – making bigger holes out of tiny gaps. I did get a few decent-looking welds after some fiddling with the power and speed settings of the welder. The thinner sheetmetal, fortunately, is less than the typical Corvair body metal thickness, I should be able to make passable welds. Regardless, the flap discs are going to get a good workout smoothing things out once I'm welding on things that matter.
CPotD #2 (Heidi Was Once a Real Beauty)

Here's a picture of Heidi right after we got "finished" with her. Sitting outside for four years, driving through all kinds of weather and road conditions, having side-swipe damaged repaired with a non-matching paint, and succumbing to the tin worm in too many places all contribute to an exterior that's - well, for lack of a better word - lacking.
The next month will be an interesting one for Heidi - and me too. After Thanksgiving, Brianna is leaving Heidi with me and taking Lucy back to Radford. I'm going to be playing bodyman until Christmas. Patches need to be welded into the right rear quarter and the front valence. Those patches and the ones Jonathan welded in for me last month all need to be ground smooth, primed, filled, primed again, sanded, and painted. Then, I'm planning on wet sanding and buffing the entire body except for the passenger door and right rear fender. Those were done with a clearcoat/basecoat as part of the aforementioned side-swipe repair.
Wednesday, November 25, 2009
CPotD (Corvair Photo of the Day)
None of the members of my fleet would anyone consider restored. Heidi was quite nice for a while, but the paint was never perfect (my first paint job). Four years later it’s all washed out. Lucy and Ringo, like Heidi, also have rust issues that desperately need my attention.
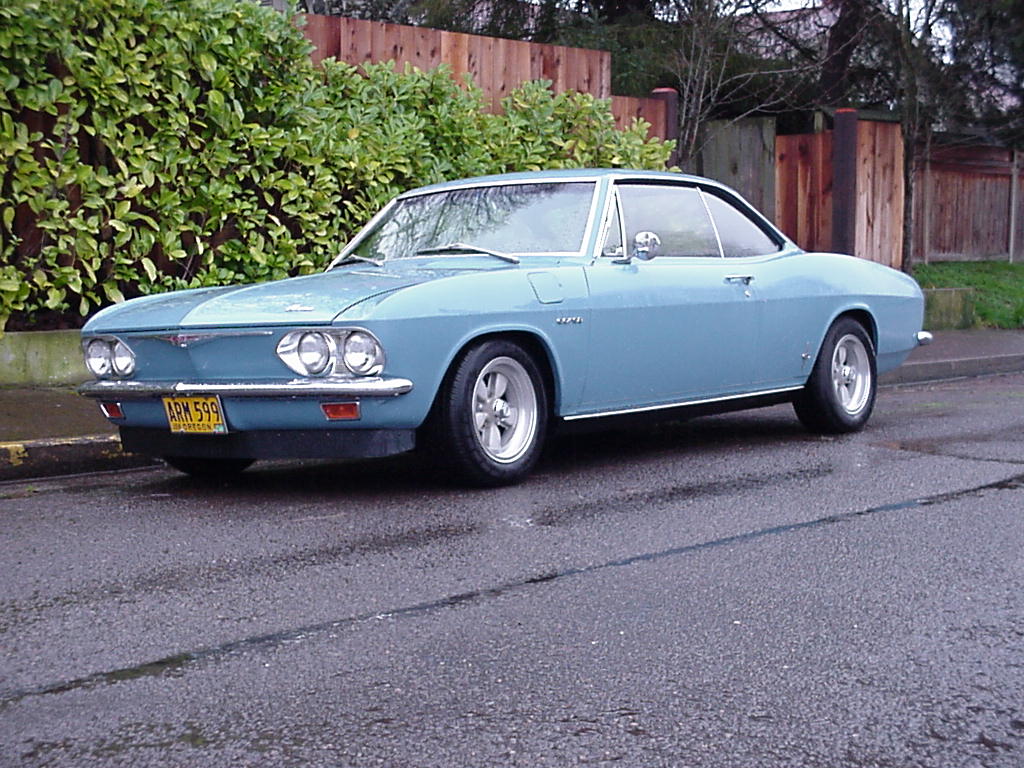
With all the work just keeping the fleet on the road, I can always use some inspiration. During my near-daily perusal of the internet, I visit a number of Corvair-related sites, many with photos of beautiful ‘vairs. I’ve decided to steal an idea from my favorite blogger, Chuck Goolsbee, and post a Car Picture of the Day or, in my case, Corvair Picture of the Day. Hope you enjoy.
This first one is my current PC wallpaper. It’s Bob Ralston’s gorgeous ’65 Corsa. I love everything about this car: the lowered stance, the wheels, the paintjob. Credit to Bryan Blackwell and his awesome website for hosting this picture (and many, many others).
Monday, November 23, 2009
If Only Every Weekend Provided So Much Car Time
Squeezed around soccer games, I was able to spend time both Saturday and Sunday working on Corvairs. I had been formulating a list of little items that needed attention on Lucy and Saturday afternoon I was able to get to most of them.
1. Rearview mirror was loose – not anymore.
2. Horn was quiet – not anymore.
3. Dash was only half-lit – not anymore.
4. New oil pressure switch was still in the package – not anymore.
5. Engine needed tune-up – not anymore.
6. Rocker panel trim needed removal – not anymore.
1 was completed by simply tightening a screw. 2 took some cleaning of one of the contacts in the trunk main harness connector. 3 was a simple replacement of a blown bulb. 4 took a little more effort, but after removing the fuel pump and pulley wheel from the generator, the swap was a snap. 5 included pulling, cleaning, and gapping the spark plugs, replacing the distributor cap and rotor with better looking ones from the shelf, and cleaning spark plug cables 6 was just a matter of six screws and it was off. I’ve removed the two panel trim pieces to get to some rust-through. Now that they’re off, I like the cleaner look. I’ll probably keep them off. Still left on the list is balancing the new carburetors and giving the inside a good vacuuming.
Sunday afternoon, Victoria asked me to go out and work on Glinda with her. I could not refuse that request. Since we’d been convinced the brake issue was a failed right rear wheel cylinder, we had to turn the car around in the garage to access that wheel. She and I were able to negotiate the spin without incident. I then directed her in the rebuilding of a brake wheel cylinder. Except for a couple of spring removals and installations, she was able to do the work under my tutelage. Impressive (her efforts, not my direction). With the brake assembly complete and the hub back in place, I had her sit in the driver’s seat and press the brake pedal. Unfortunately, the dripping brake fluid coming from the middle of the car illustrated that we’d missed a problem. A leak in the main brake line that runs to rear of the car. Without a replacement on-hand, we put away tools, cleaned up, and called it a day.
This morning I talked with Jeff at the Corvair Ranch and he told me they just buy a stock length of tubing from the auto parts store and bend it in place. We’ll do the same since a replacement, pre-bent one costs $45 plus extra shipping due to the size.
Friday, November 20, 2009
It’s Nice to Get an Easy One Once in a While
When Ariel called me on her cellphone yesterday afternoon to inform me that, “Ringo is really loud, Dad,” I cringed with the dread of an exhausting (yes, pun completely intended) job for that evening. I assumed the loudness was being caused by an exhaust leak given that Ringo was still running fine. After dinner, I pulled him into the garage and jacked up the left rear. After securely supporting body, I slid under and discovered that the driver’s side exhaust flange had broken. Great, I thought. Removing these nuts is going to be a nightmare as usual. I’ve got at least three exhaust manifolds on shelves with busted studs because the nuts had seized. To my amazement and joy, the four nuts came right off without any effort whatsoever. I would bet the previous owner sprung for the stainless steel fasteners at some point. With that hurdle crossed, I climbed up on a stool and pulled down a spare exhaust assembly (so nice to have usable parts on-hand). After coming up with two usable exhaust gaskets, the reassembly went easily. With everything snugged down, I started up the engine and slid back underneath to listen and feel for leaks at the joints. All the exhaust sound was coming from the tailpipe - the joints were good. Off the jackstand, all four wheels on the ground, and the swap was finished in about an hour. A new record for an exhaust job for me.

Since it's important that those joints stay sealed to prevent any CO from entering the salon, I got on the phone this morning to Jeff at the Corvair Ranch and ordered new gaskets as well as a muffler support strap since I'd noticed the current strap wasn't going to last much longer.

Since it's important that those joints stay sealed to prevent any CO from entering the salon, I got on the phone this morning to Jeff at the Corvair Ranch and ordered new gaskets as well as a muffler support strap since I'd noticed the current strap wasn't going to last much longer.
Thursday, November 19, 2009
Neck and Neck Expenses
I’ve been tracking how much each car in the fleet is costing us. Amazingly, Lucy and Heidi are less than $10 apart. Both cost me roughly $500 to buy. Heidi’s significant expenses have been new engine parts, convertible top, upholstery, and paint, while Lucy’s big hitter was paying for the Corvair Ranch to make her roadworthy. Two paths to the same conclusion.
Wednesday, November 18, 2009
Is Heidi Bucking for a Change of Ownership?
The following four paragraphs were submissions I made to the Virtual Vairs e-mail list. They are self-explanatory:
Tuesday, Nov. 17 at 9:11 AM
“My daughter's '64 is giving her electrical issues. The other day, the car wouldn't start. She got it jumped and drove it to Advance Auto who tested the battery and claimed it was dead (possible given the age of the battery). They replaced the battery and sent her on her way. This morning she went to start it and the battery's dead again. It was fine for three days of normal driving, but there's obviously something still wrong with it. She told me the GEN/FAN light is only on when she goes to turn the key. It's not on when she's driving. I've told her to get it jumped and take it straight to Sear's and have them check out the charging system. She'll do that this afternoon, unless I give her the name of a better place to take it. Any mechanic recommendation?”
Tuesday, Nov. 17 at 1:25 PM
“Saga continues. I decided she should take the car to the FLAPs to check the charging system (since they sold her the battery without checking). She was able to get someone to come give her a jump. She hooked up the jumper cables (and she's done this before), let the other car charge her battery for a few minutes, then turned the key. Nothing. She disconnected the positive cable from her battery and reconnected the jumper cable directly to the positive connector, had someone turn the key while she was holding the cable to keep it from shorting. Nothing. No click, nothing. She and her fiance just replaced the broken leafspring bolt assembly on the driver's side. Could the two problems be related? Never a dull moment dealing with the fleet.”
Tuesday, Nov. 17 at 4:00 PM
"Heidi's been towed to Nich's family mechanic (McCoy Auto Repair). We'll see what he finds."
Wednesday, Nov. 18 at 2:40 PM
“My embarrassment is monumental. It was an easy fix and one that, honestly, I had thought of, but since I was not there couldn't verify. Drum roll please.............. It needed a new positive battery cable. I know, I know, this is a basic maintenance item. I'm sure it's what killed the previous battery. Lack of maintenance = $$. Thanks to all for the excellent info on what could be wrong and how to check for it. All good background that I've saved for the next time. And with the number of 'vairs I've got, and will have, on the road, there's gonna' be a next time.”
Not really Heidi’s fault, but she’s trying hard to piss off Brianna so much she won’t want to deal with her anymore.
Glinda Gets Some Attention Again – Finally
Victoria and I went out to the garage Sunday with the intention of rebuilding the brake wheel cylinders. We pulled the left front wheel and hub and all we saw were nearly new parts. The giver (I’d say seller, but he only got a $1), told us the brakes were completely re-done less than 500 miles ago. Now that was five plus years ago, so we’ll tread cautiously. On early-models, one can rebuild the wheel cylinders without removing the cylinder from the backing plate. After disassembling the brake assembly, we discovered this is not the case on lates. Not wanting to needlessly risk breaking one of the attachment bolts, we decided to test the brakes with the “hard, HARDER, HARDEST” test before diving deeper into disassembly. I got behind the wheel and pressed on the brake. Everything held. Pumped and pressed harder. Still good. Pumped and REALLY PUSHED. Pop and hiss. Victoria walked around as I pumped and found that the right rear was now leaking. Too bad.
She had to leave for an appointment, so I told her I’d put the left front back on the wheel dolly and we’d move the car next Sunday to deal with the left side brakes.
She had to leave for an appointment, so I told her I’d put the left front back on the wheel dolly and we’d move the car next Sunday to deal with the left side brakes.
Spare Engine Dismantled and Pertinent Parts Put Away
Last Saturday evening, while the girls were skating, I spent a couple hours completing the teardown of the spare ‘vair engine. After investigating the condition of the crank and cam, I decided to leave them captive within the two halves of the bolted-together block. I brought the wheelbarrow into the garage and tossed the pistons (have a good set on the shelf already), valve covers (have a good set…), oil pump housing (have a good …), and the bent oil pan (have a …). I removed Heidi’s original block from a bottom shelf, added it to the wheelbarrow load and then filled the spot with the spare block assembly. I poured all the nuts, bolts, and small bits into the bottom of a box followed by the six cylinders. The box found a nice home on top of the block. I was able to get the rest of the parts – heads, bellhousing, flexplate, top cover, shrouding, etc – onto shelves and out of the way. At that point, all that was left was the cleanup. I’d created a mighty mess of soiled sockets, dirty drivers, and spoiled spanners on a filthy floor. Purple Power and rags took care of the tools, while granular floor sweep absorbent (aka kitty litter) was liberally spread over all the oily spots.
Thursday, November 12, 2009
Spare Engine Issues Force a Teardown
Went out to the garage last night to finally determine whether the spare engine was usable as-is or not. I knew there was a slim chance it would be reliably functional, but I decided to go through the motions of prepping and checking. So I fitted an oil filter and added enough used oil (hey, I am frugal) to show full on the dipstick. After pulling the distributor, I spun the oil pump using my hand-drill with the rod machined to mate with the slot. Had to tighten the oil filter bolt to stop the oozing, so I knew I was actually pressurizing the system. After a half-minute more of oiling, I hooked up a spare battery to the starter, energized the solenoid, and watched the torque converter spin around taking the crank with it. OK, that worked, now let’s see what kind of compression each cylinder has, if any. I screwed the end of the compression tester hose into the #6 sparkplug hole and energized the solenoid. The needle went up to 90 psi after a couple revolutions, but after the cranking stopped, the needle dropped to zero. I removed the tester hose, poured a little oil into the cylinder, and reinstalled the tester. This time the needle climbed above 150 psi and stayed there after the cranking ceased. Looks like that cylinder has bad rings. Moved on to the rest of the cylinders and got values of 90 to 140, each holding steady. That bodes well for the valves, I thought, but there’s no way this engine will run well.
Disassembly time. First, I carefully removed the oil drain plug so the oil would drain into the catch pan. I didn’t need to be so careful since nothing came out the open hole. A big not-good. This will be interesting. Am I going to discover a big chunk of solidified oil sitting in the bottom of crankcase? Won’t know until I open her up. Off the engine and onto the shelf went the fuel pump, harmonic balancer, alternator adapter, and oil cooler. Next off was the right-side valve cover which exposed a disturbing sight. Rusty valve springs with nary a trace of oil to be seen on any surface. Another big not-good. Into a bucket went the rocker arms, pushrods, guides, and head nuts. I’ll decide later what I’m keeping and what gets scrapped. I noticed the ends of a couple valves were a little beat, but that was only adverse sign. Over to the other side, and while no slickened surfaces were spotted, rust had not set up shop in this area. The bucket’s contents was doubled, and after removing and shelving the fan, pulley, and top cover of the engine I could finally see into the engine. No sign of oil, but also no sign of bearing bits. Can't wait to finish the teardown and figure out what the deal is with the oiling system. At that point it was time to call it a night.
’64 Corvair engines are a one-year only thing. They have the larger displacement of the later engines (via an increase in stroke), but retained the head gasket area of the prior years’ engines. In ’65, this area was increased improving reliability. I still have many of Heidi’s original engine parts including the block, crank, cylinders, pistons, and connecting rods. If the ’65 vintage spare engine equivalents are in decent shape, I’ll keep them and scrap the ’64 pieces. Anyone want a project?
Heidi’s Double-Whammy
 Around 3:15 Tuesday I got a phone call from Brianna. She said that Nich, her fiancé, had just called her and told her Heidi broke as he was leaving work. “He says something is dragging on the ground under the rear of the car and he’s afraid to move it. He’s sending you pictures from his phone now.” The pictures Nich sent me confirmed my diagnosis of a failed link at the end of the transverse leaf spring.
I called Nich to assure him he could move the car out of traffic (it was partially blocking the entrance to his work’s parking lot) and into a parking spot. We briefly discussed how we were going to deal with the breakdown and he decided he’d leave the car in the parking lot until the next day, call his parents, and beg a ride since his car was in the shop with a dead transmission (yes, when it rains, it pours). As soon as I got off the phone with him, I called Clark’s Corvair Parts and had them overnight two new link assemblies to Nich’s parent’s house.
 Then I crafted an e-mail with explicit instructions (with drawings) on how to make the repair. The only risky part is the removal of three nuts that hold the retainer to the control arm. If they break the stud because it’s rusted to the nut, then finishing the job will get very difficult. Fortunately, with new parts and towing coverage, they could get it to a mechanic who could finish the job if they absolutely had to.
Yesterday afternoon, Nich, his dad Gary, and Brianna, drove to Heidi with tools and the new parts. In a drizzle, they successfully replaced the broken link and Heidi was drivable again. Brianna got in, turned the key, and nothing happened. Dead battery. Gary’s car provided a jump start and they were underway. A few blocks down the road, Brianna had to stop quick and Heidi’s engine stopped. The battery was not recharged at this point, so restarting required another jump from Gary’s car. I can really feel their pain at this point. They just finish one repair and it goes better than they’d hoped, and now something else has popped up giving them grief.
Brianna dropped Nich off at school and then drove Heidi straight to Advance Auto. She had them test the battery confirming it had gone bad, so in went a new one. Let’s hope and pray this is the end of Heidi woes for a long while.
Wednesday, November 11, 2009
I Love GNPs
Loriann (my lovely wife) and I have always owned older houses, so many times our “home”-work is replacing broken old parts with GUPs (good used parts). Working with house GUPs is challenging to say the least. GUPs are typically more fragile than their new equivalents, so we have to work carefully. GUPs always bring along the threat that, once installed, they won’t work properly. GUPs can’t be bought at Home Depot and are usually scarce, so acquisition involves some hunting followed by exorbitant shipping charges and a few days wait before the part’s in hand.
Alternatives to GUPs are GNPs (great new parts). GNPs are a joy to work with: robust, reliable, readily available, and always accurate. Unfortunately, GNPs are typically more expensive than GUPs. Because of this, we end up using GUPs whenever possible.
The same story exists in our old car work. While GUPs are much cheaper (many times free) and readily available (sitting on a shelf in the garage), GNPs come with a warranty, are pretty, and work right the first time. Unfortunately, most of the time my budget doesn’t allow GNPs. There are exceptions, however.
As I recently reported, I was able to obtain a pair of GNP-quality carburetors for much less than GNP pricing (thank you Wolf Enterprises). Sunday afternoon I was finally able to carve out an hour to install them on Lucy. Initially, Lucy didn’t run right, but I knew the carbs weren’t the problem, so I kept tweaking the linkages until I got a nice smooth idle at 600 rpm. Throttle response is excellent and there’s no more miss at partial throttle on the highway. What a pleasure.
Like I said. I love GNPs!
Tuesday, November 10, 2009
Don’t Jump To Conclusions
I seem to have the nasty habit of assuming the worst when I go to fix a problem with one of my cars. When a failure occurs, I identify the hardest part to replace and call it the culprit. No gas to the carbs; must be the fuel pump. NOPE, it’s vapor lock and now you need to replace a perfectly good fuel pump because you screwed it up needlessly messing with it. No blinkers; must be the switch. NOPE, it’s a bad ground connection and you just wasted an hour when all it should have taken was ten seconds of cleaning and reinstalling the socket.
Friday, on my commute home, I noticed that the dash lights didn’t come on when I turned on the headlights. Not having learned anything from my previous faulty diagnoses, my pessimistic self immediately decided that the headlight switch I’d installed the night before had failed. I was so frustrated that I’d done all that work putting in the replacement, only to have it almost immediately fail. Sunday afternoon, with my mind still convinced the switch was at fault, I dove into remove, repair, and reinstall of the headlight switch. The mechanism for controlling the dashlights is a potentiometer built into the face of the switch assembly. I figured the coil of tiny wire had broken, so after removing the switch from the dash, I tested the circuit in the switch to see if I was right. I wasn’t. Surprise, surprise – not. There was nothing wrong with the switch. Irr. Time to back up and check more basic things, like whether the brand-new lightbulbs were blown. They were. I popped in a replacement bulb and Lucy’s speedometer and gas gauge aren’t in the dark anymore. I decided to see how long the one bulb lasts before I go and install the second one. Now the switch may still have a problem because something caused those bulbs to blow. Time will tell.
Now did I learn anything from this latest escapade? Doubt it.
Thursday, November 5, 2009
Headlight Failure Forces Car-Time
Last night I had to work on Lucy. Somehow it’s easier to break away from house-work and get myself out to the garage when a debilitating ‘vair issue. This time it was the headlight circuit. I only had high-beams. Since my commute starts in the dark and ends that way, I need properly functioning road illumination. Lucy’d had this problem before – a weak connection at the hi-beam switch, so I knew right where to attack. After separating the connector plug from the jack, I tested the switch to verify it’s proper functioning. All was good there. Then I cleaned the terminals of the switch and the mating surfaces inside the plug body. After applying some bulb grease to try to protect the metal from corrosion, I slid the plug back on. No headlights. Irr. I found, however, that if I twisted the plug slightly contact was made. What was happening was the plastic plug body had melted with the high resistance of the corroded contacts. The two contact surfaces were then not held tightly to each other. A small wood wedge behind the plug forced it into properly applying pressure and reliable illumination resulted.
On my way home from work I had stopped by the auto parts store and bought a package of dash light bulbs to replace Lucy’s dim ones. After fixing the headlights, I replaced the old with the new. What a tremendous difference!
When I first put Lucy on the road, the dash lights would not go on. The problem was the circuit in the headlight switch that controls the brightness of the dash lights. The variable resistor was broken. At that time I bypassed the switch by connecting the dash light’s circ uit directly to switched 12 volt at the fuse block. That meant the dash light were on whenever the car was on rather than just when the headlights are on. So my next, and last, task of the evening was to replace the switch with the used one I’d removed from the red 4-door. The first step in making this swap is to remove the knob shaft from the switch assembly. This is done by pressing a small button on the assembly while pulling the knob out. When I did that to the assembly in the car, the headlights turned on, so I used the shaft to move the switch to the OFF position. Before mounting the replacement switch, I did the same thing. After tightening the nut holding the switch to the dash, I tried installing the knob shaft into the switch. It took me quite a few tries before it would fall into place. When it did, something was wrong. The knob would only pull out slightly – not even enough to get to the first detent. I tried to remove the knob shaft, but to no avail. I ended up prying the shaft from the assembly breaking something inside. Out came the switch assembly and to the workbench it went. I disassembled both the old and the replacement switches and swapped out the broken part with the one from the old switch. I then put it all back together, tested it, and installed it; this time leaving the switch in the first detent position instead of the OFF position. The knob shaft installed easily and the switch actuated properly. Job completed, but I sure made it harder than it needed to be.
On my way home from work I had stopped by the auto parts store and bought a package of dash light bulbs to replace Lucy’s dim ones. After fixing the headlights, I replaced the old with the new. What a tremendous difference!
When I first put Lucy on the road, the dash lights would not go on. The problem was the circuit in the headlight switch that controls the brightness of the dash lights. The variable resistor was broken. At that time I bypassed the switch by connecting the dash light’s circ
 uit directly to switched 12 volt at the fuse block. That meant the dash light were on whenever the car was on rather than just when the headlights are on. So my next, and last, task of the evening was to replace the switch with the used one I’d removed from the red 4-door. The first step in making this swap is to remove the knob shaft from the switch assembly. This is done by pressing a small button on the assembly while pulling the knob out. When I did that to the assembly in the car, the headlights turned on, so I used the shaft to move the switch to the OFF position. Before mounting the replacement switch, I did the same thing. After tightening the nut holding the switch to the dash, I tried installing the knob shaft into the switch. It took me quite a few tries before it would fall into place. When it did, something was wrong. The knob would only pull out slightly – not even enough to get to the first detent. I tried to remove the knob shaft, but to no avail. I ended up prying the shaft from the assembly breaking something inside. Out came the switch assembly and to the workbench it went. I disassembled both the old and the replacement switches and swapped out the broken part with the one from the old switch. I then put it all back together, tested it, and installed it; this time leaving the switch in the first detent position instead of the OFF position. The knob shaft installed easily and the switch actuated properly. Job completed, but I sure made it harder than it needed to be.
Monday, November 2, 2009
No, I Did Not Get Much Car-Time Last Weekend
Between a trip to PA on Saturday and assorted responsibilities on Sunday, I only squeezed in about 90 minutes of time in the garage. I spent that precious hour-and-a-half working on the spare engine. I bolted on the flex-plate and a torque converter, and then mounted the starter using bolts as spacers to represent the thickness of the differential flange. My plan is to mount an oil filter, temporarily fill the crankcase with used, pull the distributor, spin the oil pump to pre-lube the engine components, and then do a compression test of the cylinders. We’ll see when I get to that.
Subscribe to:
Posts (Atom)