Wednesday, December 30, 2015

Holidays are made for Car Work

Yesterday, Mikhaila finally had a day off from work, so we went out to work on Scarlett. I told her the primary goal was to get her engine running, and that we needed to borrow some stuff from Ringo in order to make that happen. With me directing and her turning the wrenches, we removed the carburetors and linkage as an assembly and bolted them onto Scarlett’s engine. After transplanting the battery and rigging up a gravity feed for filling the carbs with fuel, we were ready to go. First check was dwell. I hooked up the meter and had Mikhaila turn the key to on and energize the purple wire to get the engine to turn. It took a few tweaks of the points, but I was finally able to get the meter to point at 32 degrees. Next, we rotated the crank until the groove on the balancer was lined up with 8 degrees on the engine block scale. With the timing light now connected, we twisted the distributor trying to get a spark, but were unsuccessful, so I had Mikhaila aim the timing light with the engine spinning by the starter and we turned the distributor until we could get the groove to show anywhere on the scale. With the timing somewhere within reason, I poured a little gas down each carb’s throat and had Mikhaila start the starter cranking. It took a few tries, but we finally got the engine to fire and run. The strange thing was, that even after twenty-plus years of sitting, there was no lifter clatter and not a whole lot of smoke. We went through a few refills of fuel before calling the exercise a success and I Mikhaila out to the driveway to clean engine shroud pieces while I did a compression check on each of the six cylinders.

Last October we did the same test on the engine and came up with the following results: one @ 160 psi, three @ 150 psi, one @ 120 psi, and one @ 60 psi. This time, with engine warmed up, testing showed two @ 140, one @ 135, two @ 130 and cylinder number two at 45. I squirted some oil down in the spark plug hole and did another check. It went up to 60, so there are still issues. All-in-all, though, the test run was a success since nothing banged, clattered, or untowardly spewed fire. My next move on this will be pulling the left valve cover and checking the rocker arm adjustment on the two valves to that cylinder.

#1 #3 #5
#2 #4 #6

The testing complete, I returned the carburetors and battery to Ringo’s engine compartment. By this point, Mikhaila had finished separating the engine seal retainers from the shrouds, so I released her from working. I, however, still had another project to attend to – this one on Ringo’s distributor. When I’d previously checked the dwell, I’d noticed that it would change with the revving of the engine. In my experience, this indicates a loose pivot pin on the points’ plate. At that time, I’d just plugged the vacuum hose, verified the dwell was holding steady at 32 degrees and moved on. Yesterday, I decided to replace the points’ plate with one that I had removed from Glinda when I’d installed the Ignitor II ignition system a few months back. After the swap, I hooked up the dwell meter, set the dwell to 32 degrees, hooked up the vacuum line, and fired the engine. It would start, but barely and wouldn’t idle. It took me a few minutes to discover my error – I’d neglected to tighten the fitting where the fuel line enters the fuel pump. Sucking air was never going to re-fill the carburetor bowls. With the fitting tight, it only took a few cranks of the engine to get gas in the carbs and the engine running smoothly. Sadly, the dwell still wouldn’t sit still as I revved the engine, so it looks like the distributor shaft bushing gets put on the list for replacement. With a golf tee securely plugging the vacuum hose, I checked the timing – still sitting at 12 degrees BTDC.

At that point I called it a day, put away the tools, and locked up the garage.

Tuesday, December 22, 2015

A Short Post

Last evening after faithfully getting me home from work, I rewarded Ringo with a carb tweak. Frustrated that the choke wouldn’t open all the way even after freeway jaunts, I finally broke down and did something about it. I pulled the to-be-mounted tire from his trunk, tossed it into the temporary garage, yanked the spare tire from the engine compartment and rolled it into the trunk. With it out of the way and the engine still up to temp, I removed the right side air cleaner assembly and disconnected the choke rod from the carb. About four twists out and the end of the rod lined up with the carb linkage with the choke wide open. I still need to replace the thermostat on the left side, but at least, once hot, both carbs are fully un-choked.

Thursday, December 17, 2015

Time for an Update

It’s been a while, and, fortunately, nothing very noteworthy has happened in the month or so since I last posted. I’ve been switching back-and-forth driving Glinda one day, Ringo the next. Last Friday evening, after struggling to see though the foggy windshield during my drive in the rain, I decided to spend some time on Ringo addressing his defroster/heater and some other niggling issues. First on the list was adjusting the latch plate on the driver’s door again. A little adjustment out, and latching was again accomplished without slamming.

Moving on to adjusting the idle speed of the engine, I connected the dwell meter to the coil terminal and ground to read rpm. The meter’s switch was set to dwell and I noticed the dwell changing as I blipped the throttle. Hmmm. Off came the vacuum advance hose, and subsequent blipping showed no movement in dwell. Unfortunately, the dwell was off by a few degrees, so I had to adjust that back to around 32 degrees, but not until I’d plugged the vacuum hose with a golf tee. Once the dwell was to spec., I readjusted the timing to about 12 degrees BTDC. Finally, I could give the idle screws a few tweaks to bring the idle speed to a little over 500 rpm with the transmission in Drive.

Next on the list was heater/defroster. I climbed under the dash, removed the three retaining screws, and dropped the controls so I could make sure all the levers were unbroken and properly set. They weren’t. The air one was bent (didn’t need it anyway), the heater one was pulled from its bracket, and one of the two defroster cable ends was also out of place. Knowing the cable was actually seized and that I was going to adjust the heater at the flapper under car, I left the heater one alone, but did re-seat the misplaced defroster. Turning my attention to the defroster doors in the rocker tunnels, I checked their operation and they were good-to-go.

Once I backed the car up on the ramps, I blocked the front wheels and released the parking brake. With 7/16ths and ½ inch wrenches in hand, I slid under the lifted rear and pushed the heater box door wide open. Next, I tightened the parking brake cable nut a half-dozen turns or so.

By that time it was late, so I called it a day.

Monday and Tuesday were Glinda days, but yesterday morning I grabbed Ringo’s keys and slid behind his wheel for my morning drive. I noticed, as I accelerated to get on the beltway, that the throttle response was not a good as the last time I’d driven him. Looks like I need to bump up the timing. Today he again was my chosen whip, and, while I could still stay up with 65-70 mph traffic, I wasn’t happy with the loping at part throttle. I’ll also be checking dwell and looking for vacuum leaks the next time I’m under his engine lid.

Friday, November 13, 2015

Is It Nearly Thanksgiving Already?


Where does the time go? Two weekends away make for very short weeks. Ringo has been patiently waiting for his turn at daily-driver-ship. This morning that opportunity came and he rewarded my trust with an event-less drive. He’s now been placed in permanent rotation – at least until he finds a new owner. There are still a couple issues I’d like to resolve in the near future. First, the TEMP/PRES light does not illuminate (I’m hoping it’s just a bad bulb). Second, the recently replaced ignition still doesn’t reliably energize the starter. In fact, the last few times I’ve had to use the hotwire in the engine compartment to get the engine going. Fortunately that works every time. I’m not sure if it’s the solenoid since it works if it sees voltage directly from the battery. I measure the voltage at the purple wire connector and got more than 12 volts with no load. I guess I should try and measure voltage when I’m attempting to energize the starter and see if there’s an issue with the replacement ignition switch showing a high resistance.

Glinda is still performing satisfactorily. I put 10 gallons of gas into the tank yesterday and fuelly.com indicated she’d gotten 18 mpg since the last fill up. No long distance trips, hence the drop in mileage from 19+.

Tuesday, October 27, 2015

Ringo’s Ready to Roll

Last Sunday afternoon I took Ringo for spin around the block and found that, once they were bedded in, the new brakes seem to work fine. The tires squealed a little, so I checked the pressures and found the fronts needed a few psi to get them up to 22 (to go with the 32 psi in the rears). I found that the idle speed, once the engine had warmed up, was a bit higher than desired. I popped the engine lid, and noticed the choke on the left carb was binding. I tried adjusting the rusted rod and broke it. Irrr. I’m sure the engine will still start with only one carb being choked, but we’ll see. I then pulled a wheel off Scarlett to temporarily use as Ringo’s spare. After bolting it into its mount in the engine compartment, I shut the lid and moved on to Glinda.


She needed me to fix her wipers. Starting with the easiest thing to do, the first step in troubleshooting was to look at the schematic in the ’68 manual and test the switch. It checked out, so I moved on to the drive end. To access it, I removed the air grill at the base of the windshield which also required me to remove the wiper arms from their shafts. Two loosened nuts after that and I’d disconnected the arm mechanism from the drive. Three Phillips-head screws held the drive assembly to the firewall and they came out easily. Once I removed the two long bolts holding the motor to the rest of the assembly I could tell the bushing at the far end of the motor shaft was not turning freely. Knowing I had a GUP drive assembly on the shelf, I decided to not repair Glinda’s, but bolt in the GUP. Everything went back together easily, and I remembered to adjust the at-rest position of the wiper arms before pushing them down on their splines. Everything now works and Glinda’s daily-driver-ness has been improved.

Tuesday, October 20, 2015

Three Steps Closer to a For Sale Sign

This weekend I was actually able to spend a lot of time working on cars (some Corvairs even) while still completing the major house project I had committed to. Saturday I spent a couple hours redoing Ringo’s rear brakes. This was one of those projects where one thing led to another which led to another. First, as I was disassembling the right rear to install the GUP e-brake cable, I noticed the shoe linings were in pretty rough, cracked shape, so I went to the box of GUP EM brake parts and pulled out two forward and two rear shoes to use. Once I got the right side put back together I moved over to the left. There I found the liners in even worse shape (had it been that long since I’d changed them?). Anyway, I put the parts back together including lubricating and turning down nearly all the way the adjusting wheel. Next, putting the hub on was much more difficult than it should have been. I made a closer inspection to ensure nothing was amiss with my work and I found the rear shoe wouldn’t retract completely to the post. Close inspection showed the one piston was seized in the wheel cylinder. A few persuasive taps with a hammer and the piston retracted and seemed freed up. I completed the brake reassembly, mounted the tires, and dropped his rear off the jackstands. After firing up the engine using the hotwire under the hood, I let the engine warm up thoroughly while I put away tools. Next, I backed him up onto the ramps so I could properly adjust the emergency brake cable length. Once that was done to my satisfaction, I drove him back down, and moved on to the more pressing project of the day – the new kitchen.

The next afternoon I’d promised my buddy, Jonathan, I’d come over to see if we could, together, solve his Corsa’s starting woes. Of late, the engine won’t consistently crank when the key was turned – the starter would spin, but the pinion of the Bendix drive wasn’t always engaging the ring -gear on the pressure plate. Additionally, the last time he’d tried to crank the engine, the solenoid got stuck in the start position and the starter just spun away. The only way to stop it was to disconnect power to the starter. We did a bit of checking of the wiring and everything seemed to be in good stead (12 volts to the purple wire when the key is in the Start position, power to the engine with the key in the On position, etc.). After those checks and reconnecting all the leads, lo-and-behold the starter stopped its incorrect spinning and responded to the turn of the key again. We hadn’t, however, fixed the inconsistent cranking. The engine would only turn on every fifth or so turn of the key, and once it did start cranking it wouldn’t even make it a full revolution before the pinion would pop out of engagement and the starter would uselessly spin freely. Jonathan removed the starter and we connected it directly to the car’s battery and watched the Bendix as I shorted the S terminal to 12V. Strangely, the pinion would pop out upon the starter being energized, but it would not stay in the full out position. After a second or two it would begin to slowly draw back into it’s at rest position even though the starter motor was still spinning away. Hmmm. Bad starter perhaps? He’s going to go get another rebuilt one and we’ll keep our fingers crossed.

After returning home, still wearing grungies, I went back to work on Ringo and replaced the balky ignition switch (seemed to be the theme for the day).

The last task for him was to replace the front seat belts. The ones he'd been sporting since Ariel and I put him on the road came out of my LeMans and allowing them to disappear with his sale would no do. The shelf contained a number of replacements, but I chose a set of new (although probably circa 1975), brown ones from Pep Boy's. I'd bought these at part's auction a few years back.

Now Ringo sits at the curb awaiting a round-the-neighborhood test drive and transmission fill before a few days of daily-driving. Once I'm sure the bugs are worked out, the Craigslist ad goes up.

Monday, October 12, 2015

Touring is Fun

It was a beautiful day - great weather, delicious beverages and snacks, and even better conversation with the small group. With only three couples in their Corvairs, changing plans became much easier as the mood stuck us.

The lovely Loriann and I met Tommy and Kathy (also from Baltimore/'63 Monza) amongst the apple trees of Distillery Lane Ciderworks (southwest of Frederick, MD). After purchasing our tasting tickets and snagging our complimentary goblets, we wandered the grounds and made the tough choices as to which of their dozen different drinks to imbibe. Finally, we were out of tickets and it was time to move on to our next destination, Creek's Edge Winery.

An enjoyable drive of roughly a half-hour took us across the Potomac into Loudin County, VA and ended at a rustic barn serving as the Winery's stand-in tasting room for the day (a wedding party had taken over their real tasting room). We were pleasantly surprised to find a live band tuning up as we bellied up to the bar and began tasting a flight of really good wines. After finishing our generous portion of the first on, Rory and Rita (Silver Spring/'66 Corsa) walked up and joined us. They shared the details of their morning's adventuresome trip in a rough-running 'vair. They'd recently took delivery of the first Corvair a few weeks ago and Rory, a capable mechanic, has been learning the nuances of the flat six while fixing the few previous owner screw-ups.

As the band started playing, it became necessary to go outside so we could converse without yelling. Six (or was it seven?) generous glasses later, we all wandered down to the meadow-cum-parking lot where the guys made some adjustments to Rory's car and discovered something else the PO had done wrong (distributor installed a couple teeth off, so the spark plug leads were one contact off). We ended up leaving the distributor alone, but thanks to Tommy bringing a timing light (who knows?) we got that and the idle speed set.

We then had to make a decision as to the next winery. One had three miles of gravel road to traverse while the other had just one. The adventurer in all of us won out and we chose more gravel over less. Another thirty minutes of driving deposited us at the pond-side old home housing the tasting room of Corcoran Winery. We selected a picnic table in the sun where we spent at least an hour eating meat, cheese, and bread while drinking two bottles of their delicious Apple Wine.

All of a sudden it was five o'clock and we realized we still had one more winery to visit. The next one on the agenda was at least a half-hour away - too far. We'd passed another one just a few miles before arriving at Corcoran, and, thanks to a quick check on the internet, we knew that Village Winery would be open until 6, so that's where we headed next.

Our server/entertainer for the next hour was the owner/farmer/winemaker. Bottom line: he was a hoot and an effective salesman since that was the only place Loriann and I spent more than the price of the tasting. Especially good were his non-alcoholic drinks made from Elderberry and Chokeberry and a new salad dressing he came up with that will be at your local Panera any day now.

Friday, October 2, 2015

When It Rains, Blah, Blah, Blah

When it rains and you’re driving a nearly fifty year old car, chances are good the wipers will stop working. That happened to me today as I was running some lunchtime errands. Something to add to Glinda’s to-do list.

The GUP parking brake cable for Ringo showed up in yesterday’s mail with an added surprise. I’d asked Jeff (Corvair Ranch proprietor) if he happened to have an EM convertible rear window lying around gathering dust. He thought he had, and lo and behold it was also packed in the box. Now Mikhaila and I have all the parts necessary to get Scarlett on the road.

Monday, September 28, 2015

I'm So Sorry Ariel

Had a nice time Sunday afternoon working on Ringo. I was able to get the engine to start by hotwiring to the purple solenoid wire, but not with the key. Looks like a replacement ignition switch in on hit to-do list. With the engine stuttering along, I put the hand over each carb. The right one behaved properly basically killing the engine by starving it for air, but the left one just made a hissing noise when blocked - a bad vacuum leak. I pulled off the carb and put on a new base gasket, bolted it back on, and refired the engine – no change. I looked and felt carefully around the carb’s mounting area. My fingers and ears told me the leak was between the carb base and top. Remember these carbs were the ones Mikhaila and I hastily rebuilt when Ringo’s original pair were swapped onto Scarlett in anticipation of the “great starting” that never happened. Off came both carburetors and put back in place were Ringo’s original pair. After a few seconds of cranking to fill the bowls with fuel, the engine started up and settled into a nice, smooth, but somewhat high idle. After warming up, the idle still wouldn’t come down until I cleaned the throttle shaft of the right carb which allowed it to close fully and drop the rpm down into the 1000 range with the transmission in Neutral.

I then settled behind the steering wheel, made sure I had a good brake pedal, and dropped the trans lever into D. A few maneuvers to get the car away from the fence, and I pulled the parking brake to keep him from rolling. Much to my frustration the handle pulled much farther that it should and brakes were never applied – broken cable. Irr.

Ringo’s driver’s door has been stuck shut since about a month or so before Ariel stopped driving the car, so that was the next focus of my attention. While still sitting in the driver’s seat, I pulled back on the inside lever hard and slammed my shoulder into the door – lo and behold it popped open. TYL. I got out of the car and looked closely at the engagement of the latch to striker plate – the striker plate was obviously too low. Loosening the three Phillip’s head retaining screws allowed me to slide the latch up. I tightened the screws and attempted to close the door – it wouldn’t fully latch. Moving the plate out about a quarter of an inch did the trick though. Now the door latches nicely with the expected amount of closing force. I feel SO badly that Ariel struggled with this door for far too long. I know I adjusted the plate when the problem first arose, but was never able to get it into a spot where a normal closing force would get it to fully latch – she really had to slam it to get it to fully close. Now it’s fixed – just a few months late.

Back to the brakes. To check out the issue, I backed the rear of the car up on the ramps and blocked the wheels to keep it there. I slid under and immediately found the cross-cable was much longer than it should be. The cable had broken near the right rear wheel, and the only way to replace it is to disassemble both rear brake assemblies which I started to do with the right side.

Running out of time, I needed to take apart the racing carbs so the bases could be sent back to the guy that modified them for replacement. Once the bases were completely bare, I closed up the garage and called it a day.

I called Jeff at the Corvair Ranch and I should see a GUP cable assembly by the weekend.

Friday, September 25, 2015

Okay, I’ll Break The Silence

By my lack of posts over the last few weeks, one can surmise not much is going on with the fleet. Glinda is still reliably motoring down the road getting her 17.5 mpg as my mostly daily-driver. The guy that modified the racing carburetors for me has agreed to exchange the bases of these apparently faulty ones for new modified ones at no charge, but I still need to tear down the ones I’ve got and ship them off to him before new bases will be sent to me. Today I scored two nearly new bucket seats out of Chevy Cobalt. I’d been watching for these during my sporadic visits to Crazy Ray’s and today I found them. The serendipitous part of this find was that someone had recently removed them from the car and just left them sitting on the ground. It was like I’d called ahead and ordered them. While these seats are not as form-fitting as the racing seats I’ve got, they are much more comfortable and far more practical for a daily-driver. Now I’ll sell the two racing seats and hopefully make back most of the $65 I just spent. Permanently installing these two buckets is already on this winter’s to-do list.


Ringo has gotten some attention too. I’ve sanded the Bondo and applied a few coats of sandable primer. I’ve remounted the right rear wheel and attempted to start the car. Even though the batter shows a good voltage, he won’t crank. I need to clean the terminals before he can be fired up. Last Sunday I hosted an informal gathering of Corvairs. I’d been e-mailing and talking with two new owners and invited them to stop by Sunday after lunch. I also sent out a group e-mail to all the Baltimore club members as well as a Facebook invite. The two new owners showed up (one brought along his enthusiastic wife) and one of the Baltimore owners joined us. We had a great time looking over cars, talking about Corvairs, and getting to know each other.

This gathering (even with its lack of Baltimorean attendance) has prompted me to organize a driving tour for next month. I’ve mapped out a convoluted route on country roads between a Maryland cidery (just south of Frederick), and three northern Virginia wineries. In addition to inviting the Baltimore folks, I’m going to put out the word to the Northern Virginia Corvair Club to see if some of them want to join in.

Monday, August 24, 2015

I Love the Smell of Ignition in the Morning

Late last week Glinda became undriveable. The tach needle was jumping around and the engine wouldn’t idle only staying running if I kept the rpms above 2500. I limped her home thinking the issue was with the dying ignition switch. I surmised that the contacts inside the switch were failing and the engine was not getting enough electricity to run properly. The replacement GUP switch from the Corvair Ranch showed up in Saturday’s mail, and I installed it that night. Upon first firing up the engine, it was still running rough – crap, not the switch. I hopped out to look at the engine, but it died before I could get the lid open. I wiggled all the electrical connections that may be causing the issue – nothing appeared amiss. I hopped back behind the wheel and turned the key. A single backfire and the engine was running smoothly again. I took her for a spin around the neighborhood and everything seemed normal.

Yesterday morning I turned my attention to Ringo. I finished sanding the Bondo, blew off all the dust, wiped down the area with cleaner, masked off and shot the entire area with three coats of red sandable primer. I’ll let it cure for a day or so before wet-sanding the primer in preparation for some coats of Black Cherry Pearl.


This morning I grabbed the keys to Glinda, buckled up behind her steering wheel, and turned the key. Her engine reluctantly fired into a stumbling idle – crap. I let the engine warm up a little with my foot finessing the throttle, but to no avail. To determine if it was a carb blockage, I pulled off the air cleaner and peered down the venturis while blipping the throttle – healthy squirts of fuel indicated the issue was ignition. I confirmed that when I fetched the timing light, hooked it up, and cranked the engine – no spark. Off came the distributor cap, rotor, and dust shield exposing the points. Using the remote starter (jumper wire from the purple wire connector to the positive on the battery), I watched the points move, but saw no spark. I was at a fork in the road – either replace the points with an unknown GUP or reinstall the electronic ignition module and coil. I opted for the later. Fifteen minutes or so later, I had everything in place and hooked up. The momentous turn of the key was immediately followed by a smoothly running engine. I let it warm up as I put some of the tools away and then plugged the vacuum line, adjusted the idle speed to around 500 rpm, and checked the timing. It was reading a little above 16 BTDC, so I loosened the distributor’s hold-down nut, bumped it a bit to get to get it to around 15 BTCD, and then tightened the nut. After reconnecting the vacuum advance tube, I set the idle speed to 800 rpm, and shut off the engine. I put away the rest of the tools, washed my hands, and inspected my work clothes to make sure I hadn’t leaned against something untoward (must be why I wear black slacks a lot of the time). When I finally pulled away from the curb, I’d only lost an hour of my day. The drive to work was wonderful with Glinda’s engine pulling strongly in all gears well above 4000 rpm – yes, that’s over 80 mph. Bonus, I can cross an item off the To-Do list.

Monday, August 17, 2015

It's Been Way Too Long

Wow, nearly a month since I last posted. Pretty sad. Anyway, what’s been happening? Well, Mikhaila and I are pretty close to dropping Scarlett off the jackstands, Ringo’s had some work done, and Glinda’s been a reliable daily driver.

More specifically, Scarlett has a re-sealed Powerglide, a Safety-taped shifter cable, two borrowed carbs from Ringo (since I’m sure they work), a solid brake pedal, a coated and installed gas tank, a new in-line fuel filter (by the left rear wheel), hooked up throttle linkage, front seat belts, and all four tires bolted on. In addition to coming off the jackstands, all she needs to get out of the garage under her own power is some gas in the tank, ATF in the transmission, and some ignition system adjustment.

I closed off the opening created by the shredding tire with a membrane tape carpenters use to seal around house windows. It has a strong adhesive backing, is plenty tough, and comes in a roll that’s four inches wide. I also applied Bondo to the treated rust-through around the right rear wheel well. I’ve decided that I will spend my car time this winter working on Glinda. With Mikhaila off to college, Scarlett will vacate the garage and Glinda will take her place. My current list of prioritized projects is:
  • Treat body rust appropriately
  • Get replacements for the racing carburetors and install
  • Paint and install the correct dash (no transmission shifter)
  • Replace the ignition switch
  • Tighten up the front steering (maybe replace the box with a quick-steer unit)
  • Weld in floor patches
  • Weld in the trunk bottom
  • Relocate battery
  • Dye the gray racing seat black to match
  • Install both racing seats in place of the front bench
If the kitchen project goes well, I may even prep and paint the car. I’m torn between Summit Racing’s Teal Green Metallic and Bright Aqua Pearl. Then again I may go crazy and shoot the car with Orange Pearl.
 
Regarding Glinda’s ongoing carburetor saga, she’s still showing far better mileage with the stock carbs, so I’m on the verge of sending the modified ones back for replacement. The next fill-up and spark plug inspection will tell the tale.

Thursday, July 23, 2015

A Little Electrical

Last evening Mikhaila and I worked on her current daily-driver, Glinda, addressing issues that have nagged this car for many months. First, we tried fixing the current right rear taillight socket, but to no avail. We ended up replacing it with one from my mass of harnesses hanging from a garage rafter. Next, we put a new blade terminal on the end of the ground wire for the left rear side marker. Mikhaila took care of replacing the failed front blinker bulb. Finally, we moved on to adjusting the front headlights. Sadly, the first one we went to adjust broke as I turned the screw. Not having a replacement, we jammed a piece of wood between the bumper and the bottom of that headlight ring which will keep the bulb from flopping. The other side adjusted just fine.

Friday, July 17, 2015

Ninety-nine Percent Positive

The other day, as I previously posted, I swapped out Glinda’s modified carburetors for the newly rebuilt ones that were meant for Scarlett. Since that change, she’s been running wonderfully for Mikhaila’s in-town trips. Yesterday morning I couldn’t resist claiming Glinda as my day’s ride. During my brief test drive of a couple weeks back (right after swapping carbs), I could tell that the throttle response was significantly better, but it still a thrill as I headed down the beltway’s on-ramp, transmission in third and pedal to the metal. The tachometer climbed above 4000 rpm with no hesitation and very little needle jiggling. A shift into fourth gear and back to WOT and soon after I was going eighty. What a huge difference. Later that day I pulled into a gas station and put less than seven gallons of high-test into the tank. According to fuelly.com Glinda had averaged over 17 mpg since the carb swap - where she’d been before the swap.

When I got home, I pulled the #1 and #6 plugs and checked them for fouling – nice and clean tip and ground electrode. #1 looked clean all over, while #6 had a little black buildup around the face of the plug body. I didn’t clean them, but put them right back in and will check again after another couple hundred miles. If, after that, the mileage is still good and the plugs are still clean, I’ll be asking the source of the modified carburetors to replace them. I’ll also, at some point, put back the Pertronix Ignitor and coil since they weren’t causing the rough-running.

Monday, July 6, 2015

Three Cars, Three Updates

Glinda: No Racer No More

A couple weeks ago I hopped into Glinda for a quick evening drive. I started her up, and pulled away from the curb. Since it had been raining, I turned the wiper knob to clear the windshield, but nothing happened - at least nothing wiper-wise. Some other things DID happen though. The radio shut off, the tach needle went to zero, and so did the voltmeter. I immediately turned off the wiper switch and everything went back to working. Since I didn’t want to get stuck somewhere, I pulled her back to the curb, with the intent of dealing with the problem later. The following morning, before turning on the car, I pushed in the wiper switch rather than turned it as a test – the wipers worked as normal. I turned them off, and, thinking the previous evening’s gremlin had moved on, I started the car and drove away. A few moments later, I checked Glinda gauges and found the voltage sitting at 10.8 rather than the normal 14+. Not having a spare vehicle available to me this morning, I continued on to work minimizing my use of electrical stuff. By the time I pulled into my parking spot at work, the gauge was now reading about 10.2. I shut off the car, and then turned the key to the ON position – the gauge needle was now pointing at slightly above 12. The drive home, however, was business as usual. The voltmeter needle pointed back to where I was used to seeing and all seemed fine.

The lovely Loriann and I decided that Mikhaila needed a car to drive while waiting for us to finish Scarlett. Glinda drew the short straw. To facilitate Glinda’s new duties, Mikhaila and I swapped out the racing seat and harness for the stock bench and belts, and we put back the skinny tires in place of the wide racing wheels. I rode with Mikhaila giving out instructions as she wheeled the car around the neighborhood. She did quite well getting used to the heavier steering and relearning the manual transmission skills she’d not had to put into practice for months.

Yesterday, after recording another tank-full of atrocious gas mileage, I gave up on the modified carburetors and swapped on Scarlett’s pair. With the recently rebuilt carbs hooked up and some gas poured down each throat, the engine reluctantly fired. After a few moments, gas started squirting out of the vent holes of the right carb. Off went the engine and off came that carb top, but not until I checked the accelerator pumps – no squirts in either carb. Inspecting the removed top assembly, I found that the wire needle retainer was preventing the needle from easily seating itself. So, I removed and re-set the float levels to ’65 setting (1-1/16” full up and 1-1/2” for full drop). I then dug out some new accelerator pump cups and a couple GUP pump assemblies from my stash. I found that the two assemblies both had pliant cups that worked perfectly in their associated bores, so one went on in place of the right top’s non-functioning one. After reinstalling that side, I pulled the left top assembly off made the same changes. Next, I needed to again clean all the filthy, fouled spark plugs (this is getting old). With everything installed and connected back up, jumping 12 volts to the purple wire contact got the engine running right away. No gushing gas and blips of the throttle were met with immediate rpm responses from the engine. I climbed in, belted up, and took her for a spin around the neighborhood. She ran better than she had in months – coincidentally the same number of months the racing carburetors had been on the engine.

Needless to say, I was quite happy as I backed her up to the garage opening. I got out my length of clear tubing, shot some water in, hooked both ends up to the appropriate vacuum ports, and balanced the carbs. With the air cleaner back on, I adjusted the idle fuel screws per the manual before setting the idle speed to 800 and shutting the engine lid convinced all woes with that car were now behind me. That euphoria lasted less than twenty-four hours ended by a single text from Mikhaila: “Glinda keeps stalling and the gas gauge went from full this morning to half full when I ran an errand.” CRAP! I thought I’d get to work on the house this evening, but NO!

Scarlett Brakes Won’t Bleed

During the last week Mikhaila and I have had a couple productive sessions in the garage. Scarlett now has all her new brake lines in place as well as her exhaust system completely hooked up. With the last brake line fitting tightened, she and I spent at least an hour and went through over a pint of brake fluid trying to get a solid pedal. With all the components of the system being new, there was a lot of air that had to be bled out. After running out of fluid, we were still getting air with each opening of a bleeder valve. Part way through the task, I got smart and adjusted the pedal rod making it longer so it would push the pistons in the new dual master cylinder deeper. This seemed to get more fluid pushed out with each stroke. I hope we’re right around the corner from an air-free system.

The muffler hanger arrived in the mail Saturday morning, so we bolted it to the engine. A new strap held the GUP muffler in place and a new 2” muffler clamp solidified the exhaust pipe to muffler joint. The engine is ready to start up other than the fact that 1) I took the carbs for Glinda, and 2) I put battery back in Ringo (see more below).

Mikhaila also took advantage of the seats being out and more thoroughly scrubbed the years of dirt from each of the front bucket seats. We also stripped the old rear window material from the three trim sticks in preparation of a new top getting installed (a ways off from happening).

Ringo Readies for Upcoming Sale


Yesterday, I pulled the tarp off Ringo with the intent of deciding what I would do to this car before I put it on the market. Instead, I jumped right into the fray by swapping back in the battery he’d so graciously loaned to Scarlett. A bit of gas poured into each carburetor and a few revolutions of the engine by the starter and the engine was running smoothly like he’d been on the road a week ago not a year ago. Next on the checklist was bodywork made necessary by the destructive right rear tire. I bent and pounded the sheetmetal behind the wheel into some semblance of its original shape. Grabbing the grinder fitted with the wire brush attachment, I attacked the mess along the front edge of the wheel-well as well as the inside of the wheel-well (is that too many wells?). I also brushed away the flaking paint and surface rust on straightened out section. Next, I pulled a jar of rusty metal primer and brushed over all the exposed steel.

I remembered that the last time I’d seen Ariel drive away in this car, one of the rear taillights wasn’t working. It took some cleaning and bulb replacement, but after a half-hour or so I had all essential lights operating properly.

With all this progress, I decided I’d move him out into the middle of the driveway so I could access the stuck driver’s door. I climbed behind the wheel, put my foot on the brake pedal, and it went all the way to the floor. I climbed back out, popped the trunklid, spun off the master cylinder cap, and stared down into an empty master cylinder reservoir. Hoping against all hope I filled the reservoir with fresh fluid and crossed my fingers. Maybe, I though, the seals will magically rejuvenate themselves after a good soaking with DOT 3.

This morning though, I went ahead and made the call to the Corvair Ranch and ordered a rebuild kit. I also asked Jeff to send me a Powerglide re-seal kit, two carburetor rebuild kits (so I rebuild the two EM carbs on the shelf to put on Scarlett’s engine), and a muffler strap for Glinda.

Thursday, June 11, 2015

The Fleet Will Lose a Member


Last evening Ariel and I had a short conversation regarding Ringo. While she isn’t emotionally ready to be rid of him, she shared that: 1) she had no desire to work on him, and 2) she couldn’t come up with a scenario where she would choose to drive him over her modern car. We agreed we both have many great Ringo memories, but we don’t need the car sitting in our driveway to keep those memories.

So, it is time for me to put a few hours into prepping him for sale. The to-do list needs to be kept short since my curtailed car-time is currently spread across the fleet plus my truck. Here’s the list as it stands today.
  • Replace the black GM deluxe seatbelts with GUPs from my stash since they belong to my LeMans
  • Get the driver’s door to open and reliably latch again
  • Put the battery back and make sure the engine starts and runs reliably
My hope is the door fix will be easily accomplished. The other two tasks will take no time at all. Then he’ll go up for sale via the usual places: Craigslist, CORSA website, VirtualVairs, CorvairCenter forum, and Facebook.

Monday, June 8, 2015

It’ll Buff Out

I’m headed into Turn 18 – the left-hander before the long, uphill straight. My brain has convinced my body that this time I could drive a little deeper and accelerate a little sooner. I waited a split second too long before coming off the gas, so I was at the turn-in cone before I’d suitably whoa’d the car. I cranked the wheel to the left, and the tires squealed in objection as I tried to get the front end close to the apex cone. Right then I felt the rear of the car start to slide out. I’d overcooked it. I spun the steering wheel to the right to try and catch the spin. The car went into the grass at about a thirty degree angle to the track. After taking out a two-foot high sign, I finally got the car pointed straight. Rather than going back on-track, I bounced through the lawn to the nearby pit entrance to get the car checked. As I passed a spectator, he yelled out, “Get that guy a new pair of shorts.” Such was my one and only four wheel foray into the agricultural side of this NECC high-speed driving event, but I’m getting ahead of myself.

To begin at the beginning, my wonderful weekend started with a Friday afternoon drive to Cobleskill, NY that, thanks to construction and idiot drivers, took over six-and-half hours. My ‘vair-buddy Jonathan with his trailered Corsa and I caravanned up there and we rolled into the hotel’s parking lot right around 6:30. Hoping to find a tech inspector to check out our cars, we soon found out that they’d gone inside to get ready for dinner. So we checked in, dumped our luggage in our room, and headed to the lobby where a dozen or so Corvair folks awaited the supper call. All of us then trooped past the pool, through the restaurant and bar, and into the attached bowling alley (it was the only space they had that could accommodate all of us for the meal). A lively time of good food, great beer and even better conversation ensued.

The next morning a six AM alarm and rain greeted us. Weather.com assured us the day would not be a washout and we’d be seeing zero percent precipitation by 9 AM. We made the forty-five minute drive to the track over bumpy New York backroads and parked in the paddock behind a guy backing his Maserati out of a trailer. We then got our cars inspected with both passing – although Jonathan’s required a replacement lightbulb to get both brake lights to come on. After sitting through the efficiently-run driver’s meeting where it was announced there’d be three hot laps, rather than two, I checked the lists posted on the wall and discovered I had been placed in Group B for the initial track session. That gave me time to mooch a couple donuts from Jonathan, grab my video camera, and stroll through the paddock to record all the participating vehicles.

Finally, the call went out for Group B drivers to get lined up. I climbed in to Glinda, put on my helmet, and buckled up. Glinda’s engine fired right up and we rolled through the paddock to take our place near the track entrance. At roughly twenty second intervals the cars were sent out onto the track for a couple low-speed yellow flag laps. Once the yellow flags were stowed by the corner workers, we could run at speed. This first session was for learning the track, not for pushing our cars hard, and the twenty minutes had flown by when the checkered flags started flying to get us off the track so the last group could go on.

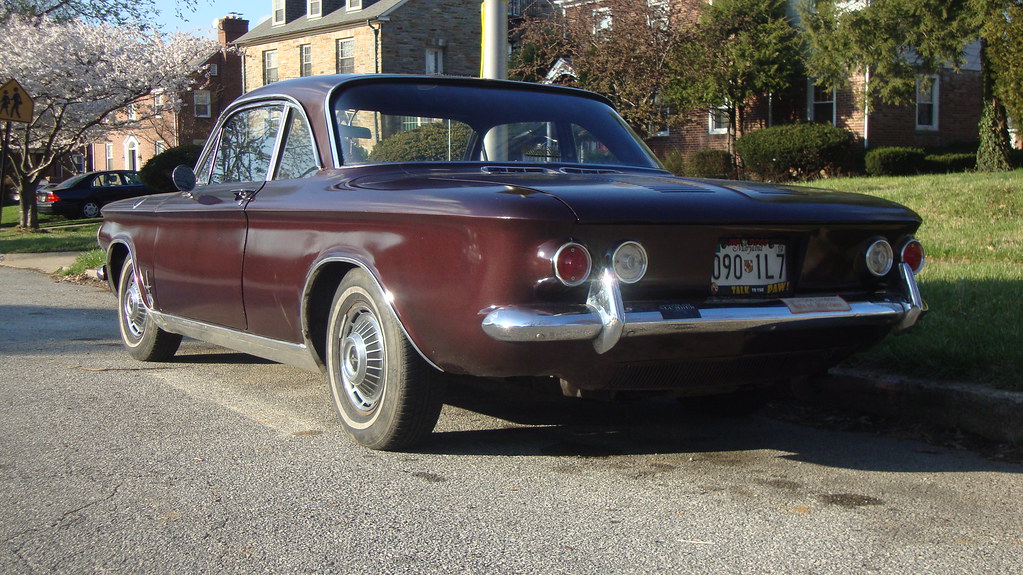
After Group C had their turn, it was open track for everyone, and I wasted no time getting back out. I have no idea how many 2.1 mile laps I put in before the lunchtime shutdown at noon. During my time on the track, I experienced something new - turning laps faster than other cars. This was happening even though the engine was still not pulling hard at high rpm. So, even though I couldn’t top 70 on the long straight, I was making up for that on the rest of the track. The way the circuit is setup – a very long, uphill front stretch followed by mostly downhill and level turns – masked the lack of power, and Glinda was handling exceptionally well – great grip getting me through the turns and brakes that would test the strength of my five-point harness. I guess my reign as the keeper of the STD (slow time of the day) has come to an end.

During the lunch hour, one of the track operators took us on an informative tour of the track. A bunch of the drivers piled into an open trailer and we were slowly towed around the circuit. At each turn, the guy thoroughly explained how we should be driving through that corner. He really tried to impress upon us that taking straight lines was far faster than swooping (making the turn longer by rounding it off). He liked the word “swooping” using it at least ten times, but it got my attention.

After lunch there was about an hour more free track time during which I tried hard to remember all the instructions I’d been given during the trailer ride and felt like I was really pushing the car. It was during this session the aforementioned agricultural adventure took place. Thankfully Glinda survived that folly undamaged.

We were flagged off the track around two so the timed laps could begin. I took a short break to let the tires and me cool down before getting in line for my turn. Even though I try to tell myself to just drive the timed laps like I’d driven the practice ones, there’s still a little more adrenaline flowing when I know I’m under the clock.

When it was my turn to be one of the two cars on track – my heart rate was up a bit as I took the warm-up lap. In third gear and trying to maximize my straightaway speed, I did my best to nail Turn 18 and then kept the pedal to the metal shifting into fourth as the tach showed 4000 rpm. Then, just past the one-hundred foot marker, I stomped on the brakes, shifted into third, let off the brake, and immediately steered left to negotiate Turn 1. At the apex cone, I was hard on the gas, aimed straight for the apex of Turn 2 and then making a beeline for the drift-out cone on the track’s right edge. I waited a little too long to nail the brakes prior to the first of the two Turn 3 apexes, so I drifted out a little too far adding precious time to my lap. Hard on the gas I carved past the second apex marker and drifted out to the left edge of the track. Turn 4 isn’t anything more than a slight kink, but Turn 5 is the first of two turns that are basically one sweeping hairpin. Aimed right at the turn-in cone, I got on the brakes and turned left. Once I hit the apex for 5, I floored it through 6 and up a slight hill shifting into fourth as I crested at the Turn 7 slight right hander. I was still WOT through Turn 8, but let off the gas as I neared the turn-in for Turn 9. Trying to keep to the right after passing 9’s apex, I shifted back into third, nailed the gas, and headed for the Turn 10 apex. For me, it took some fortitude, but I kept the hammer down through 11 and headed straight for 12’s turn-in cone. Hard on the brakes– almost to the point of lock-up - before going through the long, tight right-hander. Following instruction, just at 12’s apex I went WOT and turned the wheel from right to left to head straight for the apex of 13. After which I was again hard on the brakes to negotiate 14 which, for me, felt like the slowest corner on the track. Coasting through a slight right-hander I then floored it as I passed the apex of Turn 15, drifting dangerously close to the gravel as I began my favorite section of the track. If I could come out of 15 correctly, the beginning of 16’s ess-turn could almost be taken straight and the left-hander that completes the turn has just enough camber for carving hard through it. 17 is just a flick to the right, but 18 needed my full attention to have the most momentum to battle the runway-length main stretch.

As I mentioned, Turn 3 stole time from lap number one, and it was Turn 12 that bit me on the second lap. I pushed too hard and couldn’t make the apex which ruined my entrance into 13. At that point I was grateful for that additional hot lap which I ended up running mistake-free. I did, however, ease through that last turn not wanting to ruin the otherwise good lap.

As I’d expected, my lowest time came on my last hot lap – 2:03.85. While that wasn’t good enough to beat the other car in my class – the ALWAYS fast Brett Aston – it did put me right in the middle of the eighteen timed drivers. , I even came out ahead of some more powerful cars [some 140 HP Corvairs and some higher-rated water-pumpers (non-Corvairs)].

After everyone had their chances to race against the clock, it was open track again, and I took full advantage of it. I must’ve done at least another dozen laps when a basically empty gas tank forced me to head for the paddock. I’m sure the huge smile was still on my face as I was hooking Glinda back up to the truck.

Dinner at a local Italian restaurant and the nightcap in hotel’s bar were made better by great conversation. I’m trying to figure out if there’s any way I can make it to the next event – New Jersey Motorsports Park – in August. The issue is the Monday it’ll be run is my second day of vacation with the family. Just not looking good.

Thankfully, the drive home Sunday morning was basically traffic-free and uneventful for both Jonathan and I – a good way to end a great weekend.

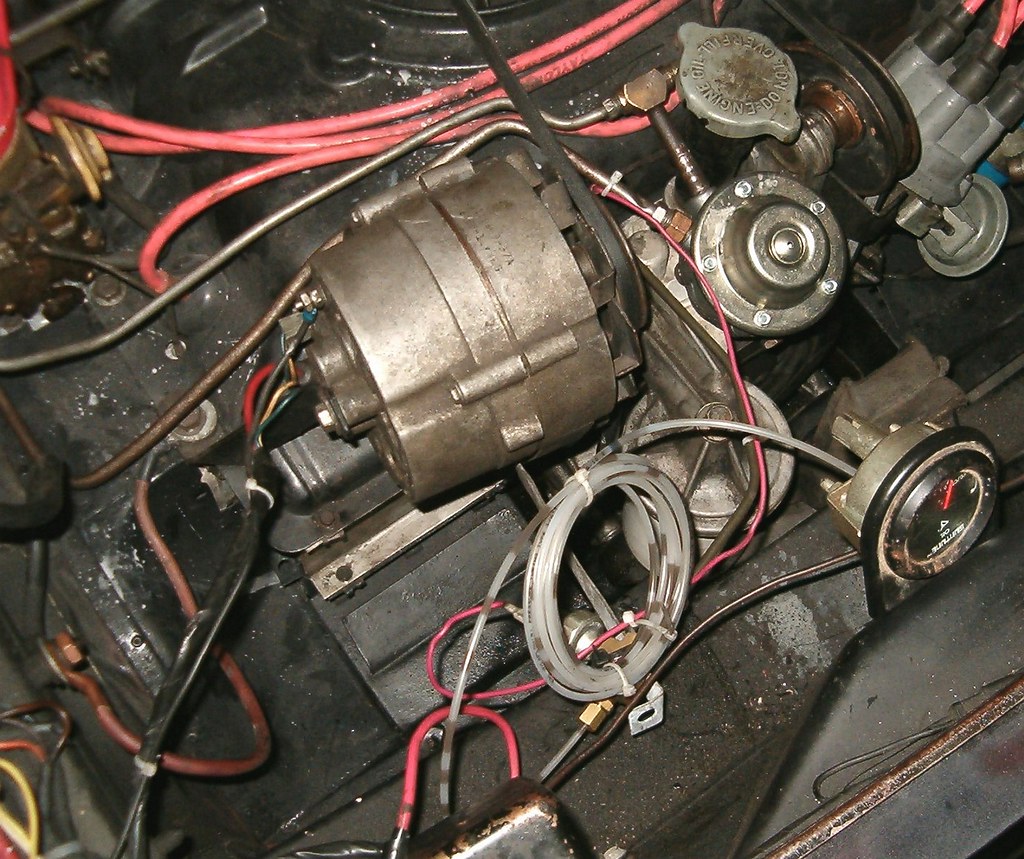
By the way, the title of this missive – It’ll Buff Out – came about when the lovely Loriann saw the scuffs on Glinda’s right side - incurred when I’d taken out the off-track sign. Oh yeah, one other thing. The tools never came out of the bag the entire weekend - TYL.

Friday, June 5, 2015

Hit the Road Jack

I awoke today to a misty morning. Regardless, I wanted to do all I could to bring a decently performing Corvair to tomorrow’s track event, so I backed Glinda up to the open garage door and pulled all six spark plugs from the engine. They were all black with soot. I’m going to attribute this condition to the forty or so miles I drove before swapping out the Ignitor II. I cleaned all the plugs and checked gaps before reinstalling. I’m still hoping I don't need to swap carbs and plugs Saturday at the track.

With the drizzle dampening only my grungies, I continued to gather and pack tools, parts, and supplies as I crossed off items on my checklist. The truck-bed's contents now includes three nearly full five gallon jugs of 93 octane, two spare tires (borrowed from Luna), a bulging bag of tools, a couple milk crates filled with assorted parts and fluids, jack and jackstands, and a couple large pieces of cardboard. Most of these items I pray will stay in the bed for the entire weekend.

I attached Glinda to the tow-bar and the tow-bar to the truck’s hitch before pulling out onto the road. Thanks to the text from the lovely Loriann I forgot the sunscreen I’d put on the dining room table. I pray that’s all I’ve forgot.

Thursday, June 4, 2015

A Success Of Sorts

While I was driving Glinda home from work yesterday, I noticed the tachometer needle would jump up while accelerating (even slight acceleration). The needle jumps up a few hundred rpm and then quickly falls back. It happened quite frequently and it appeared to have a slight miss when it did it. Soon after arriving home, I grabbed my tablet and posted my problem on Virtual Vairs. Within minutes, I received a reply from Mark Durham positing a faulty points plate. As soon as dinner was over, I donned grungies and headed out to the driveway where Glinda awaited.

Diving into the distributor, I pulled the plate and confirmed it was unmodified – no provisions to improve grounding. Ringo gave up his points plate – one that a ‘vair vendor had modified with a wire brush around the pivot to improve grounding. Before installing the replacement plate I cleaned the points with a quick swipe of fine sandpaper. Once the plate was in place, I adjusted the dwell to 32 degrees, put the rest of the distributor together, and set the timing to 16 degrees BTDC.

The subsequent test drive showed smooth action by the tach needle – success. There was still some hesitation under WOT at higher rpms in third gear. It wasn’t until this morning’s commute that I could check out the performance in fourth gear. There's still hesitation in fourth gear preventing me from getting much above four grand in the short bursts available to me.

Also somewhat disconcerting is the steady drop of the fuel gauge needle. Granted I’m doing a lot of WOT runs, but I’m still thinking the engine’s running rich. While I’ll be taking a pair of carburetors with me to New York, it’s doubtful I’ll do the swap until after the weekend.

Wednesday, June 3, 2015

Better, But Not Great

Going against the best evidence (crappy gas mileage, sooty spark plugs), I decided I’d focus on ignition (Ignitor II) over the fuel (rich carburetors).

Last night I backed Glinda up to the open garage door with the intention of reverting back to stock points to see if the poor performance can be remedied. After removing the distributor cap, rotor, and dust cover, I took out the two screws holding the Ignitor II in place, and zip-tied it out of the way. The stock points plate took its place and the rest of the distributor assembly was buttoned up. I borrowed the new-looking coil from Scarlett and zip-tied it to the engine for temporary testing purposes. With the leads in place, I fired up the engine and checked the timing. Since it was close to twelve degrees BTDC, I called it good enough for my purposes.

The subsequent test drive indicated the engine would pull in first and second gears without hesitation. Problem solved. Back to the driveway.

I removed and stored the Ignitor II and Flame-thrower coil and bolted the stock coil into place. After re-hooking up the wiring, I shut the engine lid and went inside for dinner.

This morning, once on the highway, I did a few WOT runs in 4th. Sadly, all was not well. As the rpms went up, the tach needle started occasionally bouncing around and the engine didn't seem to be pulling as hard. I was, however, able to get up to around 4000 rpm, but not much more. I still need to check the plugs (sooty or not) and tweak the timing, but I'm disappointed. I'll be taking different carburetors with me to the track. I don't want to swap carbs while at the track, but I'll try anything now.

Monday, June 1, 2015

A Fork In The Road

Saturday morning I was out in the driveway early attacking Glinda’s carburetors. I pulled the right one off the engine first. A hex wrench twisted out the plug giving me access to remove the jet. Once out, I could read the “52” stamped on the head. I’d thought I’d see a “53”. Knowing I needed to make a significant change, I screwed in a #50 jet, reinstalled the plug with some pipe sealant, and placed the carb base back on then engine. The same operations were performed on the other carb before pouring some gas into both bases. The the lids in place and the linkage all connected, I turned the key and the engine started right up and settled into a 600 rpm loping idle. Throttle response seemed acceptable with each blip of the throttle, so I left the engine running while I lowered the front end off the jackstands. Unusually, the driveway was clear, so I rolled Glinda off the ramps and out onto the street for a quick spin around the neighborhood. Sadly, the wide-open-throttle performance is still lacking – won’t pull strongly above 3500 rpm. I’ve driven the car a few times since (about 40 miles) and the gas gauge needle is already indicating I’ve burned about 4 gallons. Easy to do the math to see that estimated ten miles per gallon isn’t acceptable.

What to do now? I could still try to go against my belief that the carburetors are to blame and focus on the ignition. That would mean swapping out the used Ignitor II and new Flamethrower coil for the stock points and an old coil – roughly an hour of my time. Or I could go with all the evidence and replace the modified carbs with either Ringo’s proven ones or Scarlett’s recently rebuilt ones – again about an hour of work. Neither of the replacement sets of carbs have had the jets relocated. If the swap cures the mileage and WOT issues, I’ll still be faced with fuel cutout after high speed turns – and there are seven of them at the track I’m heading to in a few days. With rain in the forecast for this evening, I’ve got another day to make the decision.

Friday, May 29, 2015

What A Ride


It was just a few days ago I was on a high since I’d just learned about the Power Enrichment Needle and was convinced the lack thereof in Glinda’s carburetors was causing the super-rich running of the engine. Yesterday the mailman delivered an envelope from the Corvair Ranch containing two needles. As soon as I was home from work, I excitedly donned some grungies and raced out to the driveway. A few minutes later I was utterly deflated.

I’d removed the two screws and pulled off the venture cluster from the right carb only to discover the hole where I was to place an all-important needle was filled with JB Weld (see image above). A subsequent e-mail to carburetor guru informed me that: 1) filling that port is necessary to allow moving the jet, and 2) the needle only makes a difference at wide-open-throttle.

Oh well, it was fun while it lasted.

In digging around my stash of carb parts last weekend, I found a small envelope containing five carb jets. All are stamped with 51, so I’ll be swapping the 53s that are currently in Glinda for these smaller ones. I’ll also make sure the floats are set at the highest settings resulting in the lowest level of fuel in the bowls. A quick test drive and a subsequent inspection of a spark plug will tell me if I’m still running rich. If that doesn’t make any difference, the modified carbs will come off and Ringo’s pair will be installed, but I hope it doesn’t come to that.

I ended the evening by pulling out Glinda’s front bench seat and stock seatbelts and bolting in the racing seat and harness. Other than the carb issue, she’s ready to hit the track.

Tuesday, May 26, 2015

A Eureka Moment


Thanks to a Facebook contributor, it appears I now have the solution to Glinda’s poor running and horrible gas mileage.

A little background. Back when I sent the original '68 carburetors down to a carb guru to have the jets relocated for racing, he discovered that he could not modify them because of all the smog changes GM made. He, instead, traded me some '66 carb bases with the modifications. He sent them back to me without any of the interior parts since that was the way he’d received the ‘68s. I rebuilt the bases using the ’68 parts.

Sadly for me, there’s an important difference between the '65-’67 and the ’68s I’d disassembled. GM put a small needle valve in bottom of the carb base that I did not know about (not in earlier or later carbs). Without this valve, fuel runs too freely into the well that feeds the venture, thus the 14 MPG. Running way too rich had fouled the plugs with soot, explaining why, with the near-flooding, performance was so poor. A phone call to Jeff at the Corvair Ranch, and a couple GUP needles are on their way to me.

Prior to this discovery, I’d thought there had to be a leak in one of the fuel lines – probably the pressurized return line. That belief prompted me to put Glinda up in the air so I could remove the tunnel covers and inspect everything from the bottom-side. Everything was dry even with the engine running. While I was lying on the ground revving the engine, I could easily see the black smoke associated with an engine running rich. That’s what provoked me to take a video (click her to see, but turn down the volume), post it to Facebook, and seek the help of the Corvair community.

I also pulled the spark plugs and cleaned all the soot from them. Finally, I re-set the floats to ’66 carburetor spec values for level and drop. Once the needles are installed and the carbs are bolted back together, this engine should run like a top.

Another task I was able to get to yesterday were creating two extended J-bolts to retain the raised air cleaner. As shown below, I’ve been using zip-ties since adding the PVC spacers. Not anymore. The welder permanently joined two nuts so the stock J-bolt screws into one end and a 3 inch long piece of threaded rod goes into the other end. A nice benefit to this new setup is the J-bolt is now captured. I’ve lost at least one of the stock J-bolts after removing the air cleaner and placing it on the ground. Once loosened, the extended nut on one side and wing-nut on the other will keep the J-bolt permanently part of the air cleaner.

After cleaning the garage, I then took a few minutes to get out the buffer and see if anything could be done with Glinda’s oxidized paint. I tackled the passenger side of the hood figuring I had nothing to lose. After a few minutes of buffing, the pad had a green tint to it as it should. I then got out the Turtle Wax and applied it per the directions. The one side of the hood looks nicer, but there’s no way I’d say it’s shiny.

Monday, May 11, 2015

The Jury’s Out

Only had a couple hours during this last, very busy weekend to work on cars. Saturday morning I got Mikhaila out to the garage for some Scarlett-time before she had to go to work. We wanted to verify that Scarlett’s distributor and coil would play together and make sparks. First, we borrowed Ringo’s battery, hooked it up, and spun the engine to get the timing mark lined up with the 8 degree BTDC mark. We then checked to see if the distributor’s rotor was pointing to the #1 plug post. It wasn’t so we pulled the distributor out, twisted its shaft a few degrees, and then twisted the oil pump shaft the same amount, and poked the distributor back in place. After installing the new spark plug cables, Mikhaila hooked up the timing light. With the key on, I spun the distributor while she held the light’s trigger closed and watched for a light – nothing. At that point she had to leave, but I wasn’t ready to quit. I got out the feeler gauges and set the point gap to .016 inch. I twisted the distributor with the cap off and could see sparks each the points opened. When I was happy with the location of the distributor, I tightened the hold-clamp nut and turned off the key.

With a little time left before having to get ready for date night with the lovely Loriann, I grabbed tools and headed to the curb where Glinda was waiting to have the floats in her carbs adjusted. The last fill up showed she was only getting a little over 14 mpg, and that would not do for a daily-driver that demands high-octane. I pulled the cover off each cover and re-set each float to be parallel at needle closed position (about 1 1/4” measures) and 1 3/4” at full drop. With everything back together I took her for a spin around the neighborhood – still a nice throttle response. Hopefully, this will get her mileage back into the high-teens. I drove the truck this morning, but plan on putting the miles on Glinda during the rest of the week.

Friday, May 8, 2015

Glinda Update

I’ve been driving Glinda nearly every day this week. The clutch clunking is an on again off again thing. Some mornings it’s there with the first press of the pedal. Other times it only appears once the engine’s hot. It only seems to be there upon pulling away. I can’t feel it on the 1-2, 2-3, etc. shifts. Odd. Like I told the lovely Loriann, “I’m driving it until something breaks.” I had a friend recommend I buy a cheap boroscope from my favorite toy store (Harbor Freight) and watch the throwout bearing/pressure plate. I may do that if it gets worse.

While I can live with clutch clunking, I can’t afford to live with 12 miles to the gallon. That’s what I estimate she’s currently getting. I’m not driving pedal to the metal either. Just a few blasts through the gears to makes sure the stumbling is still gone, but, other than that, it’s relatively sedate driving. By the end of this weekend I will have increased each carb’s float height at least an 1/8th of an inch from where it’s at. This to make the carbs run leaner. I wanted to also replace the #53 jets with #50s, but a smarter person (the lovely Loriann) recommended I just do one change at a time and do the easier one first.

Other than that, the car seems to be behaving.

Monday, May 4, 2015

These are the Times that Try My Soul

Going backwards is not fun, but that’s what’s been happening. When last I blogged, Glinda was nearing roadworthiness, and by the end of Friday night I’d hooked up the rest of the underside linkages and hoses, and drove her down off the ramps. After a spin around the neighborhood, I was confident I’d fixed the two major issues of clunking/catching clutch and stumbling engine. I even went ahead and put the electronic ignition stuff back in before calling it a night.

Saturday morning Mikhaila and I spent a frustrating couple of hours testing, removing, rebuilding, and reinstalling Scarlett’s blinker switch assembly. While we were successful in our endeavor, it was a shame we spent all her garage time on one small task. Next on the list is bolting on the exhaust and starting up the engine. Maybe we’ll make that momentous milestone some evening this week rather than wait until the weekend.

After she went in the house, I crossed another item off the to-do list when I undid the oil gauge line at the back of the gauge, pushed the tiny ferrule back up the nylon tubing, cut off a half-inch from the end, and reattached the fitting to the gauge. After firing up and revving the engine, I was satisfied that I had a drip-less connection, so I cleaned the oil spot from front carpet. I then removed the non-functioning backup lights (the switch on the transmission was never hooked up), and replaced them with factory blank plates. These were only offered on ’65 Model 500s, but I somehow ended up with them.


One sad thing happened when I went to turn the car on that afternoon – the spring in the ignition switch broke. I now need to manually turn the key from the Start to the On position once the engine is running. Not a big deal, but it’s just one more thing that needs to be dealt with. Irr #1.

Sunday morning I had a very enjoyable windows-down drive to and from church, winding out Glinda’s 110 at each shift and loving the sound and performance. I could hear a slight exhaust leak, so, after changing into grungies, I backed her up onto the ramps again. With the engine still running, I slid under the engine and began tightening nuts on the exhaust pipe flanges. Just about the time I got rid of the leaks, the engine’s rpm increased and then, almost immediately, stopped. I got out and cranked the engine only to now discover the fuel pump wasn’t getting gas to the carbs. Irrr #2. I pushed the car off the ramps and primed the carbs directly with gas out of a can – no luck, still no gas being moved by the pump. A quick R&R with a GUP off the shelf and the engine was running again.

Irr #3 (and it’s a big one) occurred yesterday evening when I was driving the car home from a church event. The clunk/catch came back. When I got home, I told the lovely Loriann that I’m through. The level of frustration I felt after all those hours on working the drivetrain ended up being for naught was too much. I am NOT going through it again. I’ve decided I will drive the car as-is and if something breaks, at least I’ll then know what was causing the problem. If nothing breaks, I’ll learn to live with the clunk/catch. Oh yeah, here's a photo of the relocated oil pressure gauge setup.

Friday, May 1, 2015

Ticking Off The Little Things

Last night, as the rain stopped, I headed out to the driveway with plans to do some carburetor cleaning, but it turned into so much more.


After removing the air cleaner, I started with the right-side carb. The first issue I discovered was a missing clip on one of the linkages. Not sure how that happened – I suppose I could’ve left it off. I searched the surrounding area for the part, but came up empty. With all the linkages undone and fuel and vacuum lines removed, I undid the remaining screws and pulled off the carb top. Once the two screws holding the cluster in place were twisted out, I popped off the cluster and blew out all the passages with shop air. Just as I was about to return the cluster to its home, I noticed the shiny gray of the little main well insert (circled in red in the above drawing) was not visible through the hole in the gasket. I carefully pried back the gasket and, sure enough, no main well insert. Out of all the carburetors I’ve rebuilt I shouldn’t be forgetting parts. Wondering if I’d missed this part on the left carb, I immediately turned my attention to the left carb. With the cluster off, I found that at least I was consistent in my screw-up – no emulsion tube. Fortunately, my container of carb parts yielded two of the needed parts, so both clusters were reinstalled with all their parts intact this time.

Since one of the possible causes of high-rpm stumbling is a lack of fuel, I checked the float levels, both dropped and seated. Neither were to spec (1-1/16 seated and 1-15/16 dropped per the rebuild kit instructions), so I did a little bending of tangs until I achieved the desired measurements for both tops. I also noticed that one of the accelerator pumps was installed backwards (entering the inboard side of the actuator plate). While I’m not sure it really matters, I made it match the manual.


A few long minutes later the carburetors were all back together and the linkages and lines hooked up.


With time still left before bedtime, I moved on tackling another niggling issue – the placement of the oil pressure sender. When I’d made this modification a while back using the setup I’d created to check Ringo’s oil pressure (see above photo), I didn’t think it all the way through (shocking). The first time Glinda’s engine had a fan belt failure I was discovered it was necessary to undo the oil line from the T to slip the new belt into position - what a hassle. Since I’d already removed the whole thing from the engine prior to dropping the drivetrain, I straightened the brake line and put a new ninety degree turn in higher up. I screwed it back into the port on top of the oil filter housing (the place where GM had the original sender located) and put a few more bends in to route the line under the fanbelt and in front of the alternator (I know a picture’s worth a thousand words, so I’ll take one this weekend and post it). A few zip-ties later, and that project was complete.

Since I was on a roll, I continued working and re-mated all the electrical connections I’d disconnected prior to dropping the drivetrain. That included the wires to the alternator and the one going to the coil.

At that point it was nearing my bedtime, so I put away the tools, locked up the garage, and headed into the house.

With the upcoming NECC track day at New York’s Safety Track coming up in early June, I’ve added some items to the To-Do List that need to be completed before the car’s track-worthy. Take a look and wish me luck.

Thursday, April 30, 2015

Teardown Goes Faster

Putting anything complex back together is almost always a far harder adventure than taking it apart. That adage was again proven Tuesday evening, as I spent a couple hours in driveway putting Glinda’s drivetrain back together and back in place. I got the clutch fork properly placed and pulled the engine back against the differential - the bolts that hold the two drivetrain pieces together are tricky to start. I raised the rear of the engine up to meet the two studs extending down from the engine mount and finished that connection with the dual-washer and two locking nuts. With the jack out of the way, I slid under the car to tighten the two nuts of the front mounts. Then I carefully put the clutch linkages all back in place and finished the evening with test pushes of the clutch pedal – all felt smooth.

Tuesday, April 28, 2015

Enough of This Crap

Yesterday afternoon I had a doctor’s appointment which resulted in my getting home much earlier than normal. I took advantage of the extra hours by tackling Glinda’s clutch clunking issue. After donning grungies, I put her rear up on jackstands, pulled the rear wheels, and spent about fifteen minutes working in the engine compartment disconnecting electrical plugs, undoing the oil pressure sender, ground strap, and the accelerator linkage. I threw some cardboard under the car and crawled under to unlink the clutch, shifter, and throttle rod and loosen the two transmission mount nuts. I was careful to not disturb the orientation of the shift tube mounting rod in its bracket to prevent having to realign the shift tube again. The engine jack went under the engine next, jacked up and supporting the drivetrain. Removing the engine mount cover plate gave me access to twist off the two nuts holding the mount to the body. The engine came down slowly as I watched closely for anything hanging up. As soon as I could reach the top bell-housing bolts, I stopped pressing the jack’s down pedal. Off came the starter, followed by the remaining bolts holding bell-housing to differential. Finally, I could roll the engine rearward exposing the throwout bearing and clutch fork. Sure enough, the fork was not properly placed over the ball stud. One of the two retaining clips was bent between the cup and the ball instead of behind the ball. Once I got the clip bent back and the fork properly placed, I pushed the engine back into engagement with the trans-axle. While I was pushing, the lovely Loriann informed me my play time was over, so the reassembly will have to wait.

Tuesday, April 21, 2015

A Weekend of Work, But all Lights are Still Mighty Small

Those would be the lights at the end of the tunnels called Glinda and Scarlett.

Friday evening I backed Glinda up onto ramps and slid underneath to try and figure out what was causing the clicking linkage clicking. I disconnected the cable from the pivot arm being careful to keep tension on the cable so its other end didn’t come off the pedal arm inside the car (a zip-tie did the job). Next I removed the small cover that closes off the clutch volume inside the bellhousing. That gave me access to jiggle and push the clutch fork around. Lo and behold, I got a clip-related click when I pushed the fork inboard. Problem solved? Only putting everything back together and taking the car out on a test drive would verify. That’s what I did, and before I could complete my couple miles and stop-and-go, the clunk had returned. By the time the car was back on the ramps, the whole area under the car was too hot to handle, so I gave up for the night.

The other sad outcome of the test drive was the unsolved rough running. I’d thought (hoped) the problem had been a failed Pertronix electronic ignition, so I was confident (mis-guided) that putting the stock points plate back in would result in a free-revving 110. Pedal to the metal in first and second gear and the tach needle would never go above four thousand. It’s so sad (there’s that word again) that I can’t get the work on this car going in the right direction. Mikhaila and I spent a solid six hours in the garage last weekend trying to make some headway with her car. What did we have to show for it? Three crusty brake lines lying on the floor and a better understanding of Scarlett’s electrical issues.


As to the first, Saturday was brake day. I had high hopes we’d get the final brake pieces installed and the system bled of air. After bending and screwing in the last piece of brake line, I went around and made sure all bleed valves were tight. Sadly, when I got to the right front (with the new wheel cylinder), I found I could not get a wrench on the valve. It looks like I mistakenly used a LM cylinder. Irr. We dug Scarlett’s original cylinder out of the box of brake parts, punched out the old guts, cleaned it in the parts washer, honed the inside, blew it clean, and stuffed it with a GUP rebuild kit. The newly rebuilt cylinder then replaced the incorrect and we were good-to-go. We topped off the master cylinder and began the dance of Press-Press-Hold. She would press the brake pedal twice and hold it on the third pump while I cracked open the bleed valve to let out the air. After a few minutes of this, I looked under the car and saw significant amounts of brake fluid dripping onto the cardboard. Irr (there’s that word again). We both grabbed paper towels and wiped up the mess. We then removed the front underside tunnel covers and confirmed the back-to-front brake line was rotted through in a couple spots. The rear tunnel cover came off next followed by the humped cover under the dash. That gave us access to remove the entire line. As I lay under the rear of the car looking at the crusty left and right rear lines, it was easy to make the call and remove them too. I’ll get the replacement lines from Napa sometime this week for installation next Sunday.

The next day, we hooked up a 12 volt supply to the ends of the battery cables and began a thorough check out of Scarlett’s electrical systems. The connectors for the right rear taillight showed 12V with the headlight switch pulled, but the left side was dead. We moved to the front and found both headlight plugs were powerless. A quick check showed we’d never returned the dimmer switch after painting the floor. With one pulled from GUP stock, cleaned up, checked, and plugged in, we had 12V at both contacts of both plugs. Yay! We then plugged the connectors to send the juice to the headlights, pulled the switch, but were rewarded with all four beams staying dark. Dead bulbs – no problem. Sadly (there’s that word again), though a continuity check showed all bulbs were still fine. We spent the next hour or so swapping switches and cleaning contacts until we finally got all the bulbs to burn brightly. TYL. We moved on to the blinkers, and, the left side checked out as did the front right side, but there was no electricity making it back to the right rear plug. I’m thinking the issue is in the blinker switch assembly – a little cleaning and adjusting is called for. Finally, I had Mikhaila connect the two brake light wires (the ones that plug into the brake light switch), so we could check out that circuit. Result – right works, left doesn’t. Again, the blinker switch is probably the culprit.

Friday, April 17, 2015

Are My Corvair Days Numbered?

A few recent occurrences in my life have me pondering my current car path. Of the cars in the fleet, none are roadworthy and it will take, I believe, significant efforts to make each of them fit for driving again.

Glinda is the closest, and she’s a drivetrain dropping project away from having her clutch fork engagement corrected. Added to that, every time it rains, her carpet gets wet; the needle on her voltmeter shows a charging voltage that’s too high; her dash still has an automatic transmission shifter sticking out it; and her trunk’s leading edge is a minefield of rust bubbles just waiting to explode. Many, many hours ahead of me to deal with those top of the to-do list items.

Scarlett is many Saturday mornings and Sunday afternoons away from complete roadification – not to mention the challenge it’s going to be to come up with the estimated $1600 of parts that are left to buy. That all assumes the engine is good-to-go – not a surety by any stretch.

Luna has sat untouched since Victoria and I installed her new top eight months ago. Her engine hasn’t run in over a year, and she hasn’t been on the road in nearly two. I blogged back in February of 2014 that she and I agreed to regularly spend time working on her car. Obviously, that hasn’t happened. I wish I could count on one hand the tasks ahead of us to get her car where she’d like it, but it’ll take three hands at least.

Finally, there’s Ringo. When Ariel and I had to pull him from the road, he had a myriad of issue including a ripped out right rear wheelwell with associated body damage, a driver’s door that wouldn’t open, and a driver’s seat that wasn’t fully bolted to the floor. While I have all the parts and supplies to do the work, what I don’t have are the space and hours to make the repairs. Once Scarlett is on the road, Ringo will go in next I suppose.

So, what were the occurrences that caused this trip down Frustration Lane? First, a recent visit with my parents reinforced how important it is to make the most of every moment since we never know when we’ll lose the ability to do the things we love. It’s been a few years now since my mom and dad had to stop traveling due to my mom’s advancing dementia. Now she’s in assisted living and his days are spent as her caregiver. You never know what God’s plans are. Second, the budding trees and warmer weather means winter’s over and our yard needs attention. Finally, there are the never-ending house projects that suck a significant portion of my weekends.

So, what’s a whiner supposed to do? One option is to sell all four of them. The uproar that would cause would be immense, but the girls would forgive me eventually. Fortunately, the lovely Loriann recommended something a little less drastic. I give the daughters responsible for Ringo and Luna a couple ultimatums. They shall find time in their busy schedules to spend at least eight hours working on their cars before June 15, and then enough time to get their cars on the road before September 15. If they fail on either of these, I will sell their car for them.

That addresses two of the four. What about Scarlett and Glinda? Mikhaila and I WILL spend sufficient hours in the garage to get her car on the road by early June so she can enjoy a summer of top-down motoring. I WILL spend an evening a week working on my car knocking out her issues and making her a reliable, racy daily-driver.


One other fleet-related happening is tomorrow’s expected purchase of a second racing seat for Glinda. My occasional Craigslist searches finally turned up a reasonably priced, used seat that looks enough like my existing seat to not induce disgust every time I climb in. It needs cleaning and some coats of black spray fabric dye before being bolted in. Two bucket seats means I now get to find a storage place for Glinda’s original bench.

Monday, April 6, 2015

It Was Glinda Time Yesterday

Yesterday afternoon, while Ariel and Victoria were cooking a delicious Easter dinner, I was out in the driveway working on Glinda.

Before diving into discussing the work accomplished over the weekend, I need to share a couple events in Glinda’s life. I thought I’d already blogged about them, but a quick search proved a complete lack of documentation. First is an air cleaner modification. Back in the days of Lucy, I’d bought PVC couplers that were supposed to fit between the air cleaners and the carburetors to increase the straightaway the incoming air travelled before entering the carb. That modification lasted about a week when I found the air cleaners sitting askew atop the carbs. I reverted back to stock and squirreled away the PVC pieces. With some time to kill a few weekends back, I installed extensions between each of Glinda’s two carburetors and the associated end of the air cleaner cross-tube. In order to accommodate the increased height of the air-filter housing, I needed to increase the length of the stud that retains the cover. To do this, I ran two of the correct-sized nuts together onto a piece of all-thread and welded two nuts together. After letting the fabrication cool, I unscrewed it from the all-thread and installed it part-way onto the existing stud. Into the open end of the welded nuts, I then screwed in a 4” long piece of all-thread and snugged it against the end of the stud to lock it in place. It was the perfect length for the top wing-nut to hold the air cleaner cover in place. Zip-ties held the ends of the crossover tube to the carburetors.

The other undocumented work was the voltage regulator I’d mentioned in my last post. Well, it arrived from Amazon, and, once installed, actually increased the voltage reading rather than reducing it. It went back to Amazon, and I’ve chastised myself (again) for not supporting a Corvair parts’ vendor. The old regulator is back in place and borrowing Luna’s for another test is on the to-do list.

Now back to yesterday’s activities – which were focused on Glinda.

First issue to address was her clunking clutch. After backing her up onto the ramps, I tried all the linkage adjustments I could from one extreme to the other. Sadly, it was all for naught. Here’s a video of the issue as it now stands: https://www.youtube.com/edit?video_id=xOwfakkv-8o. I posted my problem on VirtualVairs and the first few responses I got all point to the clutch fork incorrectly installed. One responder’s sharp eye spotted a slight sideways movement of the rod that pushes the fork right as the clunk occurs. That, to me, is an excellent clue the fork’s got an installation issue. This wouldn’t surprise me since, at one point in my working on this car, I accidentally popped the fork off the pivot ball. I’d thought, at the time, that I’d properly popped it back into place, but that sounds doubtful now. Sadly, I don’t think it’s possible to access the fork’s attachment point through the small hole in the bell-housing. I think, however, I can drop the drivetrain enough to slide the engine rearward to access the clutch area. My hope and prayer is that I do NOT need to disconnect axles and control arms. There’s rain in the forecast and taxes to be done, so this project, however involved it gets, will have to wait a week.

The second issue I addressed was the stumbling performance under heavy acceleration. In keeping with my bad luck with Pertronix, I swapped out the Ignitor II for Glinda’s original points’ plate and made the necessary dwell and timing adjustments. The whole clutch thing will keep me from finding out if I’ve solved the problem until that’s resolved.

The third issue I fixed was the sticking throttle. I'd installed one of the new engine carburetor linkage pieces too close to it's neighbor and they were binding at wide-open-throttle. I moved the part slightly and the binding is history.

The final thing I did was finally install the last throttle linkage pivot subassembly. This was a piece I got a while ago, but was unable to use as-is since I couldn’t use the later transmission. The maker of this fine product, Roger Parent, sent me an adapter bracket that accommodates bolting his pivot onto the early transmission, so that’s just what I did. It looks and works wonderfully - nice and smooth actuation.