My new motto since it was borne out so well last evening. Having convinced myself Heidi’s engine issue was another leaky carb float, I tore down a carb I knew had a good float, packed the requisite tools into the toolbag, and drug my trouble light and looonnnnngggg extension cord out to the curb. I was going to just pull the top off the newly replaced carburetor and swap the float out, but a little voice said, “test to see if it’s really flooding.” I had the keys, so I turned on the engine and wouldn’t you know it? The engine fired, but while it still ran, barely, the carburetor didn’t overflow. Once I knew it wasn’t a float issue, I started looking and listening more closely. It didn’t take long to discover that I’d stupidly left off the vacuum hoses after I’d balanced the carbs the other day. Once reconnected the engine’s idle smoothed right out and a test drive showed she was running like new again.
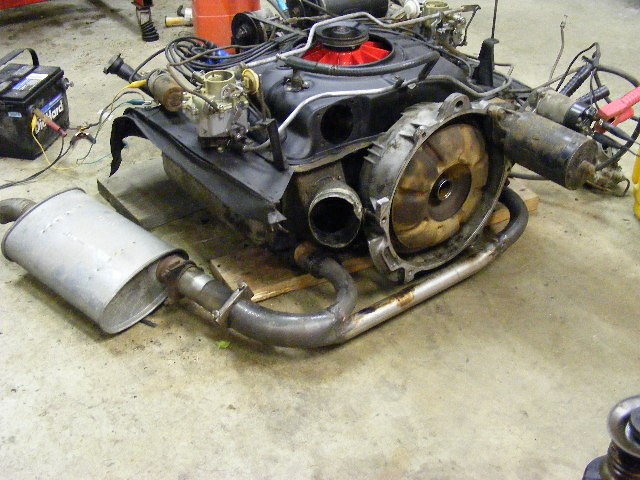
With that resolved, I moved on to Lucy who was now back in the garage. First order of business was changing the oil and filter. Once I’d refilled the crankcase with 10W30 Shell Rotella, I started her up and checked for leaks. While the engine was still running I went looking for the exhaust leak that was so aurally noticeable. I found it at the muffler’s input joint. Off went the engine, and up on a jackstand went Lucy’s right rear. As I pulled the right rear wheel to optimize access, I spied a nail embedded in the tire tread. I fixed that issue by putting in a plug and topping off the air pressure. With the wheel out of the way, I could more closely inspect the leaking area of the exhaust. I found the top of the exhaust pipe had a crack in it. Off to the shelves for a GUP. I found a suitable replacement, but it was currently still attached to a cherry bomb glasspack. I was able to remove the two tubing clamps, but I’m afraid I’ll need to cut off the muffler. It was about time to go inside, so I made sure Lucy was still drivable by wiring up the end of the muffler where the crack is just in case it decides to break clean through.

Tuesday, January 31, 2012
Monday, January 30, 2012
A Sad Lack of Fruit
Many times my spouse, the lovely Loriann, isn’t completely up to date on all my automotive accomplishments. She ends up discovering how I spent my endless hours in the garage via this blog. This morning I warned her to not read today’s post due because it would only frustrate her. She’s quite patient of my endless hours in the garage, and I know much of that tolerance is because she feels, for the most part, it’s time well-spent keeping the fleet on the road. This past weekend, sadly, my efforts were not rewarded by fixed issues.
First project: Ringo and his blankety-blank transmission. Still grasping at the slight hope his lack of upshifting could be solved easily, I removed Heidi’s governor and installed it in Ringo. A quick spin around the neighborhood the problem was still there. Further research on the forums yielded another possible cause (no output from the rear pump) and a test (push start). I tried this test on a downhill section of street near the house. I put the shifter in N, turned off the key to stop the engine, put the key back in the On position and shifted into D. The speedo read about 20 MPH and the engine would NOT start. Additionally, there was nasty sound coming from the rear end as soon as I turned off the engine. Now the published speed necessary for push starting is 18 MPH, so I figured I hadn’t been going fast enough, so I drove a couple blocks further to a steeper section, got the car up over 25 and re-tried the test. This time the engine started up, but the nasty noise was still there as soon as the engine was turned off. Okay, the pump works, but there’s something else going on. One other recommendation I’d read was to use a ATF additive, so after parking the car on the street, I walked to the FLAPS and bought a pint of Lucas trans fix and dumped it down Ringo’s tranny filler tube. And then another extended test drive to circulate the liquid magic throughout the tranny. I know it’ll take a while for it to work its magic, so I parked Ringo at the curb and moved on to the next task.
Second project: Heidi and her backfiring and poor idling. I had decided this issue was a carburetor with a vacuum leak, so step one in fixing the problem was rebuilding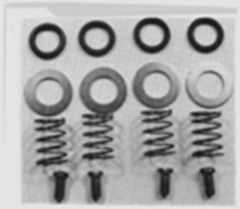 a carburetor using the new parts that recently came my way. Last week, I went through my stash of carb bodies, tops, and throttle shafts and found a set suitable for renewing and gave them a good 2-day soak in my can of carburetor cleaner solvent. Since there was some play between the throttle shaft and bores in the body, a seal kit (Clark’s C1473) was installed per their instructions. The pieces from one of the NOS carb rebuild kits were installed (needle-and-seat, accelerator pump, gaskets), along with a NOS choke pulloff, with the balance of the bits assumed GUPs from my carb part jar. Spoiler alert: “assumed” will come back to bite me. I pulled off the suspect right carb and bolted down and hooked up the replacement and Heidi rewarded by firing right up and settling into a sweetly smooth idle. Each blip of the throttle elicited a responsive and willing rev of the flat-6. Once the engine had heated up and the chokes were wide open, I set the balance between the two sides and found the idle speed in Drive right at the specified 500 rpm. The lovely Loriann’s daily-driver was in the driveway, so I eschewed the test drive trusting that the effortless idle and willing revving indicated problem solved. Thus ended my Saturday’s car time.
Third project: Lucy and her broken speedometer. For the last few months Lucy’s odometer has been sticking nearly every time the tenth of a mile wheel goes from 9 to 0. When it sticks the speedometer needle jumps around wildly. Once the wheel unsticks itself (which happens eventually), the needle settles back down. Then, last Friday, I glanced down at the speedometer during my commute home and the needle was bouncing around more wildly than usual. After a few seconds of this, the needle dropped to zero and the odometer wheels stopped turning. Irr – a broken speedometer cable. Fortunately, there was a brand new replacement amongst the stash of new parts I was recently given. So, yesterday afternoon I put Lucy in the garage and decided the best approach was to first clean and lubricate the odometer and speedometer before installing the new cable. While I was under the dash unhooking gauges, switches, and sockets I noticed the existing cable had been repaired with a splint of sorts (two small hose clamps holding a split piece of rubber hose over a break in the sheathing of the cable). After disconnecting the cable from the rear of the speedometer, I pushed the inner core in as far as it would go and tried to give it a spin. It wouldn’t rotate which meant the cable wasn’t broken. Not really wanting to climb under the car and run the new cable, I adjusted the splint in the hopes the only problem was the fix had slipped over time. With the gauge set out of the car, I tore down the assembly to get access to the speedometer and odometer. I then sprayed brake cleaner on and around the odometer wheels and the speedometer mechanism. After giving ample time for the cleaner to evaporate I squirted in generous amounts of liquid graphite attempting to fully coat the rotating parts. I tested it by driving the shaft with my variable speed drill running backwards. I got the needle to go up to 50 or so and sit steadily while I ran it past the sticking point without any indication of an issue. With a cleaned lens, I reassembled the gauge set, installed it back into the dash, put everything back where it belonged, and called it a day.
The fruits of my labor, part 1: sunk float? Having chosen Heidi as my ride of the day, I climbed behind her steering wheel, started her engine, put her shifter into Drive and proceeded to get about twenty feet down the driveway before the engine died. CRAP! Shades of a leaky float. Since I was too far down our driveway to push her back, I coasted down to the street and parked her against the curb. Guess I should have tried testing that float I’d selected before trusting it as good. Thank goodness I had a backup vehicle.
The fruits of my labor, part 2: speedometer cable. After backing Lucy down the driveway and out onto the street, the first test of the speedometer fix commenced. I watched the needle bounce around as I accelerated away the house. “No worries,” I thought; “It just needs a few minutes to settle down and it’ll be fine.” Instead of settling down, a few minutes later it flat-lined back to zero. CRAP! Another assumed GUP lets me down. Guess I should have taken the time to install the brand new cable.
First project: Ringo and his blankety-blank transmission. Still grasping at the slight hope his lack of upshifting could be solved easily, I removed Heidi’s governor and installed it in Ringo. A quick spin around the neighborhood the problem was still there. Further research on the forums yielded another possible cause (no output from the rear pump) and a test (push start). I tried this test on a downhill section of street near the house. I put the shifter in N, turned off the key to stop the engine, put the key back in the On position and shifted into D. The speedo read about 20 MPH and the engine would NOT start. Additionally, there was nasty sound coming from the rear end as soon as I turned off the engine. Now the published speed necessary for push starting is 18 MPH, so I figured I hadn’t been going fast enough, so I drove a couple blocks further to a steeper section, got the car up over 25 and re-tried the test. This time the engine started up, but the nasty noise was still there as soon as the engine was turned off. Okay, the pump works, but there’s something else going on. One other recommendation I’d read was to use a ATF additive, so after parking the car on the street, I walked to the FLAPS and bought a pint of Lucas trans fix and dumped it down Ringo’s tranny filler tube. And then another extended test drive to circulate the liquid magic throughout the tranny. I know it’ll take a while for it to work its magic, so I parked Ringo at the curb and moved on to the next task.
Second project: Heidi and her backfiring and poor idling. I had decided this issue was a carburetor with a vacuum leak, so step one in fixing the problem was rebuilding
 a carburetor using the new parts that recently came my way. Last week, I went through my stash of carb bodies, tops, and throttle shafts and found a set suitable for renewing and gave them a good 2-day soak in my can of carburetor cleaner solvent. Since there was some play between the throttle shaft and bores in the body, a seal kit (Clark’s C1473) was installed per their instructions. The pieces from one of the NOS carb rebuild kits were installed (needle-and-seat, accelerator pump, gaskets), along with a NOS choke pulloff, with the balance of the bits assumed GUPs from my carb part jar. Spoiler alert: “assumed” will come back to bite me. I pulled off the suspect right carb and bolted down and hooked up the replacement and Heidi rewarded by firing right up and settling into a sweetly smooth idle. Each blip of the throttle elicited a responsive and willing rev of the flat-6. Once the engine had heated up and the chokes were wide open, I set the balance between the two sides and found the idle speed in Drive right at the specified 500 rpm. The lovely Loriann’s daily-driver was in the driveway, so I eschewed the test drive trusting that the effortless idle and willing revving indicated problem solved. Thus ended my Saturday’s car time.
Third project: Lucy and her broken speedometer. For the last few months Lucy’s odometer has been sticking nearly every time the tenth of a mile wheel goes from 9 to 0. When it sticks the speedometer needle jumps around wildly. Once the wheel unsticks itself (which happens eventually), the needle settles back down. Then, last Friday, I glanced down at the speedometer during my commute home and the needle was bouncing around more wildly than usual. After a few seconds of this, the needle dropped to zero and the odometer wheels stopped turning. Irr – a broken speedometer cable. Fortunately, there was a brand new replacement amongst the stash of new parts I was recently given. So, yesterday afternoon I put Lucy in the garage and decided the best approach was to first clean and lubricate the odometer and speedometer before installing the new cable. While I was under the dash unhooking gauges, switches, and sockets I noticed the existing cable had been repaired with a splint of sorts (two small hose clamps holding a split piece of rubber hose over a break in the sheathing of the cable). After disconnecting the cable from the rear of the speedometer, I pushed the inner core in as far as it would go and tried to give it a spin. It wouldn’t rotate which meant the cable wasn’t broken. Not really wanting to climb under the car and run the new cable, I adjusted the splint in the hopes the only problem was the fix had slipped over time. With the gauge set out of the car, I tore down the assembly to get access to the speedometer and odometer. I then sprayed brake cleaner on and around the odometer wheels and the speedometer mechanism. After giving ample time for the cleaner to evaporate I squirted in generous amounts of liquid graphite attempting to fully coat the rotating parts. I tested it by driving the shaft with my variable speed drill running backwards. I got the needle to go up to 50 or so and sit steadily while I ran it past the sticking point without any indication of an issue. With a cleaned lens, I reassembled the gauge set, installed it back into the dash, put everything back where it belonged, and called it a day.
The fruits of my labor, part 1: sunk float? Having chosen Heidi as my ride of the day, I climbed behind her steering wheel, started her engine, put her shifter into Drive and proceeded to get about twenty feet down the driveway before the engine died. CRAP! Shades of a leaky float. Since I was too far down our driveway to push her back, I coasted down to the street and parked her against the curb. Guess I should have tried testing that float I’d selected before trusting it as good. Thank goodness I had a backup vehicle.
The fruits of my labor, part 2: speedometer cable. After backing Lucy down the driveway and out onto the street, the first test of the speedometer fix commenced. I watched the needle bounce around as I accelerated away the house. “No worries,” I thought; “It just needs a few minutes to settle down and it’ll be fine.” Instead of settling down, a few minutes later it flat-lined back to zero. CRAP! Another assumed GUP lets me down. Guess I should have taken the time to install the brand new cable.
Thursday, January 26, 2012
It's Puttin' a Whuppin' on Me
I think my posting on the CorvairCenter forum does a good job describing the status of my ongoing saga with Ringo’s transmission.
This is getting REALLY frustrating! I've installed the missing e-clip, put everything back together, poured in $20+ of ATF, and it still won't automatically upshift. During last night's test drive, I was able to get it to go into Drive by accelerating to over 30 mph, movng the shifter into N, then back into D. This worked a few times, and another couple times, I had to repeat the N then D sequence before it would shift. Then, if it was in D, anything more than feathering the throttle would cause it to downshift back into L. I guess it's possible the e-clip popped back off, but I'm thinking it's a bad pump.
Regardless, I'm at the point of dropping the drivetrain and replacing the powerglide with my one spare that hasn't operated for 30+ years. There's still fluid in the replacement, but probably not much. The pan is off, but otherwise the tranny's intact. In addition to pulling the valve body and thoroughly cleaning all those parts, what else should I do to maximize my chance for success?
The responses to this and a similar posting on VirtualVairs included:
- "It’s still a governor problem. Put one in that you know is good before you give up on the current transmission."
- "Grooves in the bore where the governor goes may be leaking preventing the required pressure buildup."
- "Adjust the Manual Valve Linkage"
- "Adjust the Low Band"
- "Old, worn, bad, flex seals will cause that to happen. The PG needs an overhaul. Put a kit in it and it'll be fine, hopefully."
- "I recently installed a pg in my 64 that had been sitting dormant for 20+ years. All I did to it was drop the pan, clean the filter, and add a bottle of Trans-X to the fluid. It is quiet, the fluid still looks good after a couple hundred miles, and it shifts just fine."
- "I too, tried swapping in another tranny that hadn't run in many moons. (Don't do it!)It turned out to be full of garbage and contaminated the fluid in the torque converter and still didn't work. I ended up pulling the drivetrain 5 times till the problems were finally resolved."
So, what am I to do? Well, I’ll give the governor swap one more try; this time with the known working one out of Heidi. If that doesn’t fix it, out comes the drivetrain. I’ve inherited a Powerglide rebuild kit at some point and I’m hoping all the parts are there. I think I’ll try rebuilding the spare tranny and install it rather than risk putting junk into the torque converter.
Oh yeah. One other thing. Throughout the test drive the clacking from the lazy lifter was almost as maddening as the lack of shifting. I've given the lifter plenty of time to get its act together. Looks like I'll be pulling the rocker cover off the left side and re-adjusting the pre-load.
Wednesday, January 25, 2012
Ringo's Tranny Ready for Fluid
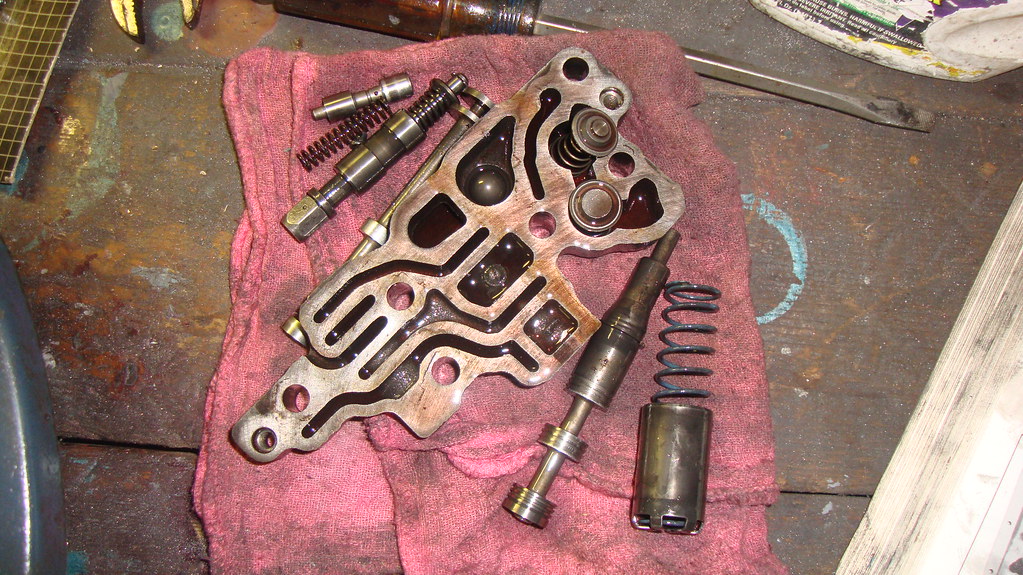
Last night I was able to get the transmission put back together, but not without some frustration. The assembly of the valve bodies went well, as did the first install of the valve body into the transmission and its associated torquing of twenty bolts, but my first attempt to engage the ball on the end of the shifter cable into its cage in the tranny was a failure. After a few irritating minutes of struggle, I slid out from under the car and pulled out the spare Powerglide to see what I was missing. The cage moves on the mainshaft of the tranny as does the part that actuates the throttle valve. While axially separated, one had rotated relative to the other so that once the parts were slid along the shaft back into their proper places, they did not have proper range of rotation anymore. In other words, I was screwed. The only fix was to take out the twenty bolts while again retaining the main piston, adjust the actuators and reinstall the valve body and the twenty bolts. I did all this, but made sure the shifter would go into all positions properly before attaching the valve body. Once this was completed, I fished out a new pan gasket, put a skim coat of gasket sealer between the pan flange and the gasket and bolted the pan to the bottom of the Powerglide. By that time, it was nearing ten and time to call it a day.
Tonight, I’ll replace the o-ring on the governor with a new one, pour in a gallon or so of fresh ATF, and cross my fingers before taking Ringo for a road test.
Tonight, I’ll replace the o-ring on the governor with a new one, pour in a gallon or so of fresh ATF, and cross my fingers before taking Ringo for a road test.
I Have a Dream
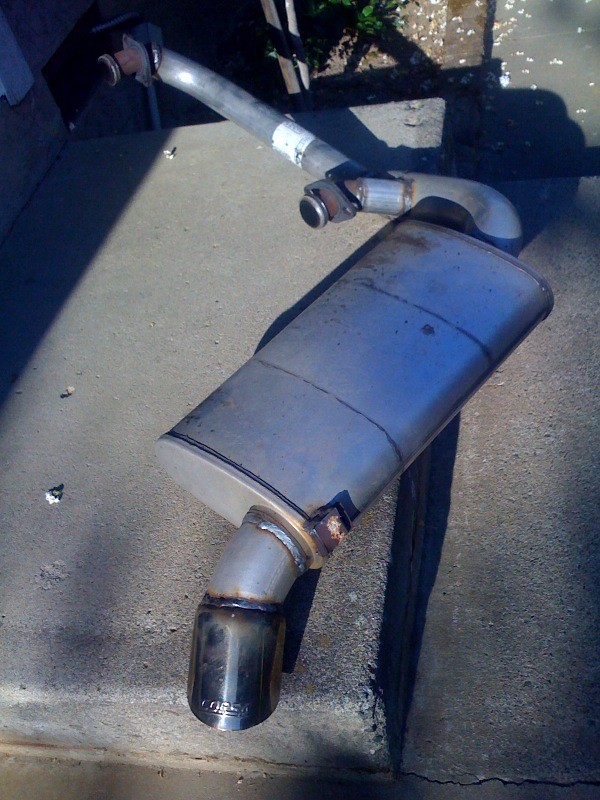
Well, what else is new? I’m always dreaming. This time it’s about exhaust. As I drove Lucy to work this morning with my iPod cranked to 10, I decided that the current exhaust system is too loud, especially at highway speeds. So, how do I get a quieter exhaust without sacrificing the performance gain I’ve experienced with the dual exhaust? Install a Big Single. For a couple years or so, a couple of Corvair nuts were producing a custom exhaust pipe made from larger diameter tubing. This assembly, pictured below, provided the much less restrictive flow of a dual system without the horrible drone. This design goes into a 3” diameter muffler. Here’s a link to a sound (.wav) file for a setup much like the one pictured, except it uses a Raptor turbo muffler.
Others have produced the same setup, but with slightly different approaches. The following one is built by cutting and welding together stock pieces (the standard Corvair u-pipes, 2-1/2” elbow, and 1-3/4” straight). The tricky part is forming the input end of the elbow for a good fit with the two incoming pipes. This one uses a 2-1/2” diameter muffler. One of the posts the producer of the previous product made is, “two 1-3/4” diameter pipes fit a 3" pipe; a 2-1/2” pipe will require 1-5/8” or 1-1/2" tubes.” One of the factors that will play into my decision about 3” or 2.5” mufflers is the diameter of Lucy’s current mufflers. If I can, I’d love to re-use one, but not to the point of going smaller than 2.5”. If they are only 2” as I believe they are, I’d need to buy a new muffler anyway and would probably go big for the visual affect since the price is the same.

Finally, one guy who must really love to weld came up with the following mega-custom job. While I enjoy welding, I’m sure I’ll have enough of a challenge creating good welds for the few I plan on making.

All these changes will be in concert with the installation of the 140HP four-carb heads and matching exhaust manifolds. I can’t wait to hear AND feel the difference. I need to get Ringo out of the garage first.
Others have produced the same setup, but with slightly different approaches. The following one is built by cutting and welding together stock pieces (the standard Corvair u-pipes, 2-1/2” elbow, and 1-3/4” straight). The tricky part is forming the input end of the elbow for a good fit with the two incoming pipes. This one uses a 2-1/2” diameter muffler. One of the posts the producer of the previous product made is, “two 1-3/4” diameter pipes fit a 3" pipe; a 2-1/2” pipe will require 1-5/8” or 1-1/2" tubes.” One of the factors that will play into my decision about 3” or 2.5” mufflers is the diameter of Lucy’s current mufflers. If I can, I’d love to re-use one, but not to the point of going smaller than 2.5”. If they are only 2” as I believe they are, I’d need to buy a new muffler anyway and would probably go big for the visual affect since the price is the same.
Finally, one guy who must really love to weld came up with the following mega-custom job. While I enjoy welding, I’m sure I’ll have enough of a challenge creating good welds for the few I plan on making.
All these changes will be in concert with the installation of the 140HP four-carb heads and matching exhaust manifolds. I can’t wait to hear AND feel the difference. I need to get Ringo out of the garage first.
Tuesday, January 24, 2012
The Better Part of Valor is Discretion
Properly quoting Mr. Shakespeare, the title of this post describes my latest decision to pass on buying an EM convertible. While I now have the confidence, equipment, and skills (marginally) to tackle a rusted body, I’m not sure I want to. Here’s the story. Loyal readers may remember that Mikhaila (daughter #4) has chosen an early model convertible as her father-daughter car. Her original choice was a Corvair truck (Rampside/Loadside), but her mother and I vetoed that idea since putting a brand new driver behind the wheel of vehicle with no crumple zone is too risky. Yes, yes, just putting her (or any of the daughters) behind the wheel of any forty-plus year old vehicle is risky, but there’s no way I can afford a Hummer with two dozen airbags for each of them. But I digress.
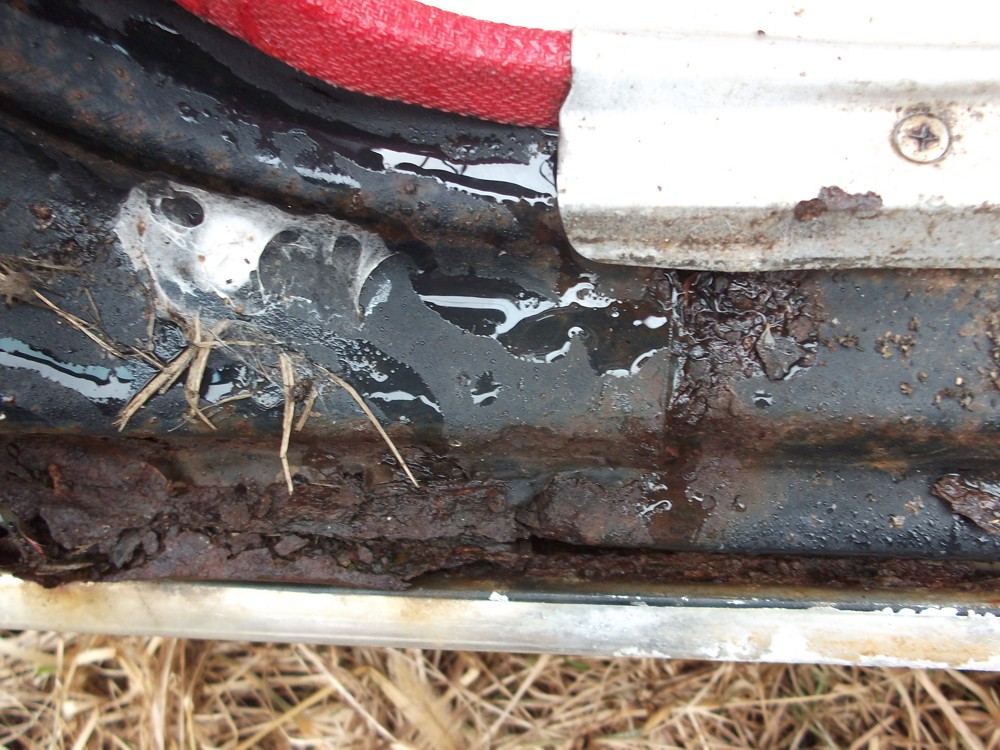
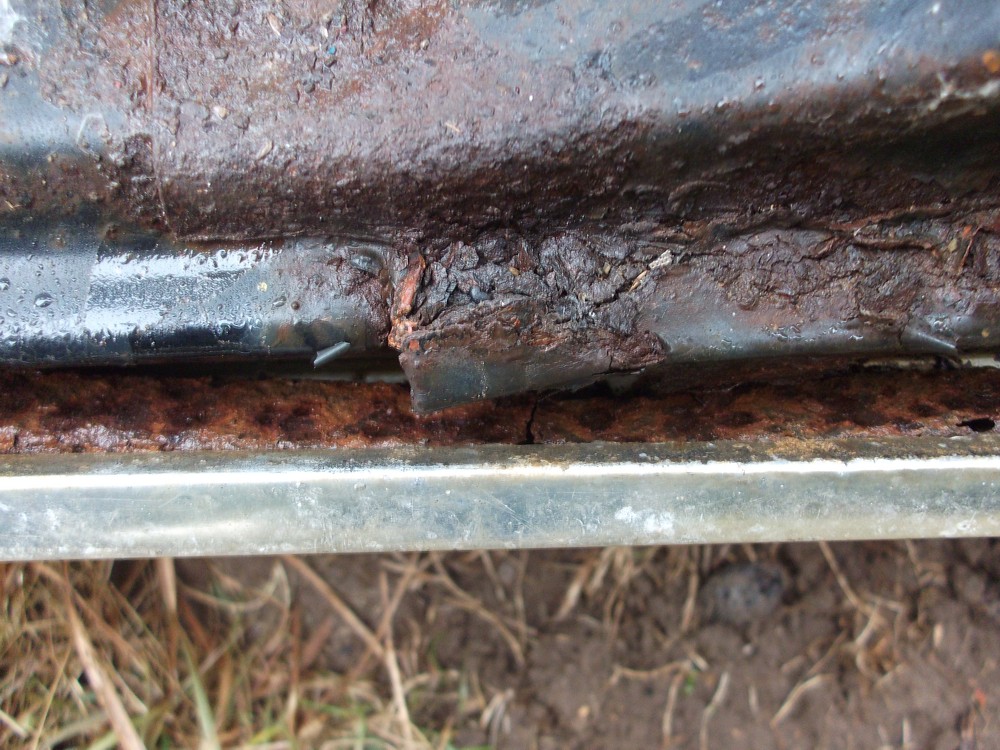
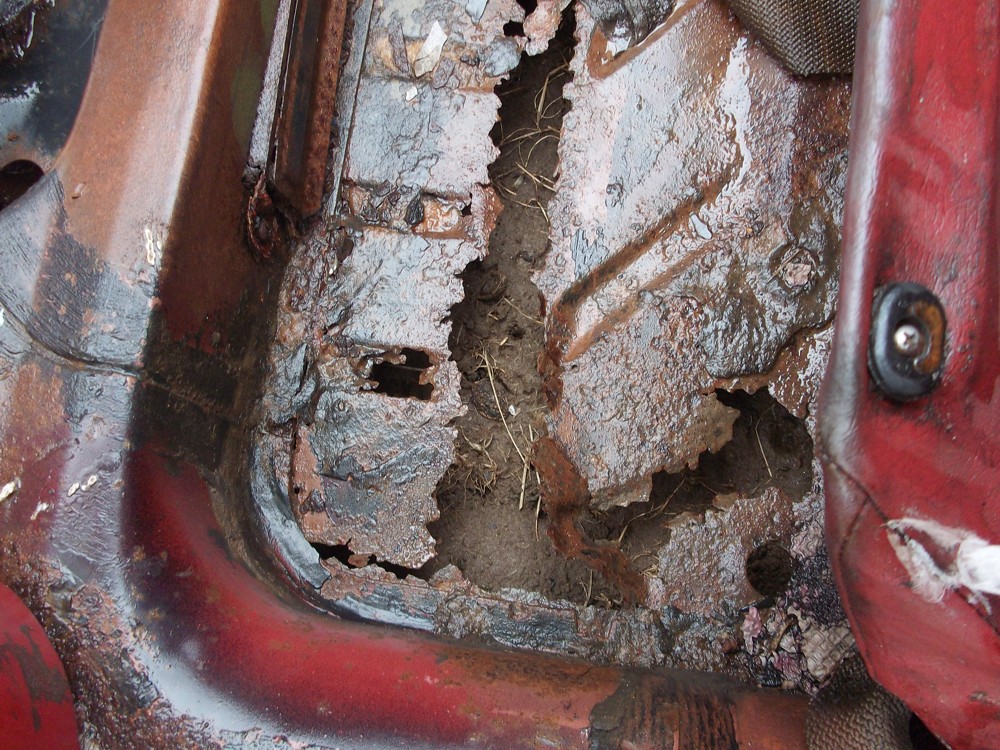
Since the EM ‘vert was her second choice, I’ve been occasionally scanning the web for suitable candidates. To us “suitable candidate” means solid and cheap. Sadly, those two rarely go together. I have been blessed a few times in the past, so patience is the key. A few days back, I was sent a link from a local guy who, ironically, is into ‘vair vans and trucks. The link was to a van for sale in the Blacksburg, VA craigslist. I followed the link and noticed there was also a photo-less listing for a ’63 convertible for only $500. I gave the seller a call and was rewarded with a nice conversation with his side being conducted in that wonderful southern Virginia accent I so miss. He shared that the floors would need replacing, but that mostly the car was solid and ready for a restoration. After getting off the phone, I sent my daughter and son-in-law a text asking they’d be willing to drive out to the country to take some pictures of the car. They agreed and last Saturday they travelled to Floyd and, after spending some time talking and taking pictures, Brianna called me and described the car. She agreed the floors were gone and said she’d taken pictures of some other rusty locations on the body. I eagerly opened the attachments to her e-mail yesterday, and she’d done a good job capturing the car’s condition. Sadly, it appears the tin-worm has taken up residence in the all-important rocker panels.
 I’d love to roadify this car with Mikhaila, but having just gone through floor and rocker replacement with Ringo, I’m not enthused to sign up for it again so soon. However, because Clark’s carries all the metal I’d need to make this car whole again, I’ll keep the guy’s number handy in case nothing else shows up in the next six months or so. I may even go for a drive and check the car out during one of our visits with Brianna and Nich.
Thursday, January 19, 2012
Powerglide Reassembly Commences
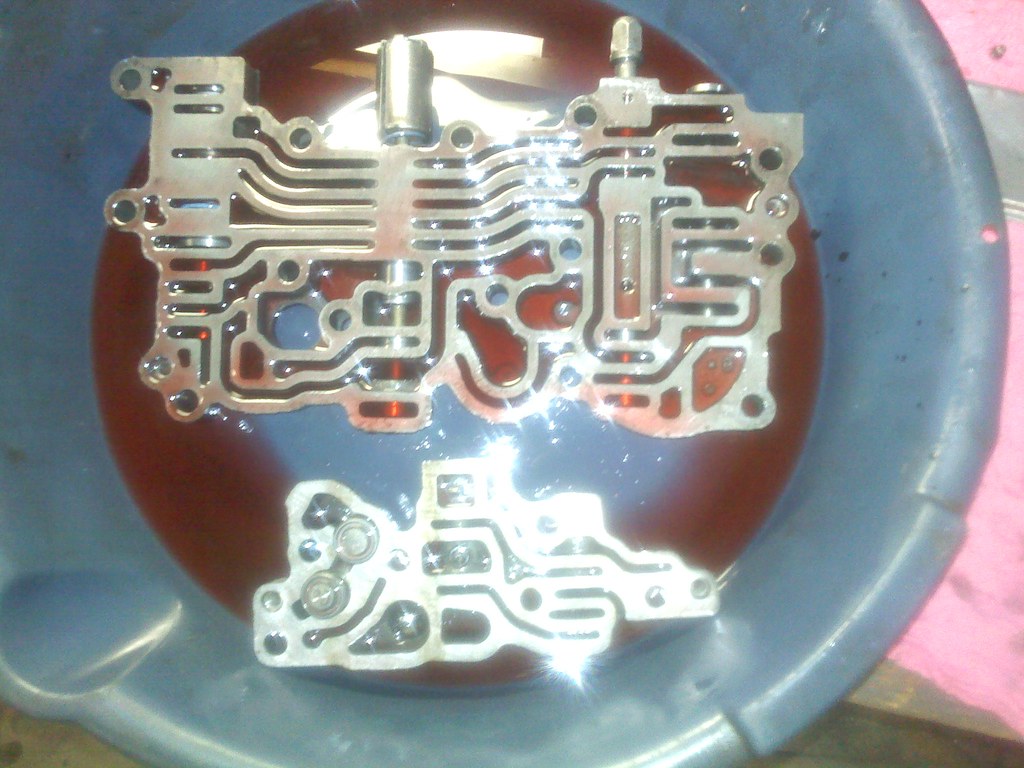
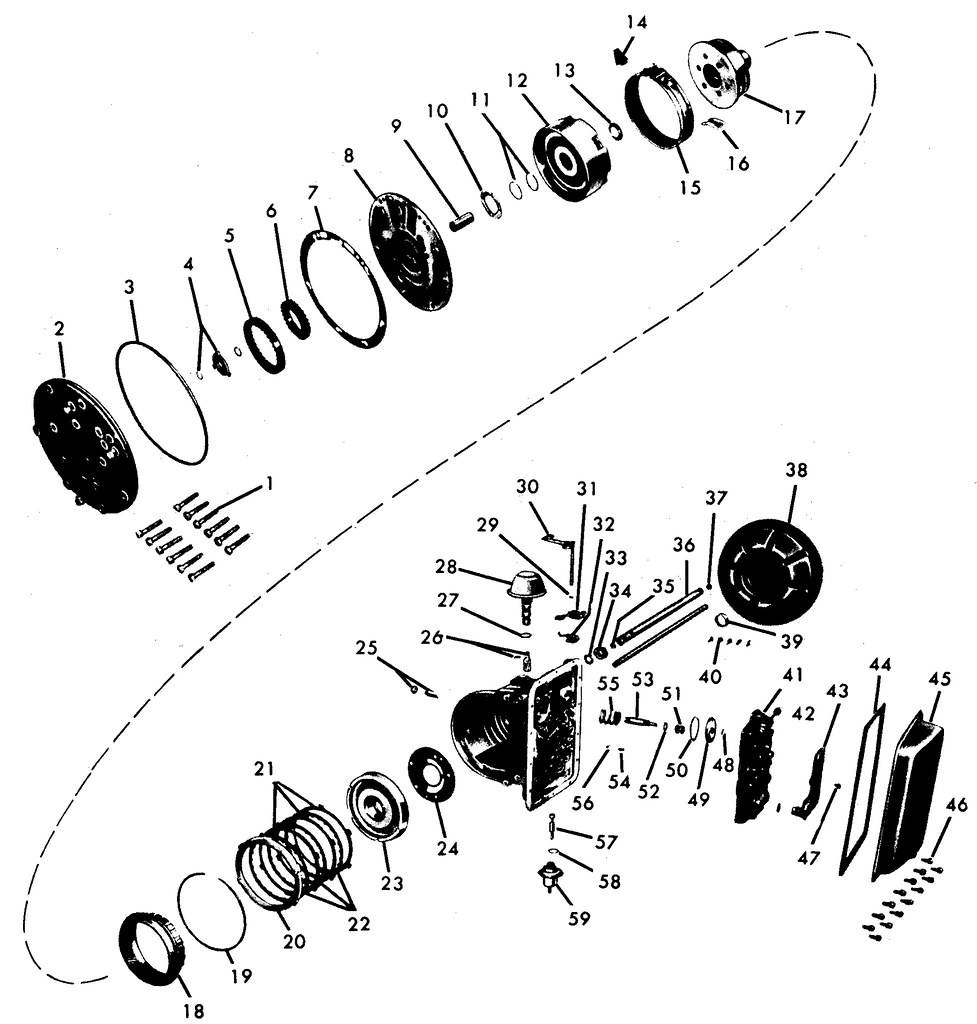
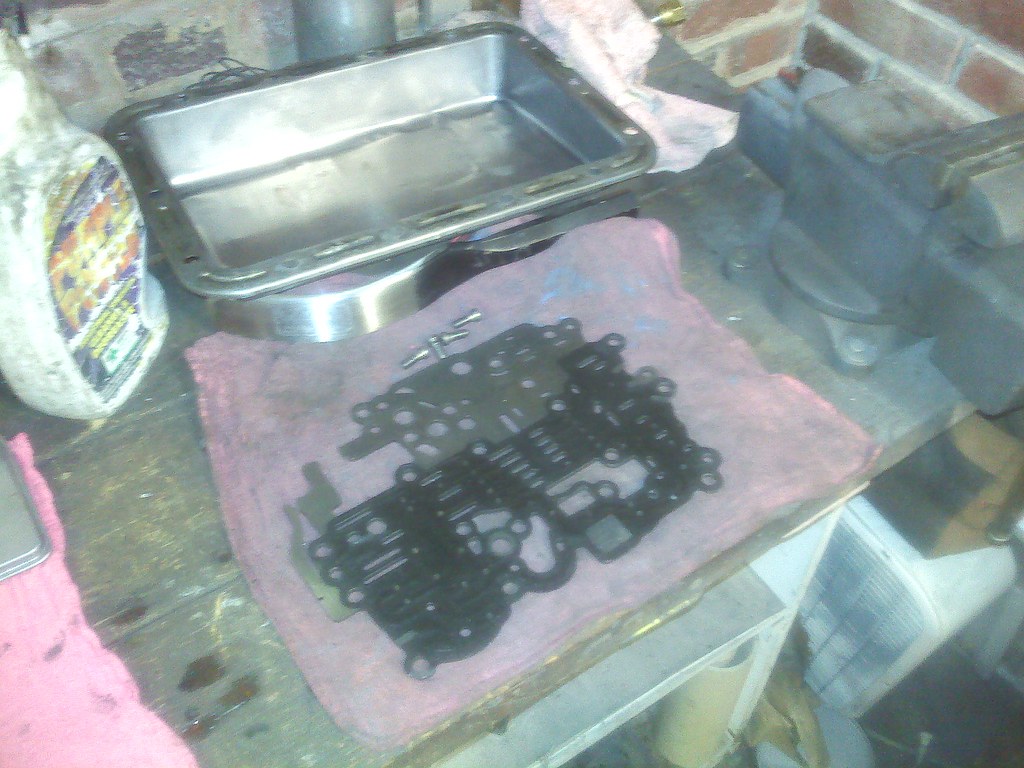
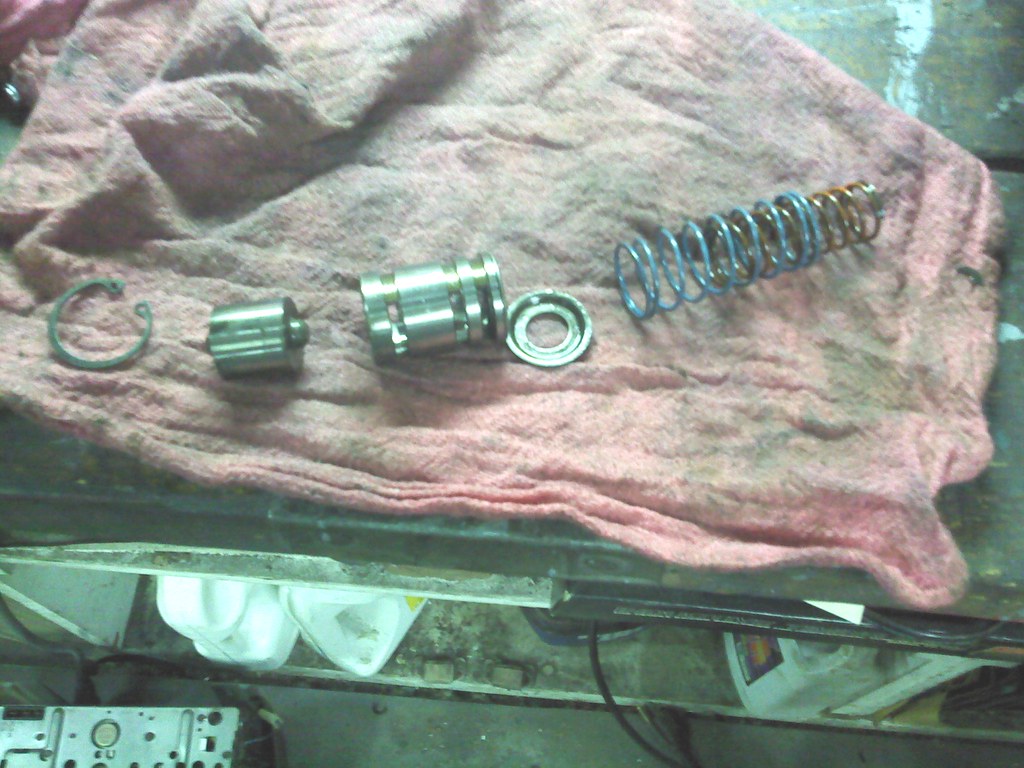
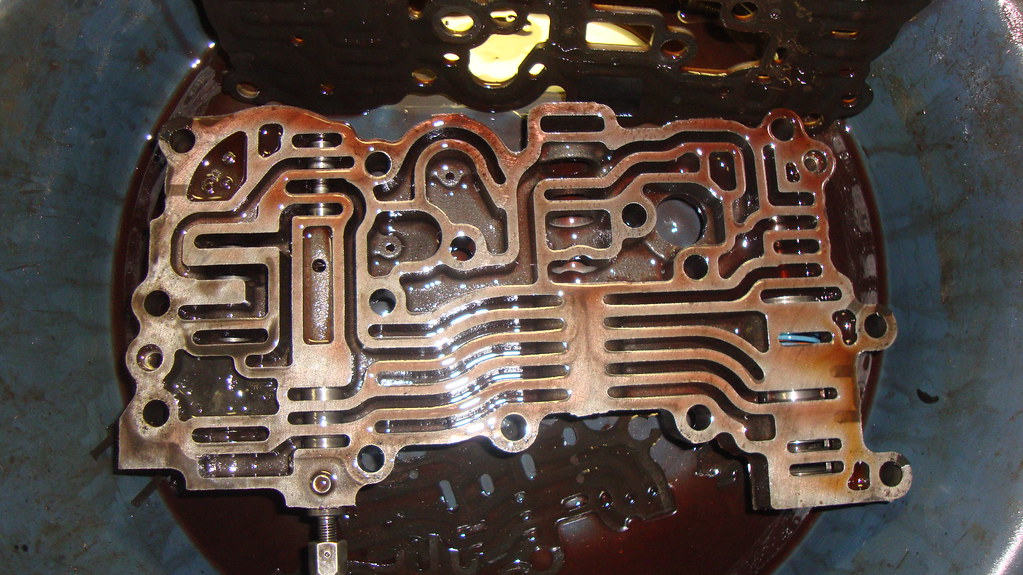
Even though the mailman didn’t have my Clark’s order in his bag yesterday, I pressed on with putting Ringo’s transmission back together. I removed the soaking parts from their solvent bath and rinsed thoroughly in water. After blowing everything dry, I poured about a cup or so of automatic transmission fluid (ATF) in a drain pan, set the modulator valve body in the soup and filled it ATF-coated valve parts per the manual’s exploded view. With that valve body assembled, I moved on to the main valve body. Starting with the low-drive regulator stack-up, I slowly slid the components into the bore ensuring all pieces were able to freely move. A retainer ring captured the stack-up. The rest of the valves were installed in the same manner. Now all I need is the e-clip for the throttle valve and I can bolt everything back together. Sadly, the USPS did not come through for me in today’s delivery, so, since I’ll be gone most of the weekend on a church activity, this all has to wait until Sunday evening.
Wednesday, January 18, 2012
Heidi Is Annoying Me
Last night I pulled the top off of Heidi’s flooding carburetor and shook the float – it had gas in it. Into the trash it went (just the float, not the entire carb), a replacement float was taken from one of the carbs on the shelf, and everything was put back together. The engine fired right up and, after blowing out the idle circuit, seemed to be idling nicely. This morning she started up and ran down the road nicely, but a couple issues appeared. First, when decelerating on the highway, I heard backfiring. Second, when I pulled into my parking spot (the only stop on my commute), the engine died. It started right back up, but didn’t want to idle. I think the backfiring is due to a failed exhaust gasket since I’m also hearing a different sound from the exhaust area. I’ll probably have to tear down the carb and blow out all the passages before the idling misbehavior goes away.
In preparation for the expected delivery of Ringo’s tranny parts, I did some more scraping and cleaning last night. The valve bodies and valve components are currently soaking in solvents, while the gasketed surfaces have all been scraped bare. If all goes well, I should have good news to report tomorrow.
In preparation for the expected delivery of Ringo’s tranny parts, I did some more scraping and cleaning last night. The valve bodies and valve components are currently soaking in solvents, while the gasketed surfaces have all been scraped bare. If all goes well, I should have good news to report tomorrow.
Tuesday, January 17, 2012
Lucy Gets Some Love
It looks like the float I installed in Heidi’s carb last weekend also has a hole in it. The car is behaving exactly as it did with the previous flooded float. I’ve got others to choose from. I don’t think any of the rebuild kits that were in my recent parts’ influx have floats in them, but I’ll check. It would be cool to install a brand new one instead of taking my chances with another GUP. I would have done the fix last night, but Ariel was in town to swap vehicles (the Suburban for Lucy), so I had to attend to a few annoyances I’ve noticed while driving her the past week.
First I adjusted the blinker switch so the left side is cancelled by the spin of the steering wheel. Next, I tightened the three screws holding the horn ring to the steering wheel. That was followed by a thorough lubrication of the cables that operate the two defroster doors. Sadly, I could only get to the short sections at either end, but it seemed to make a difference. I still haven’t found the time to install the red door panels that were swapped from Ringo, so the inside holes in the doors are still only covered by plastic sheeting that keeps out the draining water. The driver’s side has developed some tears, so I used duct tape to fix them and masking tape to re-adhere to the metal. The sideview mirror was next. The tensioning screw was too tight to allow adjusting, so I loosened it, moved the mirror into place and re-tightened. While doing this, I didn’t like how the door's detent was operating – too “catchy”, so I applied a generous amount of grease and that smoothed things out significantly.
First I adjusted the blinker switch so the left side is cancelled by the spin of the steering wheel. Next, I tightened the three screws holding the horn ring to the steering wheel. That was followed by a thorough lubrication of the cables that operate the two defroster doors. Sadly, I could only get to the short sections at either end, but it seemed to make a difference. I still haven’t found the time to install the red door panels that were swapped from Ringo, so the inside holes in the doors are still only covered by plastic sheeting that keeps out the draining water. The driver’s side has developed some tears, so I used duct tape to fix them and masking tape to re-adhere to the metal. The sideview mirror was next. The tensioning screw was too tight to allow adjusting, so I loosened it, moved the mirror into place and re-tightened. While doing this, I didn’t like how the door's detent was operating – too “catchy”, so I applied a generous amount of grease and that smoothed things out significantly.
Monday, January 16, 2012
Where’s the E-clip?
Yesterday, after church, I fired up the heaters in the garage and proceeded to go through the boxes of new parts and tools taking pictures and putting stuff away. With the floor next to the car now cleared, I dove into solving the tranny shifting problem. It took me a while to get the valve body off since I was being quite careful, but once off and disassembled I found that a critical e-clip had fallen off and disappeared. This is a known cause of Corvair Powerglides failure to upshift, so I wasn’t surprised to find it missing. After cleaning gasket material off parts, I called it a night.
Heidi’s Got Problems With Gas
Last Wednesday, I got behind the wheel of Heidi for my morning commute and cranked over her engine. It started, but not easily. It seemed to idle okay, so I got out to scrape the frost off the windows. Before I was done, the engine died. This isn’t unusual, so I wasn’t concerned. Back inside I restarted the engine and pulled away from the curb. A few feet later, the engine died again and would not restart. I ended up driving Lucy to work that day and the rest of the week.
Saturday afternoon I grabbed a handful of tools and headed out to the street to figure out what was ailing her. I pulled the air cleaners and turned on the engine. Immediately, gas started mildly geysering out the vent hole of the left carburetor. Thinking it was a stuck needle-and-seat, I pulled the top off, tweaked the assembly, and put it back together. A refire of the engine and the geyser continued. Off came the top and a shake of the float elicited the sound of sloshing gas. I went to my stash of carb parts and found one sad-looking float sitting in the bucket. I tested it for leaks by submerging it in a bowl of water and looked for air bubbles. There were none, so I put everything back together with the supposed GUP, cranked the engine, and all seemed well. I let the engine fully warm up idling at the curb and then took it for a run to the kerosene station. For the most part she ran fine, but still had a bad miss at hard acceleration. I decided then when I got home, I’d use up some of my new parts by replacing the points and rotor and giving Heidi a tune-up. Then, while sitting at a stoplight, I noticed then idle speed was lower than it had been before. I put it in Neutral and blipped the throttle and engine speed rose as usual, but the idle speed was still way down. Guess the carbs aren’t copasetic after all. And then, while driving down the driveway, the GEN-FAN light came on. What now? Once parked in front of the garage, I popped the hood to see if she’d thown a fanbelt, but everything was in place. Out came the multimeter and a check of the voltage output of the generator showed less than 3V coming out - the generator was toast. While a quick tune-up would have been okay out in the elements, I decided a generator swap warranted pulling the car into the garage, so out rolled Ringo and in went Heidi. From the two generator prospects on the shelf, I pulled the one nearest the car and swapped it in. The light went off as soon as the engine started running, so I’d picked the right candidate. From my new supply of NOS parts, I found a new set of points and a rotor and, after putting them in and adjusting the timing and idle speed, looked to fix the idling issue. A few tests and I’d determined the right carburetor (the one that had had the float issue) was not flowing fuel at idle. As soon as I blipped the throttle it responded though. Since I could, with a slight idle speed screw adjustment, keep the engine running at 500 rpm with the tranny in D, I decided not to work any more on it. I then took the car out for a spin. I was able to get up to 50 mph without any stumbling. At that point L was home from working a party and she and I went out for dinner.
This morning I’d planned on driving her to work, but there is still a carburetor problem. The engine would not idle and it felt like the engine was only running on three cylinders as I went to pull away from the curb. Thank goodness Lucy is running fine, so I drove her to work instead. I’m thinking the float I’d put in was bad as well and has filled up with gas like its predecessor. I'll do a quick check once I’m home this evening.
Corvair Folks are Generous

I had something extremely nice happen to me last week. An older guy in the Corvair club is getting out of the hobby and was giving away his Corvair stuff. I was the first to call him about it, so he gave it all to me. The next day Victoria (she works near Bill) brought home six boxes of parts, tools, literature, and some vintage 60s’ license plates. The parts are mostly new with many in their AC-Delco boxes; the tools, including a Sun timing light, a Wards engine analyzer and compression tester, appear brand new and some are in their original packaging. I took some pictures and posted them here. I know I won’t need it all, so I’ll offer the extras on the CorvairCenter forum.
Wednesday, January 11, 2012
Am I At A Fork In The Road?
I think my post to the CorvairCenter forum does a good job detailing my efforts of last night to get Ringo’s transmission to upshift from Low to Drive.
"I disconnected and plugged the vacuum line to the modulator. No shift. I tried replacing the governor with one of unknown provenance. Still no shift. I soaked the original governor in my parts cleaner overnight, rinsed and blew it out and pre-filled it with tranny fluid as best as possible. Installed it and then re-installed the shifter cable end per the manual (in Drive, TV fully counter-clockwise) and the hole is the 3/8ths of an inch spec'd. Took it out for a 25 minute or so test drive. It would not automatically shift out of Low, but I could get it to shift into Drive a couple times by accelerating up to 30+ MPG, shifting into Neutral, letting the engine RPMs fall, and putting the shifter back in Drive. It then seemed to operate properly in Drive until I had to decelerate. I tried more than a dozen times to get it to shift, but it was only twice it would cooperate. In the midst of the test I checked the fluid level with the shifter in Drive and it was at the Hot Full mark."
Here are the two responses I got:
“With your last comments about needing to shift to neutral after using low gear I'm beginning to think your manual valve (shifter) isn't adjusted correctly. This is done with a measuring tool (special) inside the oil pan (oil pan removed obviously)”
“Adjusting the manual valve does require special tool J-8365. Maybe someone near you has one you can borrow.”
I’m pretty confident this diagnosis is correct since I stupidly did not follow the manual’s directions when I first reinstalled Ringo’s shifter cable. I’d bet I bent the lever the cable end fits into. I’ve sent the local Corvair guru, Gary, an e-mail in hopes he’s got the special tool or knows what a properly adjusted manual valve looks like.
One other thing I noticed while test driving last night was the lazy lifter still won’t stop clattering. With these two nagging problems, I feel I’ve arrived at a crossroads. I can either continue to do battle with the current drivetrain, or I can swap drivetrains with Heidi. Since Ringo’s current setup has the one-year-only ’64 differential, it would bolt right into Heidi and vice-versa.
First, however, I think I’ll spend this evening adjusting the valves on the noisy side and dropping the tranny pan to see if I can find something to straighten at the manual valve. I’ll hold off on which path I choose at this fork in the road.
Monday, January 9, 2012
A Split Weekend
Most of the weekend was spent on house projects and repairing a hinge on the Suburban. The highlight of the Corvair work that did get accomplished was getting Heidi out of the driveway and back onto the street. All that took was some GUP carburetors pulled off the shelf and bolted onto her engine’s heads. Actually, it took three pulled off the shelf, since one of the first two appears to have a blocked idle circuit. The first two I tried were the same two that did not work on Ringo’s engine a month or so ago, so I really didn’t expect them to magically work on Heidi. They didn’t. Since the provenance of one of them was totally unknown, I pulled it off and replaced it with the one racing carburetor that was on the shelf. Heidi’s engine is now running as nicely as before. That means, however, that the engine still misses when I try to accelerate at highway speeds. I’m going to try Victoria’s suggestion of high-octane gas on the tankfull.
So, for those keeping score, here’s the carb status for the fleet.
So, for those keeping score, here’s the carb status for the fleet.
- Glinda – her original ’68 vintage carbs unmodified and rebuilt by Victoria and me
- Lucy – one racing carb (a ’65 vintage modified by Grant at Wolf Enterprises) and one race”ish” carb (a ’64 vintage modified by me to put in vent tubes and throttle shaft o-rings)
- Heidi – same setup as Lucy except the race”ish” carb doesn’t have the o-rings
- Ringo – has Heidi’s ’63 vintage carbs rebuilt by Brianna and me a few years back
Friday, January 6, 2012
Strike Two
Yesterday, I took advantage of Ariel being home for the day and had her take Ringo out for a spin around the neighborhood. Sadly, it didn’t take long before we knew the replacement governor hadn’t fixed the shifting problem. While driving in the dark, we did discover the dash lights were not coming on. I spun the knob and was able to get the dome light to illuminate, but it had no affect on the gauge lighting.
What’s next? Well, I can swap governors with Heidi, I can remove and reinstall the shifter cable (another possible source of shifting issues), or I can push the whole thing off a cliff. Since I know of no cliffs near enough to drive the car to in Low, I guess I will proceed with the easier of the first two choices. Sometime this weekend, I’ll put his left rear up on jackstands and start praying.
What’s next? Well, I can swap governors with Heidi, I can remove and reinstall the shifter cable (another possible source of shifting issues), or I can push the whole thing off a cliff. Since I know of no cliffs near enough to drive the car to in Low, I guess I will proceed with the easier of the first two choices. Sometime this weekend, I’ll put his left rear up on jackstands and start praying.
Thursday, January 5, 2012
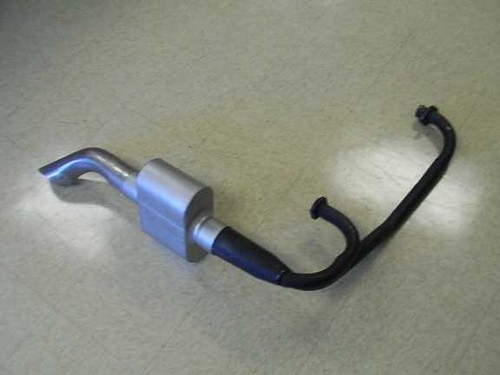
Replacement Governor in Place
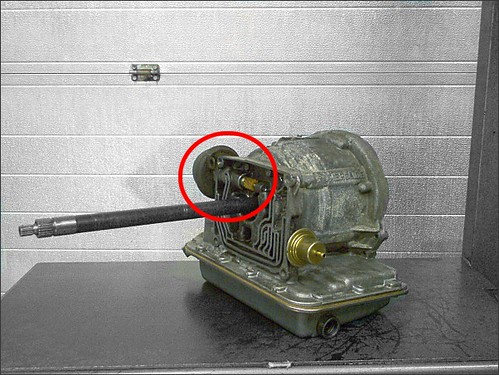
(photo not mine)
Last night, I replaced Ringo’s governor (circled above) with an unproven, yet hopefully, GUP. In order to free the current suspicious one from the tranny, I had to partially disassemble the rear suspension to lower the inside mounting of the lower control arm. That was over an hour of beating, banging, and prying before the 51 year-old joints broke loose. By the time I had it the replacement governor bolted in and the suspension all back together it was too late for a test drive. My fingers are crossed in preparation for tonight’s spin around the block.
Tuesday, January 3, 2012
More Floor Repair – Lucy’s Turn
With Ringo still not road-ready, I had to ensure Lucy was good-to-go for Ariel’s return to PA after her Christmas visit home. One thing I noticed as I gave the car the once-over was the carpet sagging towards the ground. A quick look from pavement level, and I saw the old PO repair to the right rear footwell had been soundly defeated by rust. With Ringo booted from the garage, I drove Lucy in and proceeded to pull the front passenger seat and door sill off and unbolt the seatbelts. This allowed me to roll the carpet up and out of the way to again exercise my tried and hopefully true skill of floor replacement. Some measurements, a few minutes with the cut-off wheel on my grinder, and the insertion of a straight bend and the patch was ready for installation. I decided, given the extent of the decay, it made the most sense to install the patch from the underside. With the floor jack holding the patch against what was left of the floor, I drilled a series of eighth-inch holes near the panel's perimeter and riveted it into place. Then, after replacing the cut-off disk with the wire wheel on the grinder and making sure I still had some welding gas left in the tank, I selectively cleaned the paint and rust to give me a dozen or so weld locations. Protected by leather gloves and apron and welding mask, I laid down some molten metal to finalize the installation of the patch. With the hot work done, I filled all the gaps with silicone caulk and then reassembled the interior. A spare quart of oil was tossed in the trunk and Lucy was ready to be Ariel’s chariot again.
It's a New Year and Ringo Still Isn't On The Road
When last I posted to this blog, I reviewed Ringo’s to-do list with promises of attending to the final items. How’d I do? Well, the ”loose steering” and “clicking in steering” ended up being a failed Pitman arm bushing (the rubber-filled joint between the steering box and tie-rod). With no GNP (the only way to go) on the shelf, this issue could not be instantly resolved. Then, under his own power (thanks to a new fuel pump and the carburetors off Heidi), I backed him up on the ramps and tightened the parking brake cable. With his engine up in the air, I went to install the thermostats and bottom shrouds that ensure quick engine heat up, but couldn’t find the right clips – add them to the shopping list. I also took advantage of his elevated state to top off the gear oil level in the differential. After rolling him down off the ramps and back into the garage, I addressed the final open item on the list – the under dash leak. I emptied most of a can of spray rubber coating onto the metal of the fresh air cavity before reinstalling the air grill at the base of the windshield.
At this point, I readied Ringo for the next morning’s jaunt up to the Corvair Ranch for his backlight installation. The towbar was bolted to the front bumper and the temporary lights were magnetically attached to the engine lid.
The next morning (Thursday the 22nd) I loaded the backlight glass into the rear of the Suburban, hitched up Ringo, and hit the road. I made my 9 AM arrival appointment and Jeff unhitched the car and pushed it into one of his work bays. With the overhead door closed and the Ranch’s heater pumping out nice, warm air, his technician Levi laid a protective blanket on Ringo’s engine lid and covered it with the trim sticks I’d pulled from the trunk. Jeff inspected the pieces and rightfully complained they were too banged up to install on such a nice-looking Corvair. I agreed, but true to my penny-pinching attitude, I insisted I could not spring for nice GUPs. He over-rode that decision by “making” me go out to an early coupe in the midst of a parting out to snag a smooth replacement for the lower right piece. With trim clips knocked into place over the pinch weld, the two professionals snapped the side and lower sticks into place locking them down with the pertinent nuts, screws, and washers. Next, the new weatherstrip got a bead of sealer squeezed into its glass-facing channel before enclosing the perimeter of the now-squeaky clean glass. Another sealer bead was then dispensed into the outer channel where the requisite string also found a home. Jeff appointed himself the inside operator and took up his position on the backseat while Levi and I carefully lowered the backlight into the opening. As Jeff poked and prodded the weather stripping into place, Levi and I applied pressure per Jeff’s direction. A little more than an hour later, we were successful. The fitting was not without its challenges as the three of us encountered the same issues Ariel and I had encountered 6 years ago – a gap in the bottom right corner that screws up the fit of the weatherstrip over the pinch weld. This time, I’m much more confident that it is now properly spanning the gap with sufficient sealant to keep water out.
While I was there, I bought some final parts for Ringo – a Monza badge, two door sills to replace the cancerous pair, and the clips to attach the thermostat rods to the shroud doors under the engine. Sadly, Jeff didn’t have any nylon Pitman arm bushings in stock, so I gave Clark’s a call. The part was only $7, so when I asked how much to ship it 2nd day air and was told $16, I choked a little. Then the sales gal went on to explain that, due to the holidays, 2nd day meant delivery the following Tuesday. All of a sudden I was faced with new math that had 2nd day equal to five days. Just for kicks, I asked how much next day air would be, and was told, “around forty dollars.” Needless to say, I told her to ship it good old USPS. Guess what? The package showed up Saturday afternoon – a real 2nd day delivery.
Generous Jeff gave me an early Christmas present with his Tom’s-special-pricing. He knows I’m on a tight budget, and claims the hulks I drag up there to add to his back-lot collection get me this discount. Much thanks Jeff!
By that time Levi had finished running one last bead of epoxy sealer and cleaning the glass one more time. We pushed the car out of the garage and a few minutes later had him hooked back up to the Surburban for the tow home.
During the midst of all this fun-and-games, I met a new convert to the crazy world of ‘vairs. Tate and, I believe, his dad trailered away a solid project car - a ’62 Monza 4-door (102 horsepower engine with a four-speed manual transmission) he’d just bought from the Ranch. He’s got big plans and I hope he keeps posting his progress on Facebook.
Once home and tow-bar-free, I had no excuse but to drive the car around the neighborhood to see what’s what with the drivetrain. What I found was the one clackety valve would not quiet down and the Powerglide would not shift out of Low. I posted my tranny problem on VirtualVairs and the CorvairCenter forum. The most popular blind diagnosis was the governor, so I tried to remove it with the drivetrain in place, but couldn’t get it past the lower control arm, so I bolted it back in place with the hope that just whacking it about would resolve the issue. A subsequent test drive proved that it still wasn’t right. Re-reading some of the responses to my query indicate I just didn’t try hard enough to get it out. Tonight I’ll fire up the heaters and give it another go.
Subscribe to:
Posts (Atom)