
Wednesday, December 23, 2009
Merry Christmas
As we celebrate the birth of our Lord Jesus Christ, I want to wish you and yours a very, merry Christmas. Prayers for safe travel and special times for all.
Tuesday, December 22, 2009
CPotD #21 (Clean)

There are some creative ‘vair folks that can’t help but try to improve on what Chevy provided. Many are successful, but some not so much. Today’s CPotD is of a subtly modified late model 2-door that’s quite the inspiration. Modifications include removal of chrome like the grill bar, rocker molding trim, and model script, shaving the drip rails and painting the headlight bezels. Many of these changes I’m considering for Betty. Now that I have a welder and am not afraid to use it, some of these changes have become feasible.
Heidi Headway
Last night I sanded the primer over the driver's side body patches trying to blend the edges with the adjacent paint layer. Then, with the heaters firing on high, I re-installed the lower engine shrouds so Brianna will have heat and Heidi will warm up quicker. With the garage and car temperature finally above 50, I applied three to four coats of paint over the primer and partially into the paint.
There are only two more tasks left before she’s ready for Brianna to take her back to VA. Finishing the patchwork on the passenger side and installing the new end-link assembly for the transverse rear spring.
There are only two more tasks left before she’s ready for Brianna to take her back to VA. Finishing the patchwork on the passenger side and installing the new end-link assembly for the transverse rear spring.
Monday, December 21, 2009
CPotD #20 (How to Get the Young People Involved)
The international Corvair club, CORSA, has been struggling with decreasing membership for a number of years now. The median age of the membership keeps going up since there are very few young adults choosing a Corvair as their hobby. There’s been quite a bit of online conversation as to how we’re going to reverse this trend. How are we going to get young people interested in working on and driving an old car.
For the past seven years, I have been blessed with the opportunity to work on Corvairs with three of my daughters. Each of them is still enthused about their car. Many times, however, they’ve not been so enthused about going out to the garage or driveway to work with dad. Boredom and frustration are two of our biggest enemies. Boredom when the task is menial or repetitive. Frustration when the job doesn’t go as planned and one, or both, of us gets angry. The reward of the car is not enough to inspire them to spend hours getting greasy, sweaty, cold, and sometimes bloody. The other day, however, Victoria asked me when we were going out again to work on her car. That is a triumph in getting a young person involved.
What have I been doing right so my teenager actually wants to go out and work on their cars? Five big factors come to mind.
First, I challenge them. Handing out screwdrivers and wrenches is not their idea of contributing to the project. I put the tool in their hand, give them clear instructions, and let them do the work.
Second, I try to be consistent. Life has a tendency to get in the way of our projects – other cars need work, the house needs attention, Girl Scouts schedule meetings. Regardless, we try to squeeze in at least an hour every Sunday accomplishing something on their car.
Third, I allow flexibility. If a task is not going well, move on to something else. If bolts aren’t coming loose, or worse yet breaking, it’s time to move on to something different. This means I need to be prepared with alternate tasks and the associated parts or materials.
Fourth, I try to show patience. There are times when they don’t follow directions, they don’t understand my clear instructions, or they’re not strong enough to torque that nut off. It’s not easy to get past those times without hard feelings, but I must or working together will be chore not a pleasure.
Finally, and this brings me to today’s CPotD, I try to start them off young. When I towed Betty into the driveway, I gave my camera to 11-year-old Mikhaila and asked her to take pictures. I also had her steer while I shoved Betty into the garage. Giving the young ones fun little helping tasks plants a seed of car "like" in them that I hope to cultivate into a love of their car someday.
Friday, December 18, 2009
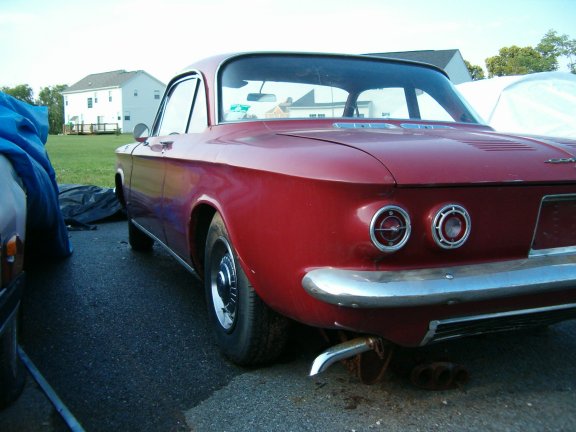
CPotD #19 (Spring is Only a Few Months Away)

With a snowy weekend forecasted for Baltimore, I needed a photo like this to give me the impetus to fire up the heaters in the garage and keep wrenching on my track car.
Many of you have heard of Yenkos. Yenko Camaros. Yenko Novas. Yenko Chevelles. Yenko Stingers.
Yenko Stingers? What’s a Yenko Stinger?
A Yenko Stinger is a modified Late Model Corvair and Charlie Doerge's http://www.yenkostinger.com/ website is chock full of Stinger info.
Today’s CPotD (courtesy of the NECC website) is of Dave Edsinger’s beautiful (and wickedly quick) YS-018.
Thursday, December 17, 2009
CPotD #18 (The Eternal Optimist)
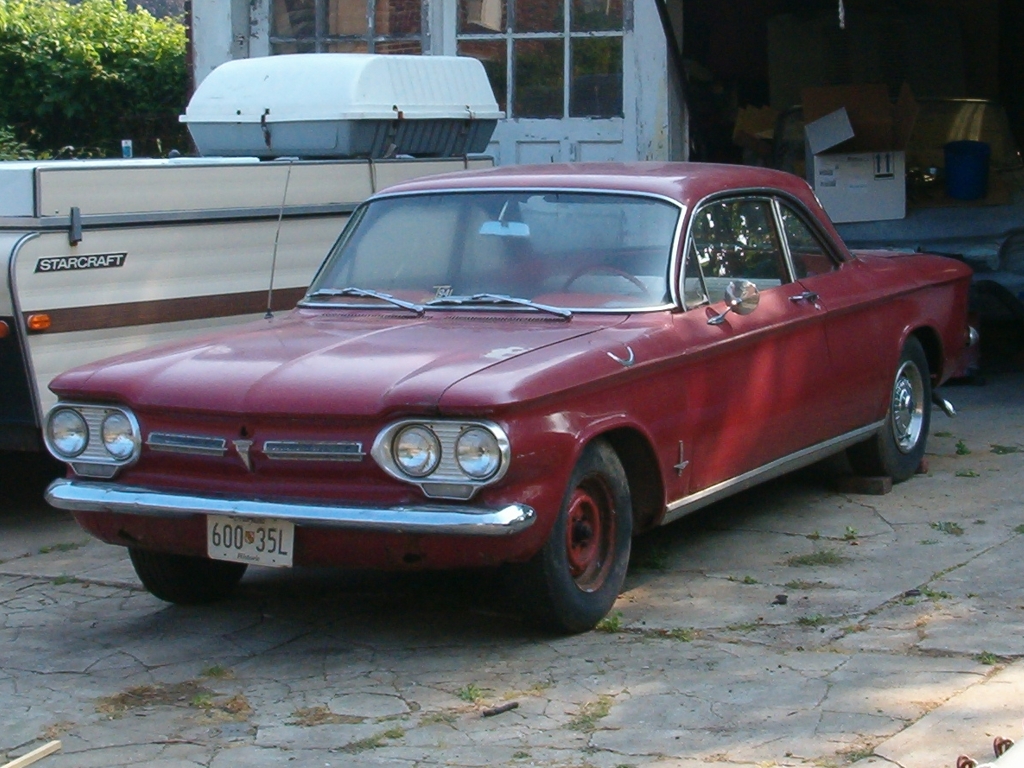
I went searching for a quote that would best sum up the dangers of optimism, and I found this one attributed to Winston Churchill. “A pessimist sees the difficulty in every opportunity; an optimist sees the opportunity in every difficulty.” Well, the car in this CPotD came with plenty of difficulties and opportunities.
 From this picture and others I took at the time, this car appeared to be a viable candidate for roadification (see Pertinent Definitions on the sidebar). However, and you can quote me on this, Bondo covers a multitude of sins.
A $100 deal creatively nicknamed Redvair, this Corvair came to me about in June of ‘05 through a fellow car-nut at my place of employ. This co-worker had been witnessing the wasting away of a couple old cars at the hand of a neighbor of his. This neighbor owned a 50s vintage Packard and this Corvair. Both cars were offered to me, but I didn’t have a garage long enough for the Packard (or a wallet thick enough for that matter). I did have the cash and desire to obtain another Corvair. At the time, I was working on Heidi and Brianna was driving the white 4-door which was rusting away beyond saving. So I was looking for another project that, once completed, could become a daily driver, and this one seemed to fit the bill.
I did give it a serious look through, but being the optimist I am, I dismissed slight rust holes and bumpy paint as minor inconveniences that could easily be corrected. After paying the seller and towing it home, Redvair was parked in the driveway and ignored for a few months while work on Heidi was completed. While it sat, Ariel started making noise about how cool it looked, and finally she asked me if Redvair could be her father-daughter project. Up to that point, she’d wanted a VW Beetle and I was grudgingly going to comply with her wish. I was quite thankful when she changed her tune.
With Heidi completed, it was now Redvair’s turn, and time to put Ariel to work. The first thing we did was get the engine running. It actually started up quite easily with new plugs, points, condenser and a borrowed battery. Oh yeah, the fuel was supplied directly from a gas can suspended above the engine compartment. Without a lot of fanfare or clacking valves, Redvair had successfully completed step 1 of its roadification.
Step 2 in my version of roadification is brakes, but we decided to temporarily skip that step and investigate the body issues. With a wire disc on my drill, I picked a suspect spot and carved my way through paint and primer before coming upon Bondo. Through the Bondo I went before coming upon ….. nothing. Most of the metal that had formed this lower front fender and the adjoining floor and firewall had been consumed by rust. The sculptor that had replaced metal with body filler had actually been quite the artist. Unfortunately, Bondo is not designed to be used as a structural member of an automobile with uni-body construction.
This same process of carving and discovering was repeated at rear fender and the front valance before I had a talk with Ariel about the difficulties of this opportunity. “Not to be a pessimist,” I told her, “but there is a much better candidate for roadification than this car.” And there was as  Ringo came into our lives less than one month after Jeff, proprietor of the Corvair Ranch, hauled Redvair away.
Ringo came into our lives less than one month after Jeff, proprietor of the Corvair Ranch, hauled Redvair away.Wednesday, December 16, 2009
CPotD #17 (Must've Been a Big Shoehorn)

There have been many creative people who’ve stuffed a V8 engine into their Corvair. Back in the day, at least two companies, Crown and Kelmark, made kits to install a small block Chevy into a Late Model car right in front of the rear differential. Since that was also the location of the rear seat, these V8 Vairs became two-seaters. Others have transplanted entire V8 drivetrains from front wheel drive cars like the Cadillac STS and Oldsmobile Toronado into the stock engine bay, thus retaining the rear seat. Few, however, have successfully squeezed a small block Chevy into the engine compartment of an Early Model.
Today’s CPotD presents the creation of one of those skilled people. Clicking here will take you to the V8 Vairs webpage detailing how Marvin Bookman accomplished this impressive feat.
 The engine compartment is amazingly sparse, and I love how he retained the classic Chevy engine orange.
The engine compartment is amazingly sparse, and I love how he retained the classic Chevy engine orange.It Wasn’t That Cold
With the end-of-year deadline racing towards me, I went out to the garage last night and made some headway on Heidi’s bodywork. With the kerosene burning, 60 grit sandpaper on my random orbital (DA) sander made short work of smoothing out the Bondo over the four patches. Three are ready for paint, while the fourth needs another shot of Bondo. Next I set about forming a patch for the hole I put in the rocker panel. It’s roughly eighteen inches long, which just so happens to be length of the piece of sheetmetal I’d bought. Using paper taped in place, I traced the outline of the opening and then transferred that to the metal. After following the line with my air cutter, I formed the flange that’ll mate with the pinch weld using a hand sledge and the workbench’s front edge. Some hand-bending made an approximate curve allowing me to vise-grip the patch in place and do some final tweaking. With the patch ready to go, I applied a liberal coat of Rustoleum primer to the backside and called it a night.
Tuesday, December 15, 2009
CPotD #16 (Look Who’s Got The Keys)

My goodness, it’s been two-and-a-half years since Victoria accompanied me to the Corvair Ranch’s 2007 Open House. At that point, Brianna had been driving Heidi for more than a year and Ariel had been behind the wheel of Ringo since Christmas. It was now time for Victoria and I to begin our father-daughter project. First she had to decided what Corvair model she wanted to call her own, and there’s no better place to see every type of Corvair produced than the Corvair Ranch. According to their website, they have over five hundred Corvairs located on the property, most of which are sitting in rows behind the service buildings. So that’s where we headed. We wandered amongst all those relics for over an hour, and after reaching the back fence, I asked her which one she wanted. She pointed to a late-model convertible and said, “One like that.” So we wandered around a little more until we came upon the subject of today’s CPotD. I told Victoria to get in and try it out. “Really?,” she asked. “Just watch out for the snakes,” I replied. After carfully taking a seat, she said, “Hey the key’s here.” I had her hold it up while I snapped the photo.

Well, Victoria didn’t end up with a convertible, but Glinda is turquoise.
Monday, December 14, 2009
CPotD #15 (Desperate Times Call For Desperate Measures)
This CPotD illustrates one way to get a parted-out 4-door to the Corvair Ranch. When I jumped on the offer of a free ’64, I assumed Jeff would be able to come by and fetch the carcass, sans suspension, when I was done playing vulture. He couldn’t since someone made him an offer he couldn’t refuse on his rollup. Without wheels, this car was unsuitable to tow behind the Suburban, so I had to be creative. Since I’ve got a 4X8 utility trailer, and I believed the weight of the 4-door shell wouldn’t exceed its limit, I decided to do what had to be done to get it to its final resting place.
After pulling out the drivetrain and suspension, I unbolted and removed everything I could from the body. The seats, doors, windows, engine lid, trunk lid, and steering column were hauled up to Gettysburg first.
 Then I gave Victoria gloves, goggles, and my Sawzall and told her to cut the car in half, but leave all her body parts attached. She did a great job. Don’t worry, I did remove all the chrome before she went crazy with the saw. Here's more of the story on my old blog.
The final trip to the Corvair Ranch was made pulling the trailer loaded as shown in today’s CPotD. When I arrived I noted the load had only shifted slightly rearward.
After pulling out the drivetrain and suspension, I unbolted and removed everything I could from the body. The seats, doors, windows, engine lid, trunk lid, and steering column were hauled up to Gettysburg first.
Then I gave Victoria gloves, goggles, and my Sawzall and told her to cut the car in half, but leave all her body parts attached. She did a great job. Don’t worry, I did remove all the chrome before she went crazy with the saw. Here's more of the story on my old blog.The final trip to the Corvair Ranch was made pulling the trailer loaded as shown in today’s CPotD. When I arrived I noted the load had only shifted slightly rearward.
Here's some more links on the story of the red 4-door:
Friday, December 11, 2009
CPotD #14 (Wide, Open Spaces)

I went through the cars I’ve featured as CPotD, and I noticed the absence of a Corvan picture. The Corvan was Corvair’s version of an industrial delivery van and was part of the Corvair-95 family (so named for their 95 inch wheelbase) along with the Rampside, Loadside, and Greenbrier. Today’s CPotD is of a Corvan with the 8-door option. Standard would have been six doors - two front, two rear, and two on the passenger side. The image is courtesy of the New Jersey Association of Corvair Enthusiasts website, one of the many fine local chapters of CORSA. You can click here for more Corvan info at Rad Davis' excellent webpage detailing all the Corvair-95s.
At one point I lived next door to a real fleet mechanic (as opposed to a poser like myself). Whenever he saw my Corvair, he was inspired to share any one of the many stories about the Corvans and Loadsides he’d had the displeasure to work on. One of the major repairs he had to lot of was replacing the rear axle bearings. He’d tell me how good he'd gotten at pulling axles, then he’d always end his account by saying something like, “they were actually pretty good trucks, but the stupid customers would always overload the hell out of them.”
Heid Work
The other night I fired up the kerosene heaters and spent some time working on Heidi. After cutting away some more rotted metal from the outer rocker panel, I wire-brushed and primed the metal underneath with Rusty Metal Primer. Fortunately, that metal is in good shape with only surface pitting. Next I applied Bondo over around the patches on the driver’s side. The sanding will have to wait for another evening.
Thursday, December 10, 2009
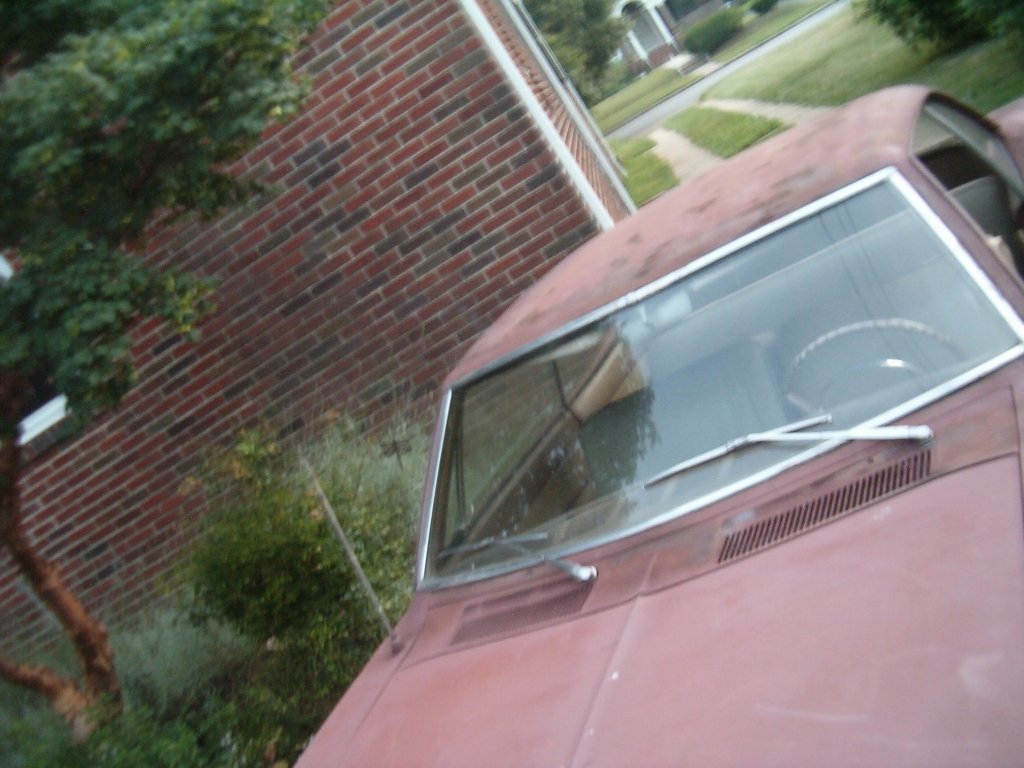
CPotD #13 (Will Betty Get a 4-Speed?)
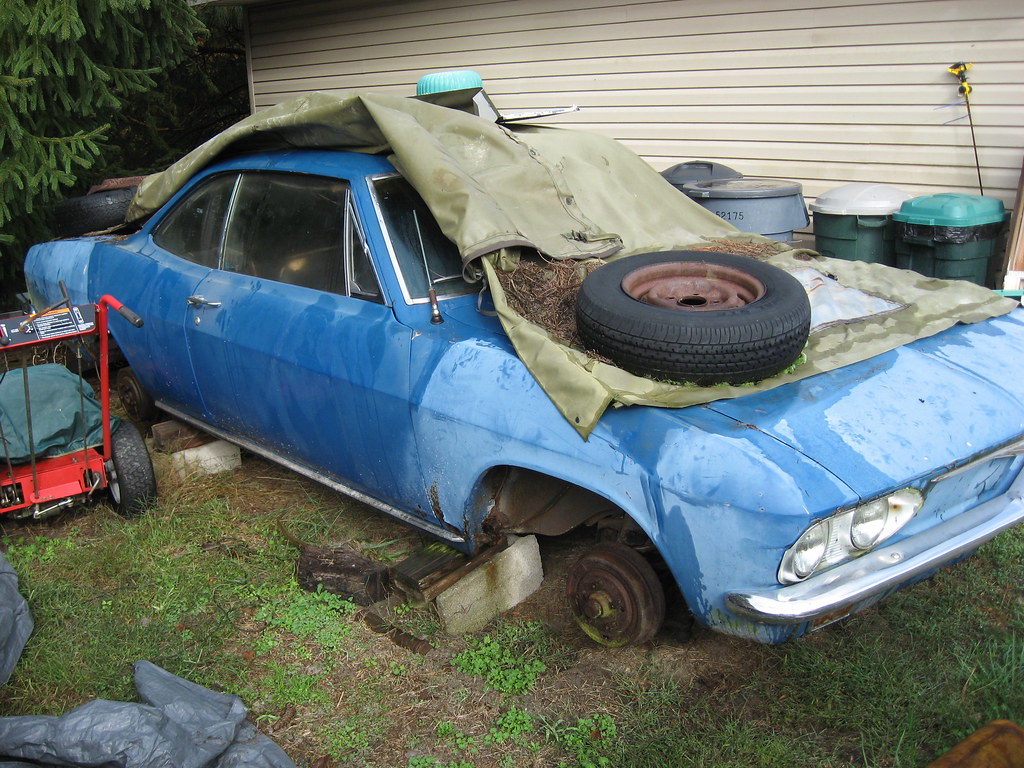
I just received today's CPotD in an e-mail. This one hundred dollar parts car is for sale, but it has no engine or title. What it does have, however, is a complete setup for a manual transmission (transaxle, pedal set, linkage, shifter, etc).
Ever since I was given Betty, I’ve been scheming to convert her automatic transmission into a four-speed. This opportunity is far-and-away the cheapest one to come my way. It’s a great deal even with the price of gas to one, tow the car home and, two, tow the strip carcass to the Corvair Ranch after I’m done with it.
So what’s stopping me? Even though my typical triumvirate of tribulation is missing the money element, time and space are still there to muck things up. Time-wise, I’m under the gun to get Heidi done before Christmas. Space-wise, I would need to tie up the entire garage for a couple weekends.
First things first. Get Heidi done, and then see if the car’s still available.
Wednesday, December 9, 2009
CPotD #12 (Inspiration)

One look at today’s CPotD is all I need to remind me why I’ve taken on this arduous task of keeping a fleet of Corvairs on the road. Seeing the smile on Ariel’s face as she prepares to run me down with Ringo never fails to lift my spirit. I’m also reminded that, since she put a lot of effort into getting this car on the road, she’s a more careful driver and car owner. I don’t believe she’d ever let anyone borrow her precious Ringo. The blood, sweat, and tears she’s invested make him too valuable to run the risk of a careless college-mate wrecking him.
There’s also the fact that she doesn’t want to get a phone call from someone telling her her car won’t start. She’d rather be the one making that phone call to me.
Tuesday, December 8, 2009
CPotD #11 (The One That Brought Me Back)
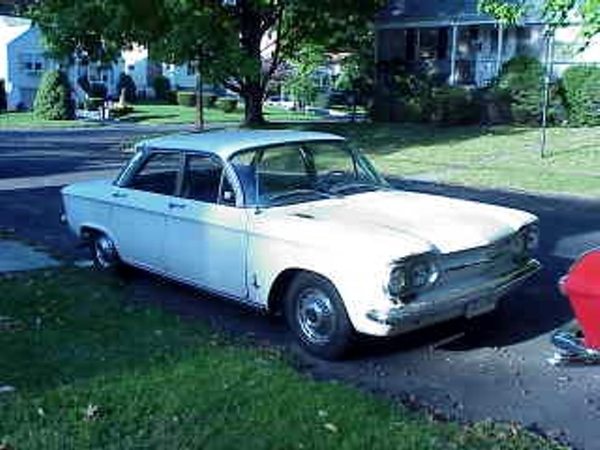
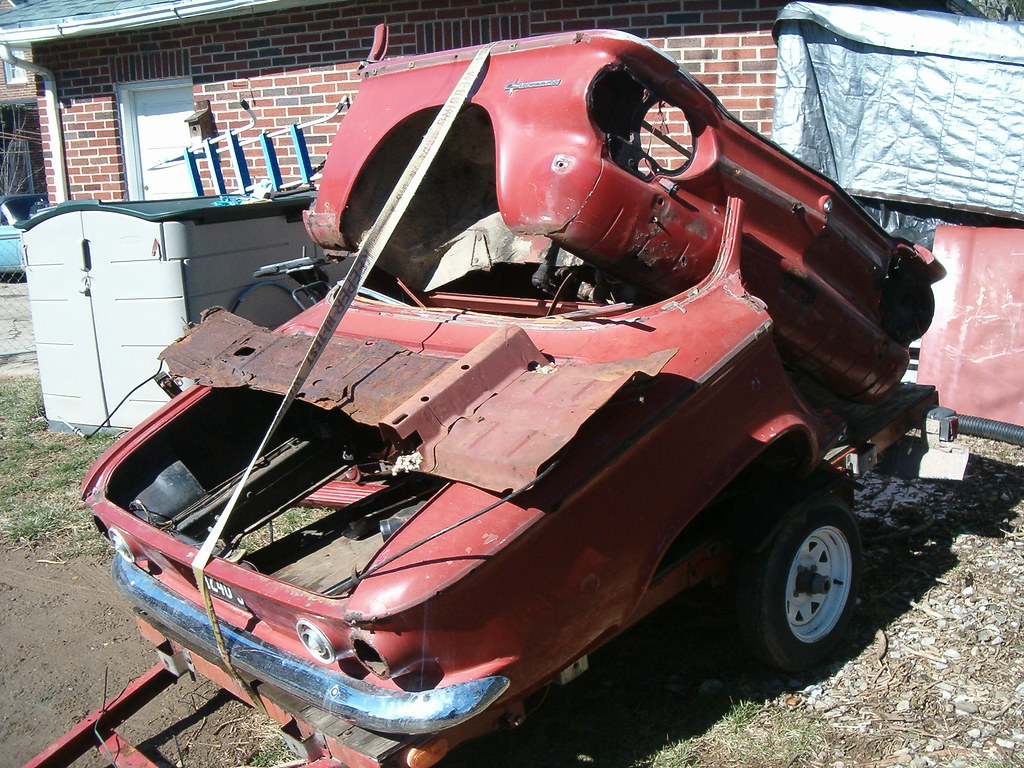
This low resolution JPEG is a poor excuse for a CPotD, but its importance in my Corvair life is too great to pass over. It was this photo and twenty-two others of a 1963 Monza 4-door sedan that brought me back into the fold so to speak. In 2001 I moved to Long Island, New York and my commute tripled to forty miles a day. After a couple months, I decided my current daily driver, a gas-guzzling ’66 Catalina, would not suffice. I wanted to continue driving an old car. I wanted one that got reasonable gas mileage. I wanted my ’62 Corvair back.
I joined the VirtualVairs mail list and immediately posted my desire to obtain a drivable Corvair. Within a day or so, a guy just north of New York City responded with an offer to trade his running old car for mine. We traded photos, and the following weekend I drove to New Rochelle and we made the swap. The seller warned me the car had no heat since the lower engine shrouds were not installed. I took my four-year-old daughter with me for company on the trip, and I can still remember buckling her blanket-wrapped body into the passenger seat.
After installing the engine shrouds, I drove that car nearly trouble-free for the next year and a half until my employer laid me off. After taking a job in Virginia, my family insisted I get a newer car to make my weekly 1000 mile roundtrips from home to work. That meant the Corvair was available for my recently licensed eldest daughter to drive back and forth to school. She did that until she graduated from high school. By that time we were all living in Baltimore. A couple months later, Heidi was ready for a running engine, so this Corvair donated its drivetrain to getting the convertible back on the road. Now it was time to make the call to the Corvair Ranch and ask the proprietor, Jeff, to come fetch this engine-less and rusty Corvair now too rotted to return to roadworthiness.
 The next time I saw this car it was laying on its side surrounded by other rejected, dejected Corvairs.
Monday, December 7, 2009
I Don’t Like Scraping the Windshield in the Morning
Especially the inside of the window. A combination of rain and snow followed by a sunny day followed by a freezing night resulted in Lucy’s windshield having ice on both sides. I can’t ever remember scraping the inside of a windshield before. Every car in the fleet leaks, so if there’s one Christmas present I actually need, it’s a magic fix for keeping Corvair insides dry.
Bodywork and Brakes
Fired up the kerosene heaters in the garage Sunday and got out the grinder. The flap disc made short work of smoothing out the welds on Heidi’s driver’s side patches. With the three done, I used the wire brush attachment on the grinder and removed the bondo and fiberglass that were temporarily holding the fourth patch in place. Then I rolled out the welder and an hour or so later, that last patch on that side was welded in and ground down to the level I wanted. A generous coat of rust converter on all the exposed metal and I left it to sit in the warmed up garage through dinner. After dinner, Victoria and I went out and installed Glinda’s replacement brake line. We had to make up the nine feet of length out of two lines by installing a coupling in between. We also had to bend the line into place. I’m glad only a week had gone by or I'd have forgotten where the bends needed to go.
It’s so much more fun working with someone else. Not just the extra set of hands, but the conversation and camaraderie. That’s what these Father-Daughter projects are all about. Quality time with each other.
It’s so much more fun working with someone else. Not just the extra set of hands, but the conversation and camaraderie. That’s what these Father-Daughter projects are all about. Quality time with each other.
CPotD #10 (Formal Four-Doors)

My apologies for the break in the jpeg, but this image best met my three criteria for today’s CPotD.
First, it’s a four-door hardtop. With all four windows rolled down, there’s something exceptional about the open-air feeling you get with the huge openings running from windshield to C-pillar. For a while my daily-driver was a ’66 Pontiac Catalina 4-door hardtop, and when the weather was nice all the windows would be down while driving. Since they were not power actuated and the car was huge, I had to go around to manually lower each one before getting in.
Second, I wanted a photo from an advertisement or brochure. I love imagining what it would have been like to take your brand-new Corvair out on the road, and until I can afford to restore one to perfect condition, these period photos are as close as I’ll come. This one is interesting to me for a number of reasons. The blue car really stands out against the browns, tans, and yellows of the surrounding and people. The younger-looking couple decided to buy a family car. The windows are all down even though it’s cool outside as indicated by the woman’s long-sleeve dress and the man’s sport coat over a long-sleeve shirt. And it sure looks like the guy’s checking his BlackBerry, doesn’t it?
Third, I wanted to highlight another great website. The Old Car Manual Project is a wonderful place to get lost in for hours. It’s not just owner’s manuals. It’s also dealer brochures, ads, photo albums – “over 38 gigabytes of old car stuff - tens of thousands of pages - the largest collection of classic car literature anywhere.”
Friday, December 4, 2009
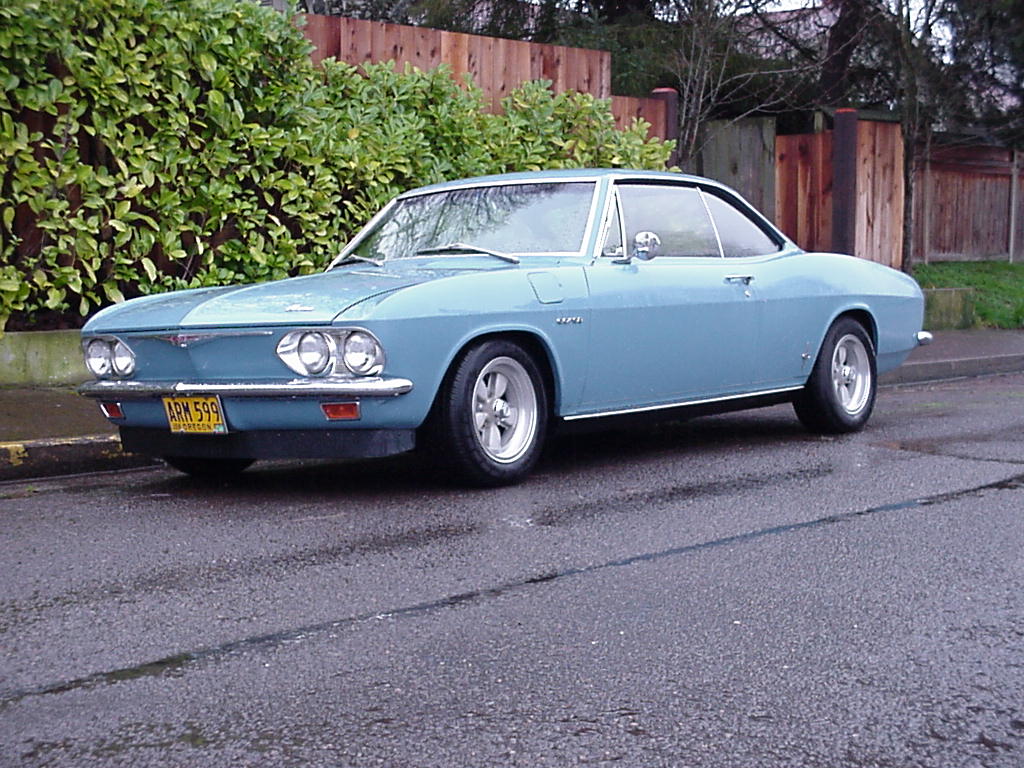
CPotD #9 (The One That Started It All)

I have absolutely no childhood memories of Corvairs. No relative owned one. No neighbor drove one. No classmate cruised in one. There must have been a bunch of them on the roads of Fremont, California during the 70s, but none every made an impression on me. So how did I get bitten by the Corvair bug?
I like to blame my in-laws. Back in the mid-60s they owned a Corvair convertible; a 1963 Monza I believe. I don’t remember whether they asked or I offered (probably the latter), but I was to keep my eyes open for a Corvair for them. Since Loriann and I were living in California – one of the only states in the Union that’s been able to keep out the tin worm – we were in a better position to find a solid twenty year old car than they were living in upstate New York. Being an old-car guy, part of my daily ritual was perusing the Antique Car section of the San Jose Mercury classifieds. Ah, the days before the web when your news was delivered once a day on your doorstep in black-and-white instead of 24/7 on your laptop in full color; when you could only get old-car parts at a junkyard, swap meet, or through Hemming’s instead of eBay, RockAuto, or through an online forum. But I digress.
One Saturday morning in 1985 I came across an ad simply worded, “63 Corvair, low miles, $950” with a phone number. I called the seller and set up an appointment to inspect the car that day. Soon after I was parked behind a proverbial little-old-lady-drove-it- only-on-Sundays car; nearly all original with less than 30,000 miles on the odometer. The owner’s daughter relayed how her mom had bought the car new and only drove it when making weekly trips to visit her children in San Jose. Since her mom had recently been placed in a rest home, she was selling the car for her. I looked all over and couldn’t find anything wrong with it. I gave it a test drive around the neighborhood, and everything checked out. As soon as I got home, I was on the phone with Loriann’s parents. To make a long story less long, they passed on the car, but Loriann and I couldn’t.
 After rebuilding the carbs, the car ran flawlessly. Twice during the decade we owned it, she was pressed into daily driver usage - once by Loriann and finally by me during the year before I sold her. This scan of a circa 1987 Poloroid shows her parked in front of our garage outside Pittsburg, PA. Next to her is my brother-in-law’s Nova he sold soon after. Now, twenty-five years later, we’re both still kicking ourselves for foolishly selling these cars.
In my case, the sale was precipitated by my foray into big-body Pontiacs, but that’s another story. I sold her to a guy from the tidewater area of Virginia who wanted a memorable birthday present for his dad. I don’t know if today’s CPotD is that same car, but it very well could be. I found this photo a few years ago, and all I remember is that it was part of a set shot by someone at a tidewater Virginia area car show. I’d be very surprised if that part of Virginia has more than one 1962 Twilight Turquoise 700 Club Coupe.
Thursday, December 3, 2009
CPotD #8 (Let's Take A Trip)
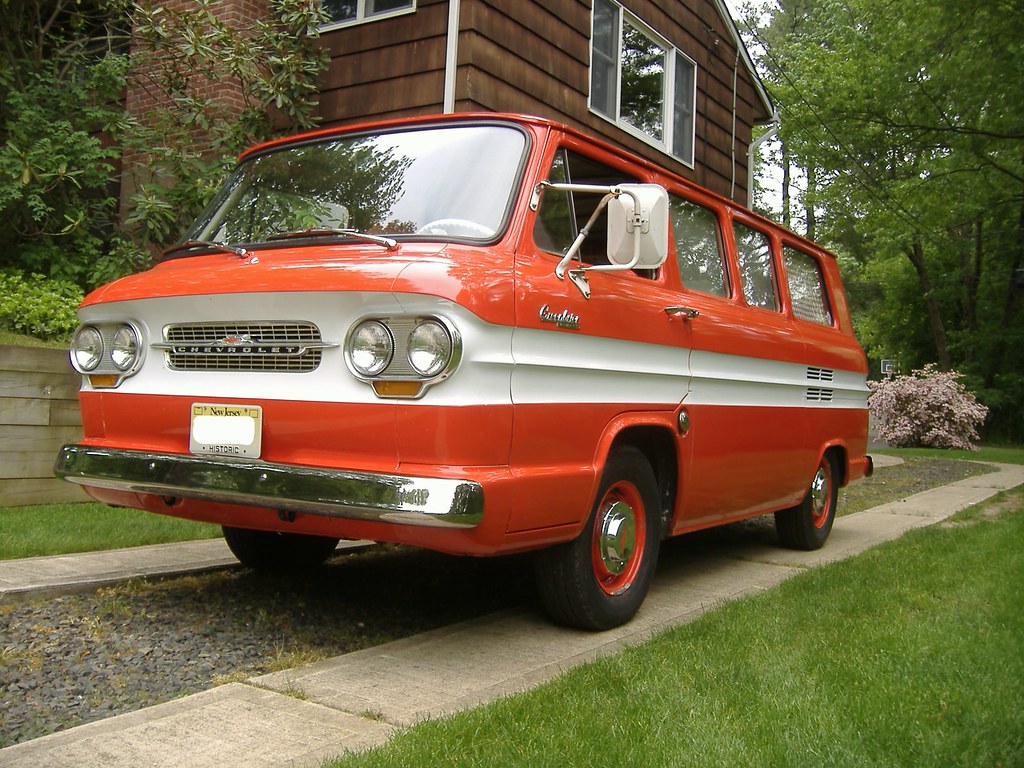
When I was only seven years old, my folks bought a new 1968 Volkswagen micro-bus (Type 2b in VW-speak). My dad immediately set about modifying it for camping. Out came the rear-most seat and in went a platform with a foam-rubber mattress, while the center seat was yanked and a homemade plywood camping box took its place. I don’t know where he got his inspiration, but Chevy dealers had been creating campers out of Corvair Greenbriers (their version of the micro-bus) since 1961.
 At the 50th Anniversary celebration car show in Cape May, there was a Greenbrier camper with a unique pop-up roof. Sadly, I didn’t get a good picture of it. Since this grainy picture is not worthy of a CPotD, I conducted a semi-exhaustive search on the web for a better photo of this distinctive Greenbrier. I failed, but I did find today's CPotD of a beautiful camper in improbcat’s Flickr photostream. Click here to see all the photos improbcat posted of this vehicle including some of the modified interior.
Wednesday, December 2, 2009
CPotD #7 (Swingin' with the Swing-Axle)

Even EMs (Corvair early models – ’60-’64) with their supposedly notorious swing-axle rear suspension can be a blast when driven fast. Here’s a picture of Lucy and I ready to roll off the grid with a couple other EMs at Summit Point Raceway’s Shenandoah circuit. The whole swing-axle sensation is superbly summed up (with pictures) on this Gary Aube webpage, but the bottom line is that under hard turning, the unloaded rear wheel will drop and tilt reducing the contact patch of the tire with the road. Naysayers claimed this scenario would result in the unloaded wheel tucking under if the steering was immediately cranked in the opposite direction causing the car to roll over. It was this unproven myth that caused Ralph Nader to devote Chapter 1 of his infamous book, “Unsafe At Any Speed” to the Corvair and its killing tendencies. In fact, the National Highway Traffic and Safety Board conducted extensive tests in the 1971 the conclusion of which was the “handling and stability performance of the 1960-63 Corvair does not result in an abnormal potential for loss of control or rollover, and it is at least as good as the performance of some contemporary vehicles both foreign and domestic." Gary’s Corvair Corsa website contains a great writeup here on this topic as well.
I believe this photo-of-the-day was taken by Scott Trunkhill, and I know it’s posted on his expansive website appropriately addressed as http://www.corvair.us/.
By the way, once we were out on the track, the other two hot cars didn’t stay behind me for long. Since I'm a big fan of both these racing EMs and their owners, I’m sure they will each have their own CPotD someday.
Tuesday, December 1, 2009
CPotD #6 (Safe At Any Speed)

This photo of my Corvair buddy, Jonathan, in his Corsa and on the brakes at Roebling Roads Raceway illustrates that Corvairs make for very fun track cars. Their four-wheel independent suspension, low center of gravity, and light weight are part of what makes these cars such a blast to drive fast. NECC, the host of this photo, “conducts high-speed track events for sports car enthusiasts.” I’ve been to two of their events and have loved every minute of the experience. Fellow Corvair racers are a great group – friendly, helpful, easygoing, and a lot of fun to spend time with. I can’t wait for next year and the next NECC event.
When the Suburban’s Away,....
... the Corvair’s Will Play Fail
We took a risk when we let Brianna drive away in the Suburban. The tow bar in the garage won’t do me any good without a 3 ton behemoth available to do the pulling. So, of course, the first day the Suburban’s out of our driveway, we have Corvair issues.
First, as I’m cruising down the interstate to work, I get a strong smell of gasoline in the salon. I begin to pray that it’s the car in front of me, and before I can finish my prayer, Lucy’s engine dies. I profoundly figure out it is MY car with the problem as I coast to a stop on the right shoulder. I reach into the glove-box for the flashlight before heading to the rear of the car to figure out if the issue is roadside fixable. I immediately discover the inlet fuel line completely unscrewed from its fitting in the side of the fuel pump. A ½” wrench from the toolbag provides the means to reattach the line. Thinking I’m home free, I close everything up, hop behind the wheel, and turn the key. It’s going to take a few cranks to get fuel back into the carburetor bowls, but my old battery is about three cranks short of success. Thank goodness for cellphones. I call my lovely wife, who drops what she’s doing, grabs the gas can from the garage, and drives to my rescue. Twenty minutes later, a splash of gas into each carb, and a jump-start, and Loriann and I go our separate ways. When it’s time to go home, I make sure I walk out with someone who can give me a jump-start, but she fires right up.
Second, Ariel calls me about 1 in the afternoon. “My car won’t start,” she tells me. Since it was raining, she drove to class and now it’s dead in the parking garage. After she explains that Ringo’s engine cranks, but won’t catch, my first thought is she’s run him out of gas. The gauge has been wonky of late reading ¼ tank left when she’s run out of gas. She says she knows there’s plenty of fuel since the gauge is reading ½ and there’s less than 110 miles since she filled the tank. It’s too dark in the garage for her to see whether there’s gas squirting in the carbs when she blips the throttle, so she decides she’ll walk back to her dorm, and come back later with a friend to help her. About ten minutes later I get another call from her. “I got him running,” she tells me. “I guessed that it had flooded, so I held the gas pedal to the floor while cranking and the engine finally started.” WOW, I guess I taught her well. Ariel’s able to diagnose and solve her own Corvair problems now.
Monday, November 30, 2009
A Long Weekend and a Short List
A short list of car tasks completed. Lucy got the most attention since I thought Brianna and Nich were going to take her back to Virginia (they didn’t, but took a Suburban full of Brianna’s stuff instead). I vacuumed the heater/defrost ducting, cleaned the windows, repaired the glove-box cardboard, installed Velcro to hold the package tray carpet in place, and checked the balance of the carburetors. The latter was accomplished using a 20’ length of clear plastic ¼” tubing with a couple teaspoons of Marvel’s Mystery Oil. I draped part of the tubing over the two rear corners of the raised engine lid forming a u in between with the oil sitting at the lowest point. Then, with the engine warmed up, I connected the open ends of the tubing to the vacuum ports on the base of each carb. The oil did not budge until I moved the throttle shaft slightly. With that little blip of the throttle, the oil started moving to the right. This showed me there is looseness in the left carburetor linkage allowing the right carb before the left one. I released the shaft. I then pulled slightly on the left carb’s linkage, and the oil started moving that direction. After releasing, the oil moved back to the center. All good signs indicating the carbs are balanced.
Ariel brought Ringo home for the long weekend, so I was able to replace the now-broken muffler strap with a new one I’d ordered from the Corvair Ranch.
Finally, Victoria and I worked hard to remove the main front-to-back brake line. This required us to take off the two tunnel covers and the air duct. I’m still amazed by how many differences there are between EMs and LMs.
CPotD #5 (I Love a Nice Purple Car)
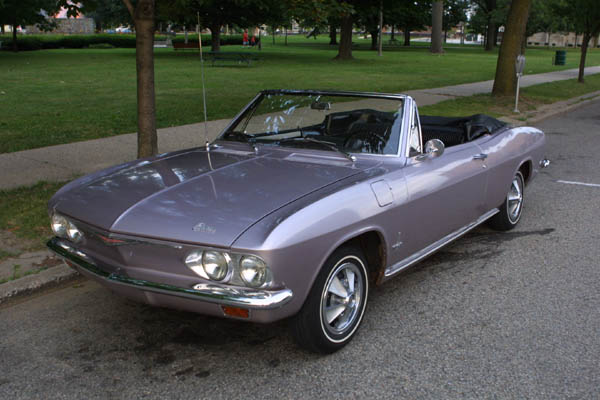
This lovely 1965 Monza convertible is painted one of my favorite colors. Even though the car is extremely desirable, this post is more about its color than the car. Evening Orchid (in Chevy-speak) was their special, one-year only, color for 1965. Pontiacs of that year could also be had in this color if the buyer checked the Iris Mist box.
In addition to the cars in my Corvair fleet, I own a black ’65 Pontiac LeMans convertible that’s patiently waiting to be restored. Because I’ll never be able to get the bodywork perfect enough to repaint in its original, imperfection enhancing color, I threaten to paint it Iris Mist. I say “threaten” because my best friend (next to my lovely wife) gives me flack about Iris Mist being a feminine color. Oh well, living with so many females was bound to have an effect.
This photo is found on Norm Witte’s wonderful website that includes, among other topics, pictures of Corvairs in nearly every color offered for every year. The Corvair community greatly appreciates Norm’s efforts on this project – it’s a great resource.
Saturday, November 28, 2009
CPotD #4 (Wagons Rock)
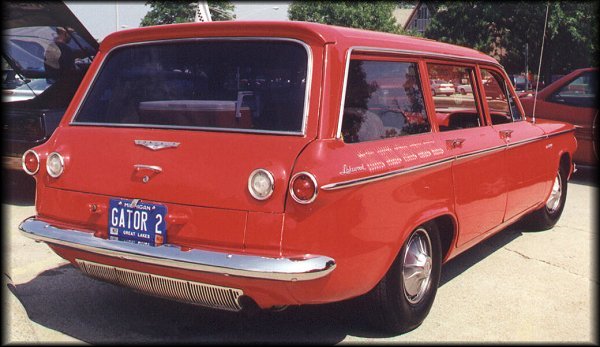
I have always, strangely enough, loved station wagons. Maybe it was all those rides to church in the way-back of the Gunnink's Mercury Colony Park. At car shows, I find myself lingering the longest at the wagons. Fortunately, for me, GM produced a typical wagon for the Corvair line, albeit for only two years, 1961 and 1962. They also called their Greenbrier (produced from 1961 through 1965) a sportwagon, even though today we'd consider it a mini-van. For 1961, the station wagon model was called a Lakewood, while in 1962 they dropped that moniker and boringly replaced it with Monza Station Wagon. The above picture is courtesy of Gary Aube's fantastic CorvairCorsa website.
At the last Corvair car show we attended, Loriann spied a wagon and told me she thought it was really nice looking. There's an in - maybe the fleet will include a Corvair station wagon one day.
Friday, November 27, 2009
CPotD #3 (This Rampside is NOT Stock)
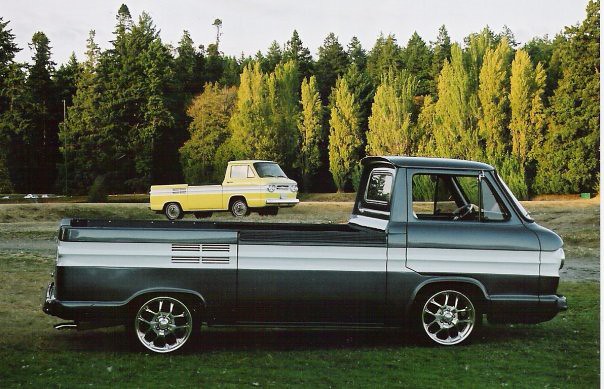
FCs or Forward Controls form a unique arm of the Corvair family. The following photo of Shawn's Rampside was snagged off the CorvairCenter's Forum Thread called "SO WHO HAS THE BEST LOOKING CORVAIR?". I think this was the best looking FC submitted.
Thursday, November 26, 2009
Thick is Better Than Thin

I finally tried out my new (to me) MIG welder today with mixed success. I had two different thicknesses of sheetmetal to practice on. I could make the nice bzzzzzzzz-ing noise welding on the thicker piece, but laying a good bead on the thinner one was a bit of a challenge. Until I turned the voltage setting down to 2, I did a lot of blowing out – making bigger holes out of tiny gaps. I did get a few decent-looking welds after some fiddling with the power and speed settings of the welder. The thinner sheetmetal, fortunately, is less than the typical Corvair body metal thickness, I should be able to make passable welds. Regardless, the flap discs are going to get a good workout smoothing things out once I'm welding on things that matter.
CPotD #2 (Heidi Was Once a Real Beauty)

Here's a picture of Heidi right after we got "finished" with her. Sitting outside for four years, driving through all kinds of weather and road conditions, having side-swipe damaged repaired with a non-matching paint, and succumbing to the tin worm in too many places all contribute to an exterior that's - well, for lack of a better word - lacking.
The next month will be an interesting one for Heidi - and me too. After Thanksgiving, Brianna is leaving Heidi with me and taking Lucy back to Radford. I'm going to be playing bodyman until Christmas. Patches need to be welded into the right rear quarter and the front valence. Those patches and the ones Jonathan welded in for me last month all need to be ground smooth, primed, filled, primed again, sanded, and painted. Then, I'm planning on wet sanding and buffing the entire body except for the passenger door and right rear fender. Those were done with a clearcoat/basecoat as part of the aforementioned side-swipe repair.
Wednesday, November 25, 2009
CPotD (Corvair Photo of the Day)
None of the members of my fleet would anyone consider restored. Heidi was quite nice for a while, but the paint was never perfect (my first paint job). Four years later it’s all washed out. Lucy and Ringo, like Heidi, also have rust issues that desperately need my attention.
With all the work just keeping the fleet on the road, I can always use some inspiration. During my near-daily perusal of the internet, I visit a number of Corvair-related sites, many with photos of beautiful ‘vairs. I’ve decided to steal an idea from my favorite blogger, Chuck Goolsbee, and post a Car Picture of the Day or, in my case, Corvair Picture of the Day. Hope you enjoy.
This first one is my current PC wallpaper. It’s Bob Ralston’s gorgeous ’65 Corsa. I love everything about this car: the lowered stance, the wheels, the paintjob. Credit to Bryan Blackwell and his awesome website for hosting this picture (and many, many others).
Monday, November 23, 2009
If Only Every Weekend Provided So Much Car Time
Squeezed around soccer games, I was able to spend time both Saturday and Sunday working on Corvairs. I had been formulating a list of little items that needed attention on Lucy and Saturday afternoon I was able to get to most of them.
1. Rearview mirror was loose – not anymore.
2. Horn was quiet – not anymore.
3. Dash was only half-lit – not anymore.
4. New oil pressure switch was still in the package – not anymore.
5. Engine needed tune-up – not anymore.
6. Rocker panel trim needed removal – not anymore.
1 was completed by simply tightening a screw. 2 took some cleaning of one of the contacts in the trunk main harness connector. 3 was a simple replacement of a blown bulb. 4 took a little more effort, but after removing the fuel pump and pulley wheel from the generator, the swap was a snap. 5 included pulling, cleaning, and gapping the spark plugs, replacing the distributor cap and rotor with better looking ones from the shelf, and cleaning spark plug cables 6 was just a matter of six screws and it was off. I’ve removed the two panel trim pieces to get to some rust-through. Now that they’re off, I like the cleaner look. I’ll probably keep them off. Still left on the list is balancing the new carburetors and giving the inside a good vacuuming.
Sunday afternoon, Victoria asked me to go out and work on Glinda with her. I could not refuse that request. Since we’d been convinced the brake issue was a failed right rear wheel cylinder, we had to turn the car around in the garage to access that wheel. She and I were able to negotiate the spin without incident. I then directed her in the rebuilding of a brake wheel cylinder. Except for a couple of spring removals and installations, she was able to do the work under my tutelage. Impressive (her efforts, not my direction). With the brake assembly complete and the hub back in place, I had her sit in the driver’s seat and press the brake pedal. Unfortunately, the dripping brake fluid coming from the middle of the car illustrated that we’d missed a problem. A leak in the main brake line that runs to rear of the car. Without a replacement on-hand, we put away tools, cleaned up, and called it a day.
This morning I talked with Jeff at the Corvair Ranch and he told me they just buy a stock length of tubing from the auto parts store and bend it in place. We’ll do the same since a replacement, pre-bent one costs $45 plus extra shipping due to the size.
Friday, November 20, 2009
It’s Nice to Get an Easy One Once in a While
When Ariel called me on her cellphone yesterday afternoon to inform me that, “Ringo is really loud, Dad,” I cringed with the dread of an exhausting (yes, pun completely intended) job for that evening. I assumed the loudness was being caused by an exhaust leak given that Ringo was still running fine. After dinner, I pulled him into the garage and jacked up the left rear. After securely supporting body, I slid under and discovered that the driver’s side exhaust flange had broken. Great, I thought. Removing these nuts is going to be a nightmare as usual. I’ve got at least three exhaust manifolds on shelves with busted studs because the nuts had seized. To my amazement and joy, the four nuts came right off without any effort whatsoever. I would bet the previous owner sprung for the stainless steel fasteners at some point. With that hurdle crossed, I climbed up on a stool and pulled down a spare exhaust assembly (so nice to have usable parts on-hand). After coming up with two usable exhaust gaskets, the reassembly went easily. With everything snugged down, I started up the engine and slid back underneath to listen and feel for leaks at the joints. All the exhaust sound was coming from the tailpipe - the joints were good. Off the jackstand, all four wheels on the ground, and the swap was finished in about an hour. A new record for an exhaust job for me.

Since it's important that those joints stay sealed to prevent any CO from entering the salon, I got on the phone this morning to Jeff at the Corvair Ranch and ordered new gaskets as well as a muffler support strap since I'd noticed the current strap wasn't going to last much longer.

Since it's important that those joints stay sealed to prevent any CO from entering the salon, I got on the phone this morning to Jeff at the Corvair Ranch and ordered new gaskets as well as a muffler support strap since I'd noticed the current strap wasn't going to last much longer.
Thursday, November 19, 2009
Neck and Neck Expenses
I’ve been tracking how much each car in the fleet is costing us. Amazingly, Lucy and Heidi are less than $10 apart. Both cost me roughly $500 to buy. Heidi’s significant expenses have been new engine parts, convertible top, upholstery, and paint, while Lucy’s big hitter was paying for the Corvair Ranch to make her roadworthy. Two paths to the same conclusion.
Wednesday, November 18, 2009
Is Heidi Bucking for a Change of Ownership?
The following four paragraphs were submissions I made to the Virtual Vairs e-mail list. They are self-explanatory:
Tuesday, Nov. 17 at 9:11 AM
“My daughter's '64 is giving her electrical issues. The other day, the car wouldn't start. She got it jumped and drove it to Advance Auto who tested the battery and claimed it was dead (possible given the age of the battery). They replaced the battery and sent her on her way. This morning she went to start it and the battery's dead again. It was fine for three days of normal driving, but there's obviously something still wrong with it. She told me the GEN/FAN light is only on when she goes to turn the key. It's not on when she's driving. I've told her to get it jumped and take it straight to Sear's and have them check out the charging system. She'll do that this afternoon, unless I give her the name of a better place to take it. Any mechanic recommendation?”
Tuesday, Nov. 17 at 1:25 PM
“Saga continues. I decided she should take the car to the FLAPs to check the charging system (since they sold her the battery without checking). She was able to get someone to come give her a jump. She hooked up the jumper cables (and she's done this before), let the other car charge her battery for a few minutes, then turned the key. Nothing. She disconnected the positive cable from her battery and reconnected the jumper cable directly to the positive connector, had someone turn the key while she was holding the cable to keep it from shorting. Nothing. No click, nothing. She and her fiance just replaced the broken leafspring bolt assembly on the driver's side. Could the two problems be related? Never a dull moment dealing with the fleet.”
Tuesday, Nov. 17 at 4:00 PM
"Heidi's been towed to Nich's family mechanic (McCoy Auto Repair). We'll see what he finds."
Wednesday, Nov. 18 at 2:40 PM
“My embarrassment is monumental. It was an easy fix and one that, honestly, I had thought of, but since I was not there couldn't verify. Drum roll please.............. It needed a new positive battery cable. I know, I know, this is a basic maintenance item. I'm sure it's what killed the previous battery. Lack of maintenance = $$. Thanks to all for the excellent info on what could be wrong and how to check for it. All good background that I've saved for the next time. And with the number of 'vairs I've got, and will have, on the road, there's gonna' be a next time.”
Not really Heidi’s fault, but she’s trying hard to piss off Brianna so much she won’t want to deal with her anymore.
Glinda Gets Some Attention Again – Finally
Victoria and I went out to the garage Sunday with the intention of rebuilding the brake wheel cylinders. We pulled the left front wheel and hub and all we saw were nearly new parts. The giver (I’d say seller, but he only got a $1), told us the brakes were completely re-done less than 500 miles ago. Now that was five plus years ago, so we’ll tread cautiously. On early-models, one can rebuild the wheel cylinders without removing the cylinder from the backing plate. After disassembling the brake assembly, we discovered this is not the case on lates. Not wanting to needlessly risk breaking one of the attachment bolts, we decided to test the brakes with the “hard, HARDER, HARDEST” test before diving deeper into disassembly. I got behind the wheel and pressed on the brake. Everything held. Pumped and pressed harder. Still good. Pumped and REALLY PUSHED. Pop and hiss. Victoria walked around as I pumped and found that the right rear was now leaking. Too bad.
She had to leave for an appointment, so I told her I’d put the left front back on the wheel dolly and we’d move the car next Sunday to deal with the left side brakes.
She had to leave for an appointment, so I told her I’d put the left front back on the wheel dolly and we’d move the car next Sunday to deal with the left side brakes.
Spare Engine Dismantled and Pertinent Parts Put Away
Last Saturday evening, while the girls were skating, I spent a couple hours completing the teardown of the spare ‘vair engine. After investigating the condition of the crank and cam, I decided to leave them captive within the two halves of the bolted-together block. I brought the wheelbarrow into the garage and tossed the pistons (have a good set on the shelf already), valve covers (have a good set…), oil pump housing (have a good …), and the bent oil pan (have a …). I removed Heidi’s original block from a bottom shelf, added it to the wheelbarrow load and then filled the spot with the spare block assembly. I poured all the nuts, bolts, and small bits into the bottom of a box followed by the six cylinders. The box found a nice home on top of the block. I was able to get the rest of the parts – heads, bellhousing, flexplate, top cover, shrouding, etc – onto shelves and out of the way. At that point, all that was left was the cleanup. I’d created a mighty mess of soiled sockets, dirty drivers, and spoiled spanners on a filthy floor. Purple Power and rags took care of the tools, while granular floor sweep absorbent (aka kitty litter) was liberally spread over all the oily spots.
Thursday, November 12, 2009
Spare Engine Issues Force a Teardown
Went out to the garage last night to finally determine whether the spare engine was usable as-is or not. I knew there was a slim chance it would be reliably functional, but I decided to go through the motions of prepping and checking. So I fitted an oil filter and added enough used oil (hey, I am frugal) to show full on the dipstick. After pulling the distributor, I spun the oil pump using my hand-drill with the rod machined to mate with the slot. Had to tighten the oil filter bolt to stop the oozing, so I knew I was actually pressurizing the system. After a half-minute more of oiling, I hooked up a spare battery to the starter, energized the solenoid, and watched the torque converter spin around taking the crank with it. OK, that worked, now let’s see what kind of compression each cylinder has, if any. I screwed the end of the compression tester hose into the #6 sparkplug hole and energized the solenoid. The needle went up to 90 psi after a couple revolutions, but after the cranking stopped, the needle dropped to zero. I removed the tester hose, poured a little oil into the cylinder, and reinstalled the tester. This time the needle climbed above 150 psi and stayed there after the cranking ceased. Looks like that cylinder has bad rings. Moved on to the rest of the cylinders and got values of 90 to 140, each holding steady. That bodes well for the valves, I thought, but there’s no way this engine will run well.
Disassembly time. First, I carefully removed the oil drain plug so the oil would drain into the catch pan. I didn’t need to be so careful since nothing came out the open hole. A big not-good. This will be interesting. Am I going to discover a big chunk of solidified oil sitting in the bottom of crankcase? Won’t know until I open her up. Off the engine and onto the shelf went the fuel pump, harmonic balancer, alternator adapter, and oil cooler. Next off was the right-side valve cover which exposed a disturbing sight. Rusty valve springs with nary a trace of oil to be seen on any surface. Another big not-good. Into a bucket went the rocker arms, pushrods, guides, and head nuts. I’ll decide later what I’m keeping and what gets scrapped. I noticed the ends of a couple valves were a little beat, but that was only adverse sign. Over to the other side, and while no slickened surfaces were spotted, rust had not set up shop in this area. The bucket’s contents was doubled, and after removing and shelving the fan, pulley, and top cover of the engine I could finally see into the engine. No sign of oil, but also no sign of bearing bits. Can't wait to finish the teardown and figure out what the deal is with the oiling system. At that point it was time to call it a night.
’64 Corvair engines are a one-year only thing. They have the larger displacement of the later engines (via an increase in stroke), but retained the head gasket area of the prior years’ engines. In ’65, this area was increased improving reliability. I still have many of Heidi’s original engine parts including the block, crank, cylinders, pistons, and connecting rods. If the ’65 vintage spare engine equivalents are in decent shape, I’ll keep them and scrap the ’64 pieces. Anyone want a project?
Heidi’s Double-Whammy
 Around 3:15 Tuesday I got a phone call from Brianna. She said that Nich, her fiancé, had just called her and told her Heidi broke as he was leaving work. “He says something is dragging on the ground under the rear of the car and he’s afraid to move it. He’s sending you pictures from his phone now.” The pictures Nich sent me confirmed my diagnosis of a failed link at the end of the transverse leaf spring.
I called Nich to assure him he could move the car out of traffic (it was partially blocking the entrance to his work’s parking lot) and into a parking spot. We briefly discussed how we were going to deal with the breakdown and he decided he’d leave the car in the parking lot until the next day, call his parents, and beg a ride since his car was in the shop with a dead transmission (yes, when it rains, it pours). As soon as I got off the phone with him, I called Clark’s Corvair Parts and had them overnight two new link assemblies to Nich’s parent’s house.
 Then I crafted an e-mail with explicit instructions (with drawings) on how to make the repair. The only risky part is the removal of three nuts that hold the retainer to the control arm. If they break the stud because it’s rusted to the nut, then finishing the job will get very difficult. Fortunately, with new parts and towing coverage, they could get it to a mechanic who could finish the job if they absolutely had to.
Yesterday afternoon, Nich, his dad Gary, and Brianna, drove to Heidi with tools and the new parts. In a drizzle, they successfully replaced the broken link and Heidi was drivable again. Brianna got in, turned the key, and nothing happened. Dead battery. Gary’s car provided a jump start and they were underway. A few blocks down the road, Brianna had to stop quick and Heidi’s engine stopped. The battery was not recharged at this point, so restarting required another jump from Gary’s car. I can really feel their pain at this point. They just finish one repair and it goes better than they’d hoped, and now something else has popped up giving them grief.
Brianna dropped Nich off at school and then drove Heidi straight to Advance Auto. She had them test the battery confirming it had gone bad, so in went a new one. Let’s hope and pray this is the end of Heidi woes for a long while.
Wednesday, November 11, 2009
I Love GNPs
Loriann (my lovely wife) and I have always owned older houses, so many times our “home”-work is replacing broken old parts with GUPs (good used parts). Working with house GUPs is challenging to say the least. GUPs are typically more fragile than their new equivalents, so we have to work carefully. GUPs always bring along the threat that, once installed, they won’t work properly. GUPs can’t be bought at Home Depot and are usually scarce, so acquisition involves some hunting followed by exorbitant shipping charges and a few days wait before the part’s in hand.
Alternatives to GUPs are GNPs (great new parts). GNPs are a joy to work with: robust, reliable, readily available, and always accurate. Unfortunately, GNPs are typically more expensive than GUPs. Because of this, we end up using GUPs whenever possible.
The same story exists in our old car work. While GUPs are much cheaper (many times free) and readily available (sitting on a shelf in the garage), GNPs come with a warranty, are pretty, and work right the first time. Unfortunately, most of the time my budget doesn’t allow GNPs. There are exceptions, however.
As I recently reported, I was able to obtain a pair of GNP-quality carburetors for much less than GNP pricing (thank you Wolf Enterprises). Sunday afternoon I was finally able to carve out an hour to install them on Lucy. Initially, Lucy didn’t run right, but I knew the carbs weren’t the problem, so I kept tweaking the linkages until I got a nice smooth idle at 600 rpm. Throttle response is excellent and there’s no more miss at partial throttle on the highway. What a pleasure.
Like I said. I love GNPs!
Tuesday, November 10, 2009
Don’t Jump To Conclusions
I seem to have the nasty habit of assuming the worst when I go to fix a problem with one of my cars. When a failure occurs, I identify the hardest part to replace and call it the culprit. No gas to the carbs; must be the fuel pump. NOPE, it’s vapor lock and now you need to replace a perfectly good fuel pump because you screwed it up needlessly messing with it. No blinkers; must be the switch. NOPE, it’s a bad ground connection and you just wasted an hour when all it should have taken was ten seconds of cleaning and reinstalling the socket.
Friday, on my commute home, I noticed that the dash lights didn’t come on when I turned on the headlights. Not having learned anything from my previous faulty diagnoses, my pessimistic self immediately decided that the headlight switch I’d installed the night before had failed. I was so frustrated that I’d done all that work putting in the replacement, only to have it almost immediately fail. Sunday afternoon, with my mind still convinced the switch was at fault, I dove into remove, repair, and reinstall of the headlight switch. The mechanism for controlling the dashlights is a potentiometer built into the face of the switch assembly. I figured the coil of tiny wire had broken, so after removing the switch from the dash, I tested the circuit in the switch to see if I was right. I wasn’t. Surprise, surprise – not. There was nothing wrong with the switch. Irr. Time to back up and check more basic things, like whether the brand-new lightbulbs were blown. They were. I popped in a replacement bulb and Lucy’s speedometer and gas gauge aren’t in the dark anymore. I decided to see how long the one bulb lasts before I go and install the second one. Now the switch may still have a problem because something caused those bulbs to blow. Time will tell.
Now did I learn anything from this latest escapade? Doubt it.
Thursday, November 5, 2009
Headlight Failure Forces Car-Time
Last night I had to work on Lucy. Somehow it’s easier to break away from house-work and get myself out to the garage when a debilitating ‘vair issue. This time it was the headlight circuit. I only had high-beams. Since my commute starts in the dark and ends that way, I need properly functioning road illumination. Lucy’d had this problem before – a weak connection at the hi-beam switch, so I knew right where to attack. After separating the connector plug from the jack, I tested the switch to verify it’s proper functioning. All was good there. Then I cleaned the terminals of the switch and the mating surfaces inside the plug body. After applying some bulb grease to try to protect the metal from corrosion, I slid the plug back on. No headlights. Irr. I found, however, that if I twisted the plug slightly contact was made. What was happening was the plastic plug body had melted with the high resistance of the corroded contacts. The two contact surfaces were then not held tightly to each other. A small wood wedge behind the plug forced it into properly applying pressure and reliable illumination resulted.
On my way home from work I had stopped by the auto parts store and bought a package of dash light bulbs to replace Lucy’s dim ones. After fixing the headlights, I replaced the old with the new. What a tremendous difference!
When I first put Lucy on the road, the dash lights would not go on. The problem was the circuit in the headlight switch that controls the brightness of the dash lights. The variable resistor was broken. At that time I bypassed the switch by connecting the dash light’s circ uit directly to switched 12 volt at the fuse block. That meant the dash light were on whenever the car was on rather than just when the headlights are on. So my next, and last, task of the evening was to replace the switch with the used one I’d removed from the red 4-door. The first step in making this swap is to remove the knob shaft from the switch assembly. This is done by pressing a small button on the assembly while pulling the knob out. When I did that to the assembly in the car, the headlights turned on, so I used the shaft to move the switch to the OFF position. Before mounting the replacement switch, I did the same thing. After tightening the nut holding the switch to the dash, I tried installing the knob shaft into the switch. It took me quite a few tries before it would fall into place. When it did, something was wrong. The knob would only pull out slightly – not even enough to get to the first detent. I tried to remove the knob shaft, but to no avail. I ended up prying the shaft from the assembly breaking something inside. Out came the switch assembly and to the workbench it went. I disassembled both the old and the replacement switches and swapped out the broken part with the one from the old switch. I then put it all back together, tested it, and installed it; this time leaving the switch in the first detent position instead of the OFF position. The knob shaft installed easily and the switch actuated properly. Job completed, but I sure made it harder than it needed to be.
On my way home from work I had stopped by the auto parts store and bought a package of dash light bulbs to replace Lucy’s dim ones. After fixing the headlights, I replaced the old with the new. What a tremendous difference!
When I first put Lucy on the road, the dash lights would not go on. The problem was the circuit in the headlight switch that controls the brightness of the dash lights. The variable resistor was broken. At that time I bypassed the switch by connecting the dash light’s circ
 uit directly to switched 12 volt at the fuse block. That meant the dash light were on whenever the car was on rather than just when the headlights are on. So my next, and last, task of the evening was to replace the switch with the used one I’d removed from the red 4-door. The first step in making this swap is to remove the knob shaft from the switch assembly. This is done by pressing a small button on the assembly while pulling the knob out. When I did that to the assembly in the car, the headlights turned on, so I used the shaft to move the switch to the OFF position. Before mounting the replacement switch, I did the same thing. After tightening the nut holding the switch to the dash, I tried installing the knob shaft into the switch. It took me quite a few tries before it would fall into place. When it did, something was wrong. The knob would only pull out slightly – not even enough to get to the first detent. I tried to remove the knob shaft, but to no avail. I ended up prying the shaft from the assembly breaking something inside. Out came the switch assembly and to the workbench it went. I disassembled both the old and the replacement switches and swapped out the broken part with the one from the old switch. I then put it all back together, tested it, and installed it; this time leaving the switch in the first detent position instead of the OFF position. The knob shaft installed easily and the switch actuated properly. Job completed, but I sure made it harder than it needed to be.
Monday, November 2, 2009
No, I Did Not Get Much Car-Time Last Weekend
Between a trip to PA on Saturday and assorted responsibilities on Sunday, I only squeezed in about 90 minutes of time in the garage. I spent that precious hour-and-a-half working on the spare engine. I bolted on the flex-plate and a torque converter, and then mounted the starter using bolts as spacers to represent the thickness of the differential flange. My plan is to mount an oil filter, temporarily fill the crankcase with used, pull the distributor, spin the oil pump to pre-lube the engine components, and then do a compression test of the cylinders. We’ll see when I get to that.
Friday, October 30, 2009
Will I Get Any Car-Time This Weekend?
The last few weekends have been pretty jammed up with family and house stuff. I really wanted to get Victoria out to the garage to work on Glinda, but that hasn’t happened. There’s a lengthy list of Lucy projects in addition to working with V on her car. Top of that list is installing the reworked carburetors that showed up in yesterday’s mail. Then there’s the spare engine project that’s just sitting in the way on the garage floor. I really should determine whether it’s in good enough shape to leave together or if I should just tear it down into pieces that can be shelved.
Also in yesterday’s mail were two 1.5 by 2 inch ABS plastic couplers. They’ll be used to raise the air cleaner to improve (read: smooth out) the airflow into the carburetors. They won’t, unfortunately, just be a slap-on improvement. I’ll need to fashion gasketing at each end out of RTV that prevented from sticking to the carb and air-cleaner metal using wax paper or plastic wrap.
Guess we’ll just wait and see what the weekend brings me.
Wednesday, October 28, 2009
Parts Packed Prior to Postal Passage
Last night I boxed up the free Corvair parts I’m shipping to ‘vairists across the county. Sunvisors and smog pump to Virginia, seat tracks to Pennsylvania, jack and lug wrench to California, and a shifter to Ohio. It’s nice to help out the Corvair community.
I got my welding helmet in the mail yesterday, so I had to try it on – as did a couple of the kids. Claudia, our 12-year-old Korean exchange student, was full of questions and comments like “You can’t see through the window!” I’m now ready to make metal messes in the garage. EXCITEMENT about something new!
I got my welding helmet in the mail yesterday, so I had to try it on – as did a couple of the kids. Claudia, our 12-year-old Korean exchange student, was full of questions and comments like “You can’t see through the window!” I’m now ready to make metal messes in the garage. EXCITEMENT about something new!
Monday, October 26, 2009
Carburetor Expert Diagnosis and Repairs
I shipped my balky carbs to Wolf Enterprises last week. Following are excerpts from his work on them:
“I got the carbs and the problem was obvious. Whatever was used to seal the top vents had deteriorated and was throughout the carbs and was plugging the venturi clusters….
- removed one of the double gaskets under the inlet seat - throwing off the float settings (floats not level)
- very worn and leaking throttle shafts - put on seal kits
- one base vent always open (air leak) - removed, adjusted and replace
- chokes tripper arms on the throttle levers out of adjustment
- right carb fast idle speed adjustment on the cam
- replaced a cracked choke tripper lever”
So it appears the root of the problem was clogging caused by the epoxy I’d used when installing the vent tubes. I guess Loctite’s General Purpose epoxy is not impervious to gasoline. On the definite upside Grant fixed and tuned the carbs, so I’m quite excited about seeing how much nicer Lucy will run with excellently setup carburetors.
Friday, October 23, 2009
Everything Checks Out
I checked for a battery draining short last night using a broken, yet electrically functional, taillight assy. By disconnecting the negative cable from the battery and inserting the taillight bulb in series, I could see if any device or a short was drawing current with the key off. The light stayed dark, so everything is off and there are no shorts. I turned the ignition key to ON and the lightbulb went off. All’s good. Oh wait. The dome light was still off. A slight turn of the headlight switch knob and on popped the light. Guess I bumped it when I messing about the night before.
Yesterday I placed an order with the Corvair Ranch for a new pressure switch to replace the leaking one in Lucy's engine. Also on the shopping list was rebuild kits for the front and rear brakes of Victoria's car, Glinda. That's the next get-Glinda-on-the-road project she and I will undertake.
On the welding front, I was all set to start using my MIG welder, but I decided to buy a different welding helmet. The one I'd bought at Harbor Freight is auto-darkening, but I read about a chin-activated helmet. I feel this type will be safer for my eyes because I'll control when the tinted lens comes down, not depending on electronics to darken the lens. I jumped online and bought one on eBay. Hopefully, it'll arrive this weekend so I can start making sparks.
Thursday, October 22, 2009
Perfect Electrical Storm
Needing to address a few issues on Lucy, I pulled her into the garage last night. First on the list was removing the right side rocker trim that had been flopping for a few weeks. Due to rust, the attachment screw at the front had no decent metal to thread into, so it fell out. Since I’m going to weld in a patch in the near future with my new-to-me MIG welder, I decided now was a good time to see how severe the decay was. Not too bad considering the significant patch I had to buy and have welded in the same place on Heidi’s fender.
Second, I needed to fix the unreliable wiper switch. I pulled it out of the dash and disconnected the leads. Since Lucy originally had a one-speed wiper motor, I had put in new wires with separate connectors when I upgraded her to a two-speed motor. This meant I would need to pay attention to which connector went to which lead on the switch. I didn’t. Discovering my error, I re-plugged the connectors to where I remembered them going and tested the switch. Lo-and-behold the switch worked reliably for a dozen or so actuations. I re-installed the switch into the dash and all still worked wonderfully.
Finally, I needed to deal with the intermittent turn signal switch. Thinking it was corrosion in the switch, I pulled it out, cleaned off all the grease, lubricated with bulb grease, reassembled and tested. All appeared to be functioning correctly. I plugged the switch into the harness and ran a test. Right turn worked fine, left did not. Now I needed to find out where the break in the circuit was. With voltmeter in hand, I verified 12 volts at the blinker module, then 12 volts at the back of the connector, then 12 volts at the connector in the trunk, but no lightbulb lighting with everything plugged in. Walked over to the right front socket and gave it a jiggle – light went on. Cleaned the ground contact and it stayed on. Still wouldn’t blink though. Walked around to the back of the car – no light on the right side. Opened the engine lid and jiggled the connector – light went on. Everything worked at that point. Who'd have thought that both right side lights had problems at the same time.
With all the problems supposedly solved, I put the tools away and went inside for the night. This morning as I opened Lucy’s door to drive her to work, I noticed the dome light was not on. Hmm. Then I turned the key and the engine barely rotated. Double hmm and a "ah crap" thrown in for good measure. I wondered if all my fixes resulted in a short that drained the battery. No time to deal with it then. I hooked up the charger and took a different car to work. Tonight I’ll play the put-a-light-inline-with-the-battery-cable game to see if something’s draining the battery. Hopefully, it was just all my testing last night drained the battery.
Tuesday, October 20, 2009
Freeing Up Some Storage Space
With my branching out into the new world of Late Model (LM) Corvairs (1965-1969), I now find myself needing more shelf space in the garage. Last weekend I filled a wheelbarrow with parts that I don’t think I’ll ever need. I took a few photos and posted a “free parts” thread on the CorvairCenter Forum. I’ve already had four guys respond. I’m glad these parts will get used instead of dumped.
The free space was quickly filled with the ’64 differential I bought a while ago and the parts that came with Glinda that have been filling her trunk. There’s still room for more. One of the cool things about putting away Glinda parts is finding all the new and nice, used stuff that came with the car. A lot of these parts will find their way onto Betty since Glinda is already pretty complete. I’d started a list of all the spare parts I’ve gathered, but it’s tough to keep up-to-date. A lot of the new parts are still in their Clark’s packaging marked with Clark’s numbers. I’ll need to add them to the spreadsheet and add the description.
The free space was quickly filled with the ’64 differential I bought a while ago and the parts that came with Glinda that have been filling her trunk. There’s still room for more. One of the cool things about putting away Glinda parts is finding all the new and nice, used stuff that came with the car. A lot of these parts will find their way onto Betty since Glinda is already pretty complete. I’d started a list of all the spare parts I’ve gathered, but it’s tough to keep up-to-date. A lot of the new parts are still in their Clark’s packaging marked with Clark’s numbers. I’ll need to add them to the spreadsheet and add the description.
New Shoes for Lucy
What a difference new tires make. Lucy hasn’t had a full set of new ones ever since I got her. The tires that came with her, while having plenty of tread, were dangerously cracked and aged. I pressed two decent spares into service and replaced the other two with new, stock size tires. Then, in December of 2007, I got the 280ZX wheels. After cleaning them up and replacing the valve stems, I drove around on the tires that were on the wheels for about a year – yes, junkyard tires. I even spent a long day on the Summit Point racetrack on those Dunlops. A year later, I decided I should replace the junkyard tires before the snow came. A quick trip to local used tire store lightened my wallet by $100 and got me four all-season radials with a reasonable amount of tread left. Now, nearly another year and 10,000 miles have passed and it’s time to break the bank and buy new tires. I did some shopping online and found a fairly limited selection in 195/70-14. I eventually settled on buying Yokohama AVID TRZs from Jim’s Racing Tires. With their 700 tread rating (80,000 miles warranty), these tires will probably outlast the car. Just think, I could double the mileage that’s currently on the odometer before they wear out.
My first drive after installation was on rainy, wet streets. Wow, no slipping and sliding; no tiptoeing through turns. The next day, on dry streets and highways, I could take the on and offramps at 45 with no hint of the backend coming out. Quite, quite fun!!!!
My first drive after installation was on rainy, wet streets. Wow, no slipping and sliding; no tiptoeing through turns. The next day, on dry streets and highways, I could take the on and offramps at 45 with no hint of the backend coming out. Quite, quite fun!!!!
Friday, October 16, 2009
Dead Wipers
This morning I turned Lucy’s wiper switch and was met with nothing. This switch has been in the process of failing for a few weeks now. I’ve been able to coerce it into functioning by turning it to high and then back to low, but this time no dice. Had to drive the Suburban to work.
After a couple weeks of trolling Craigslist for welding accoutrements, I gave up and went to Harbor Freight on my lunch hour. I picked up a self-darkening helmet, welding gloves, and three hi-powered magnets that will be used to the hold the patches in place while welding. I decided to pass on their $80 empty 20 cubic foot Argon cylinder when a phone call to the nearby Airgas store revealed their price of $120 for a 40 cubic footer. The downside is they’re out of stock until Monday. Lucy’s front valence will have to wait a little longer before the rust is gone and nice, new metal has filled in the holes.
After a couple weeks of trolling Craigslist for welding accoutrements, I gave up and went to Harbor Freight on my lunch hour. I picked up a self-darkening helmet, welding gloves, and three hi-powered magnets that will be used to the hold the patches in place while welding. I decided to pass on their $80 empty 20 cubic foot Argon cylinder when a phone call to the nearby Airgas store revealed their price of $120 for a 40 cubic footer. The downside is they’re out of stock until Monday. Lucy’s front valence will have to wait a little longer before the rust is gone and nice, new metal has filled in the holes.
Thursday, October 15, 2009
Spare Engine Turns Freely
Last night I was in the garage working on the Suburban and when I was finished I decided to fiddle with the spare engine that’s just been sitting. I put the bar across the bolts that I’d put in the harmonic balancer and cranked away. It turned all the way around! I then put the engine on end resting on the face of the bellhousing and cranked away for a few more minutes. After each revolution it got easier to turn. Looks like next I’ll have to bolt a torque converter, differential, and starter on, put some more oil in the crankcase, and see what kind of compression each cylinder has.
Back to Stock Carburetors
Last May, I had a Corvair carburetor expert relocate the jets in two spare carburetor bases. Doing this gave me carbs that wouldn’t be starved for fuel when I was going through high speed turns on the track. I rebuilt these carbs and installed them on Lucy. She did great at BeaveRun and for the following couple of months during my daily drives. Then in July one of the carbs acted like it was plugged. I swapped it out for one of the original ones and the engine ran normally.
I reported yesterday that Lucy’s engine was running rough, but I’d thought I’d fixed it with some high-rpm running. Well, I hadn’t. The problem came back even worse Monday on my drive home from work. Tuesday evening I discovered that the left three cylinders weren’t functioning, so off came the second modified carburetor and on went the second original one. Problem solved. I’ve contacted the expert and will probably send the carbs to him to diagnose and solve the problem(s).
Ariel drove Ringo home for the weekend and she returned to Millersville without issue. While she was here, I installed the bottom engine shrouds and repaired the heater control lever, so now she and her car are ready for winter. They made the roundtrip without issue – thank You Lord.
Wednesday, October 14, 2009
Vapor Lock Delays
Sunday afternoon was CORSA of Baltimore’s second annual Fall driving tour. We were scheduled to drive to two wineries with a visit to an apple farm stuck in between. Three Corvairs showed up at the departure point. We waited another ten minutes or so to see if any other travelers would appear before starting our cars’ engines and heading out. Lucy got to the exit of the parking lot and then her engine died. Hmm. Shades of last weekend. I hopped out and waved the cars behind me around while I opened the engine lid and verified that, indeed, the carburetors were out of fuel.
Vapor Lock (for those of you with modern cars and electric fuel pumps) occurs when an old car is turned off and the engine compartment is hot. The gasoline in the inlet line to the fuel pump vaporizes, and since a pump is designed to move liquid (it is not a fan), everything just sits there until the engine compartment cools off and the gasoline vapor condenses. So that’s what we did, waited. Of course we had to keep ourselves busy while we waited. Gary (the local Corvair guru) was one of the participants, so he and I removed the brand new fuel to verify that it was not at fault. As far as we could tell, it was functioning, but Gary felt that it was not as strong as he’d like to see. He also pointed out that the oil pressure switch was beginning to fail and warned me that when it goes, it’s not pretty – lots of oil gets pumped out quite quickly.
With the fuel pump reinstalled and some fresh gas poured down each carburetor throat, Loriann turned the key and Lucy’s engine came to life. After conferring with Gary, I convinced Loriann we’d be okay to continue. We were. At the first stop, Cygnus Winery, I opened the engine lid to let the heat out while we went inside the tasting room. As we entered, we were met by three more folks from the club. We tasted six different wines and then moved on after buying a bottle of the Port.
Lucy started right up and kept running as we followed the convoluted directions I’d come up with using Google. My aim was to keep us off the main highways. It was really apparent that I’d succeeded when one of the roads I’d chosen turned into gravel – this was not part of the plan. It became a paved road again in less than two miles, so we pressed onward. After another four turns, we were again on a gravel road. This was the last road to our next destination, so the three Corvairs continued. We arrived and I immediately began apologizing. It wasn’t my intention to subject these nice cars to gravel roads. No one seemed angry, so I guess I’ll still be allowed to plan these events.
Loriann and I stayed at Baugher’s Apple Orchard longer than planned (as did the rest of the party), so we never made it to the second winery. On the drive home, Lucy began running roughly. Not threatening to die, but her engine was missing. At one point, as we pulled away from a stoplight, I decided to run the revs up pretty high before shifting with the intention of sucking through or burning off whatever was causing the problem. Sure enough, the engine smoothed back out and we drove the rest of the way home without issue.
Fuel Filter and Emblem Installed
With the disassembled/reassembled fuel pump spitting gas, I ordered a replacement and parked Lucy until she was repaired. The pump from the Corvair Ranch showed up Thursday, so I went out after work and installed it. All seemed to be running fine – no leaks. I also installed the good, used CORVAIR emblem for Lucy’s engine lid. The previous one had lost the V right before the trip to Cape May, so I ordered a replacement in the same order as the fuel pump. It was embarrassing to be showing a COR AIR in a park full of CORVAIRs. This emblem has three little posts that fit into three corresponding holes in the lid. I used RTV to hold the posts in the holes.
Monday, October 5, 2009
A Wonderful Weekend
The weekend away with Loriann at Cape May at the NJ 50th anniversary celebration of the introduction of the Corvair was wonderful. We got a late start Friday with all the time it took me to swap tires/ wheels between Lucy and Heidi, so we didn’t even try to make it to the Friday night festivities at the host hotel – the party and unveiling of the 1960 model. It was really too bad since they did an “unveiling” of a beautifully restored ’60 to recreate the original experience. All of the audience was dressed in late-50s style clothing. Hopefully someone shot a video and posts it somewhere. Lucy ran great the trip down, although Loriann commented she’s a little loud.
After breakfast Saturday, I drove to Rotary Park in downtown Cape May to help with the parking of cars. The park was a perfect venue with the twenty-some Corvairs comfortably filling the space. We got TONS of walk through traffic due to the proximity of the main shopping area. The highlight for me was when Loriann let a couple of younger boys sit in Lucy. As the older one, probably 7 years old, got out he exclaimed, “This is the best day!” The show broke up around 3, and I was there to help direct the cars safely out of the park. I posted some pictures on Motortopia.
Sunday we took a detour on the way home to buy a welder from a guy in Middletown, DE. After that we had our only mis-adventure of the trip. I pulled into the Elkton, MD McDonalds to use the restroom, and when we returned to the car, we noticed a young gal in the car parked next to us with the hood up. She said her battery was dead, so I offered to give her a jump start. After hooking up the cables, I got into my Lucy and was revving the engine to get more current when the engine speed dropped to zero. Irrr. I checked, and there was no gas at the carbs – failed fuel pump. I was not well prepared, so I didn’t have the wrenches to R&R (remove and replace) a fuel pump, nor did I have a spare pump. I did have my Blackberry and cellphone, so I called the AutoZone just down the street and they said they had a pump for me. We walked there (via K-Mart to buy a wrench set) only to find out the pump they wanted to sell me was not an original mechanical one, but a universal electric pump that would have required significant re-plumbing and wiring. They could get me a stock one, but it would be the next day. Irrr. The only other auto parts store open in town had the same situation. We walked back to the car trying to figure out what we were going to do. Since Brianna had already left for VA there was no daughter available to drive the Suburban with the tow bar to rescue us. Loriann finally said, “Why don’t you make sure it’s the pump and not a clog; then we’ll decide what to do.” I disconnected the fuel lines into and out of the pump and had her crank the engine. I had suction on the input, but no pressure on the output. I pulled the pump off, took it apart, scraped some crap off some of the inside surfaces, banged it on the ground a couple times, blew it out, put it back together, stuck it back on the engine, hooked up the input line, and guess what? It worked when Loriann cranked the engine. Connected the output lines and drove it home without issue. Thank You Lord. She’s still in the driveway until I install a replacement.
The welder I bought is a used Craftsman Professional MIG welder. I’m excited about figuring out how to use it so I can replace rusted body panels on the fleet. Currently four of the five need patching. I only have to buy a helmet and some Argon gas since the guy threw in a regulator, gas tube, and a heavy-duty extension cord.
By the way, Heidi safely and uneventfully transported Brianna and her fiancé to Radford, VA. Thank You Lord for that too.
Friday, October 2, 2009
Corvair's 50th Anniversary
Today, the Corvair historian, Dave Newell, posted the following to the list-serv I’m on:
“This is it, folks, the most important date in Corvair history. The Corvair's 50th Anniversary is happening...NOW! 50 years ago, you could have been the first to scurry down to your friendly Chevy dealer's to see and buy the "Revolutionary New Corvair". Today isn't merely the 50th Anniversary of the 1960 Corvair, but the 50th Anniversary of the Corvair itself. This is the critical date for Corvair faithful everywhere, be they '60 cavemen, balls out racers, FC Rampers or Ultravan campers....the BIG FIVE-OH is upon us at this hour. Drive your Corvair if you can!”
This weekend Loriann and I will be in Cape May, NJ to celebrate this occasion. We’ll be driving Lucy and hope to have a dry and wonderful time.
The other night Jonathan ran out of the Argon shielding gas before he was able to weld on the last of the five patches. I needed to cover the hole, so last night I got out the Bondo and fiberglass cloth. This fix will be temporary, but it will seal the opening. This weekend Brianna will prime and paint the patches and use clear RTV to fill in any pin holes she finds in the welds. All this to weatherize. She and I haven’t decided the fate of Heidi. With her nuptials next summer and the unknown future, she may not be able to afford the upkeep of a 45 year-old convertible. If she doesn’t live near me, she’d have to pay a mechanic to deal with any issues Heidi develops. Mikhaila (our youngest daughter) is convinced that Brianna should sell us the car for her. Brianna doesn’t want the car to leave the family, so that may be an option we give serious consideration. For the time being though, Brianna’s going to see how things go with Heidi in southwest VA.
Tuesday, September 29, 2009
All That’s Left Is The Grinding
And the priming. And the filling. And the sanding. And the priming again. And the painting.
After Jonathan’s welding of last night, there’s still plenty of work left to do on Heidi before we call the rust repairs complete. In light of a VERY busy schedule over the next five days – business trip, deck to finish, Corvair 50th Anniversary Celebration in Cape May to go to and prepare for – there’s’ no way all those steps are going to be completed by Sunday evening when Brianna and her fiancé need to drive Heidi back to SW VA.
So, I’ve decided to have Brianna and Nich do enough to rustproof what’s there. I’m going to have them prime everything with Rustoleum primer and then topcoat with an off-the-shelf light blue to get the car through the winter. Some day I’ll get the car back in the garage and complete the repairs.
Regarding the welding, I really need to get me one of them nifty MIG welders. While I certainly appreciate Jonathan’s willingness to spend his time and argon (and feed me dinner no less), I’ve got so many body repair projects on tap I can’t bug him all the time. So, a decent new or used MIG welder is on the top of my Christmas list. That and a self-darkening helmet and a bottle of argon gas.


Wednesday, September 23, 2009
Set a New Date
I talked with Jonathan the other night and we’re planning on welding Monday evening. I really need to get my butt in gear now. The garage is still a mess; the trailer is still full of patio furniture; the deck is still just an unfinished frame; and Heidi still sits on the street.
Brianna had an uneventful drive to Radford in Lucy. She did complain that Lucy was difficult to re-start when she got gas. A little vapor lock, but she overcame.
Ariel also made it to her destination without Ringo giving her any problems. Thank You Lord for those blessings.
Brianna had an uneventful drive to Radford in Lucy. She did complain that Lucy was difficult to re-start when she got gas. A little vapor lock, but she overcame.
Ariel also made it to her destination without Ringo giving her any problems. Thank You Lord for those blessings.
Monday, September 21, 2009
A Big Chunk of the Fleet Has Flown the Coop
With the departure of Ringo to Millersville and Lucy to Radford, my fleet maintenance focus is on Heidi. Replacing the Suburban’s intake manifold gasket took WAY longer than I’d anticipated, so all my great plans for Friday and Sunday (the family spent Saturday at King’s Dominion) were blown out of the water. I wanted to get the patches welded on to Heidi’s body Sunday afternoon, but that was not going to happen since the panels weren’t ready. So a change of plans had to occur. Brianna would take Lucy to Radford for a couple of weeks while I did a proper job of repairing Heidi’s rust.
In preparation for that, a good portion of yesterday afternoon was spent getting Lucy ready for travel. I finished getting the heating system in order by installing the driver’s side heater duct and refitting the lower engine shrouds. Since she had the worn, used tires, I swapped wheels/tires with Heidi so Brianna would be that much safer. When doing this, I noticed the clearance to the inside edges of Heidi’s rear fenders was pretty close with my wider wheels/tires. In fact, when I got in the car this morning and drove away, the nasty sound of rubbing rubber caused me to turn around, park Heidi, and drive the Suburban to work instead. She needs to go into the garage anyway.
In preparation for that, a good portion of yesterday afternoon was spent getting Lucy ready for travel. I finished getting the heating system in order by installing the driver’s side heater duct and refitting the lower engine shrouds. Since she had the worn, used tires, I swapped wheels/tires with Heidi so Brianna would be that much safer. When doing this, I noticed the clearance to the inside edges of Heidi’s rear fenders was pretty close with my wider wheels/tires. In fact, when I got in the car this morning and drove away, the nasty sound of rubbing rubber caused me to turn around, park Heidi, and drive the Suburban to work instead. She needs to go into the garage anyway.
Subscribe to:
Posts (Atom)