Wednesday, December 21, 2011

Ringo’s List - Checking it Twice


As I near the completion of the Ringo’s re-roadification, I should verify I’ve corrected all the issues Ariel wrote down way back in … well, let’s just say it was a while ago.

  • floor – lots of solid metal welded in
  • tighten steering - seems tight, but I’m checking that tonight by making sure the steering box is adjusted correctly
  • tighten brakes – the correct backing plates are now in so there should be automatic adjustment now. I still, however, need to adjust the parking brake, and I’ll do that tonight
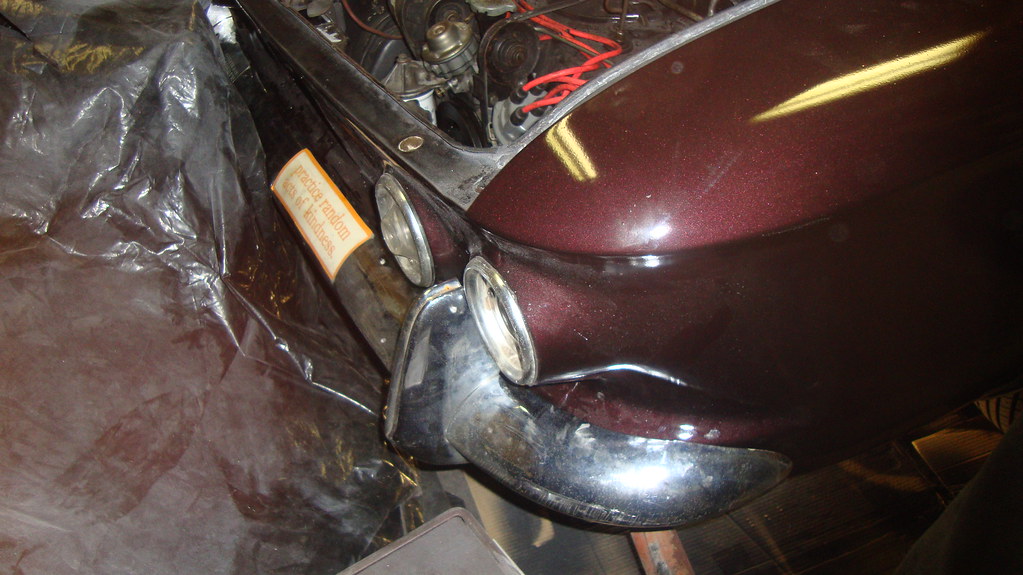
  • rust spots – definitely dealt with that
  • dent – also repaired
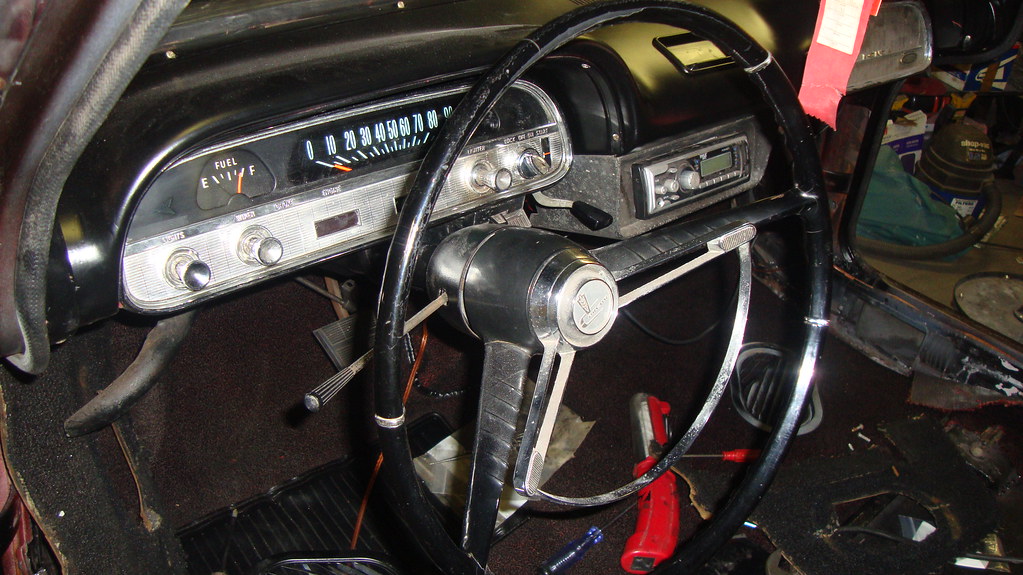
  • gas gauge – replaced with accurate one
  • speedometer- cleaned and lubricated
  • leaking oil – installing a rebuilt engine better have taken care of this one
  • leak under dash board – I’ll be spraying undercoating in the area under the front fresh air grill tonight
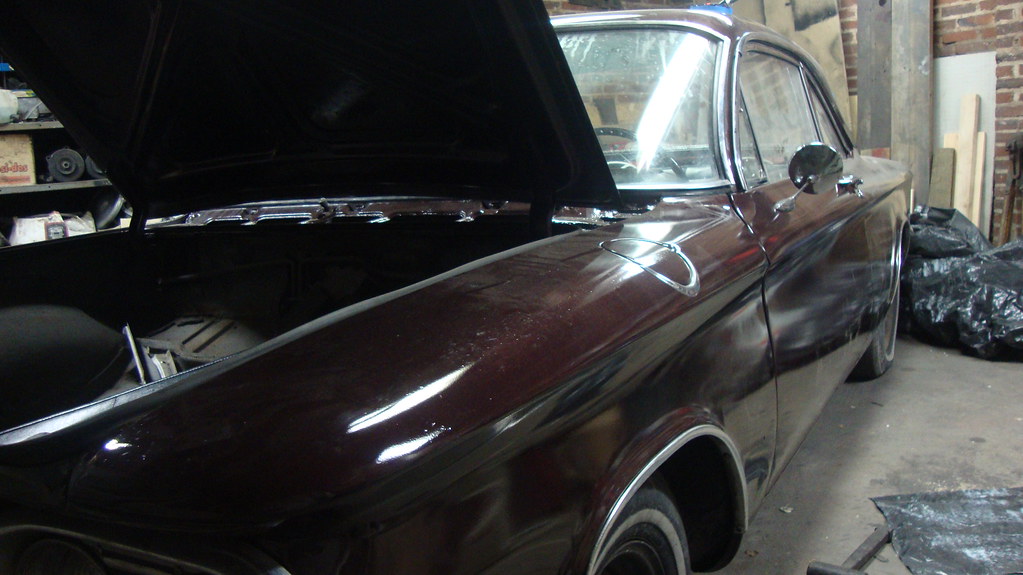
  • paint – oh boy is this one done
  • under hood burn spot – all part of the new paintjob
  • clicking in steering – part of tonight’s mechanical activities
  • screeching in tires when turning – this may be an alignment thing, so he’ll eventually need to be checked

Obviously, I had hoped to have ALL the items addressed by now, but TTT, as usual, was ever present over the past 16 months.

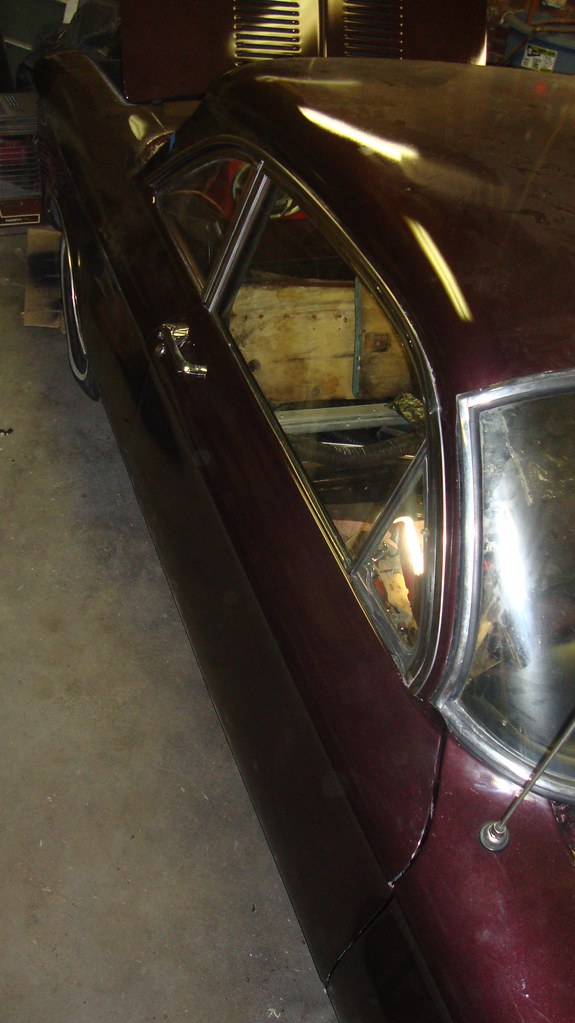
The highlight of last night was installing the driver door. With help from the lovely Loriann, it took less than an hour. My original attempt had 1/8th diameter drill bit pieces as pins taped into the holes in the hinges. We struggled to make that work, but gave up after fifteen minutes of frustration and pulled the pins. Then, with the bottom edge of the door resting on the padded jack saddle, my wonderful wife pushed and pulled on the door until the hinge holes were aligned enough for me to start a bolt in each hinge. With the bolts tight, she was able to easily latch the door. I checked the alignment holes using an awl and lo-and-behold everything was aligned. TYL. As she departed, the lovely Loriann quipped, “That was easier than it should have been.”

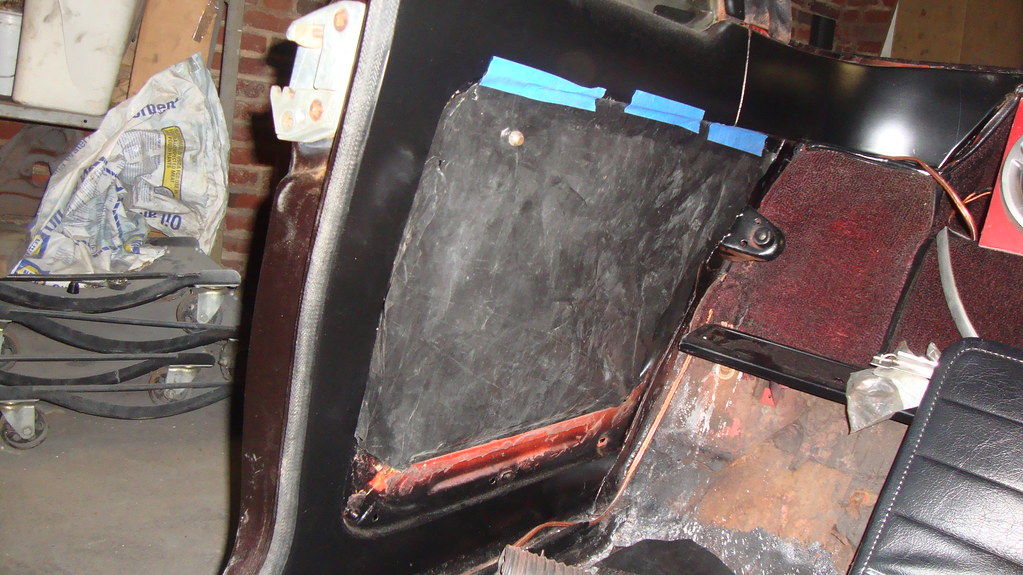
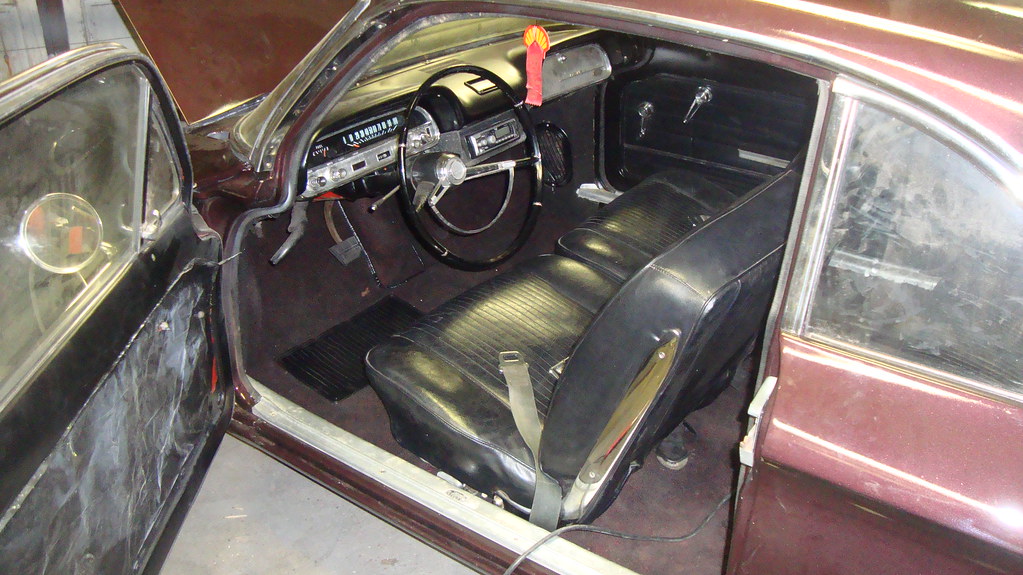
The final four hinge bolts were torqued down, and then I completed the door’s reassembly which included lock cylinder, latch handle, side-view mirror, and a sheet of plastic to seal out moisture. With the door in place, I could now proceed with finishing the interior. The defroster hose went in first which necessitated some adjustments under the dash. While on my back poking around, I found the elusive lighter wire. I plugged it into the pin on the back of the lighter and verified 12 volts. After routing the hose and putting the under-dash back together, I ran the speaker wire and screwed down the sill plate. The new rocker panels, like the other side, required some holes to be drilled which hurt to do. Not physically, just emotionally painful to drill through the brand new paint and metal. I went through the same pain when attaching the stainless rocker panel trim which came next. Finally, I vacuumed the carpet, bolted down the seat, and called it a night.

Tuesday, December 20, 2011

I Didn't Drop the Door

Last night, after rolling Ringo out into the driveway, I took an hour or so out of a busy evening to put away the paint stuff (AGAIN!), straighten things up, and lower the driver door down to the ground. By the way, I made absolutely sure that its resting place was positively safe. No more slipping, sliding, and scraping. Then I pushed the car back into the garage and started installing the door. I didn’t get far before a cooler head prevailed and I decided not to risk an incident by doing the task all by myself. I’m going home early this afternoon and will get assistance from the lovely Loriann so it can be done safely.

Monday, December 19, 2011

Touched Them All and Didn’t Screw Anything Up

It was a nice weekend with lots of time working on Ringo. Saturday morning, I rolled him out of the garage, set up the sawhorses and placed the driver door on top. After sanding the primer to perfect smoothness, I re-hung the door from the ceiling and fired up the heaters. After a couple hours, the garage, door, and paint were all at a workable temperature, so I shot four coats of color and four of clear. Of course, it couldn’t go perfectly, so there are a couple of runs due to laying too thick a second coat in the area around the beltline crease. After letting it cure for a couple hours, the paint wasn’t hard enough to handle the door, so I carefully raised it closer to the ceiling by shortening the two cables I was using to hang it. With it high enough to not hit Ringo’s roof, I pushed the car back in the garage, and spent the next few hours working on the interior. I installed the rear panels, the passenger sill plate, seat, defroster hose, kick panel, air grill, and, finally, the back seat. Then I reconnected the battery and checked all the lights. At first try, only the headlights, brake lights and tail lights worked. The rear blinkers needed the contacts of the blinker to fuse block de-rusted, while the front blinkers required some cleaning and tightening of the sockets before they were functional. The backup lights’ 12 volt connection at the fuse block had to be cleared of corrosion before they were shining brightly. That was it for that day.

Sunday was the day I touched ‘em all. First on the list was dealing with Heidi’s starter issue. I drug jack, jackstand, tools, and a tested GUP starter/solenoid out to the street and put Heidi’s left rear up in the air. With the wheel off, I loosened and disconnected the larger air hose so I’d have good access to the solenoid wiring and starter bolts. As I put the wrench on the solenoid’s main lead, I immediately discovered the entire starter was not bolted down tightly. “Wow, this will be an easy fix,” I told myself. And it was. A few minutes later, bolts were tightened and the hose was back in place with the clamp snugged down. All was not completely copacetic, however, as the short rubber hose connecting the ends fo the fuel line had an inch-long crack in it. Fortunately, I still had some new hosing hanging on the wall in the garage, so I cut it to length, removed the old piece, and had the new hose clamped in place in no time. Ariel came home for the part of the weekend, and I decided to give her the choice of Lucy or Heidi to drive back that afternoon. To ensure Heidi was ready, I started the engine which ran nicely, checked the fluid levels (had to add about a pint of tranny fluid), and put air in the tires to bring them up to the 30 rear/20 front psi desired.

Lucy’s tires also needed some air, but that was the only “touching” she required. Ariel had reported that she had some new squeaks on the inside (steering wheel and brake pedal) and the tachometer had ceased to work (the wire was still intact in the engine compartment), but I decided to let those issues go since they wouldn’t strand her on the side of the road. In the end, Ariel selected Lucy since she, “was more comfortable driving her.”

The third ‘vair requiring my attention was Glinda. I popped her engine lid and found the fanbelt was too loose. This is the same belt that required my attention a couple weeks back when I ended up re-forming the fingers of the guard at the pulley wheel. I hadn’t replaced the belt then and it did have some damage, so this time I swapped on a new Clark’s belt and properly tightened the pulley wheel before snugging down the retaining nuts. I told Victoria to remind me to check it in a couple days.
Finally, I was back in the garage working on Ringo. By the time I had to knock off to get ready for the CORSA of Baltimore Holiday Party, I had drilled holes and partially installed the stainless rocker trim on the passenger side. Still left is drilling three holes for screws that retain the bottom edge of the trim.

This morning I made an appointment with Jeff at the Corvair Ranch for this Thursday to get help installing the backlight. This “should” be the last task before a final cleanup and turning the keys over to Ariel.

Thursday, December 15, 2011

Though Not a Snail’s Pace, It Still Seems Slow


Yesterday, after some prodding from the lovely Loriann, I left work early to begin re-refinishing Ringo’s driver door. I was still sickened by the sight of the scratches as I placed the door on the blanket-protected sawhorses out on the driveway. I had first rolled Ringo out of the garage in anticipation of shooting primer. My DA sander is really getting a workout on this project, and after about a half-hour of effort, the door was ready for cleaning and masking which took at least another half-hour. I chose to only expose the outer painted surface below the window so the jambs and the window frame were all enclosed. Finally, I was able to don my respirator, fill my big gun (the one with the 2mm tip opening) with primer, and start shooting. Three coats fifteen minutes apart and it was mealtime. After dinner and some shopping with Victoria, I headed back out to the now-cold again garage, lit the heaters, and finished reassembling the passenger door. The last task of the evening was adhering the plastic sheeting over the area where the right rear panel goes. This will be ready to trim and cover with the panel the next time I’m out in the garage (this evening).

Wednesday, December 14, 2011

Passenger Door Nears Completeness

Fired up the kerosene heaters another time last night as I strove to finish the assembly of the new (to Ringo) passenger door. Digging through piles of leaves, I was able to locate the main window and vent window assemblies in the trailer where I’d placed them months ago for safekeeping. Since the latch release/handle and the lock cylinder had been installed the previous night, the next part to go in was the bottom track for the window regulator followed by the regulator itself. Getting the latter in through the hole in the door is a bit of a maneuver, but I was successful without putting any scratches in the new paint. Same was true for the main window going in. Next, however, was the vent window and it put up a fight in which some paint was sacrificed before it was properly placed. I’ll touch it up the damage before turning the keys over to Ariel. With the door guts all functioning properly, I covered up the internal openings with a sheet of plastic to keep any errant rainwater from dampening the inside surface of the cardboard-backed vinyl door panel. Needing to let the adhesive dry, I shut off the heaters and lights and called it a day.

Tuesday, December 13, 2011

Inspiration Can Appear in the Most Unlikely Locations


Yesterday, my generous employer provided me with Chinese food for a working lunch. The fortune cookie I selected contained the above saying. How appropriate given the horrid events of the weekend. Last night, duly inspired, I spent a productive handful of hours in the garage installing some GNPs and working to make Ringo’s right side actually appear finished. A small package from the Corvair Ranch showed up during the day with taillight lens gaskets, front blinker lens gasket, and the $%@&* tiny c-clip that retains the Powerglide cable to the dash shifter. After only dropping the clip once and only spending five, freakin’ minutes finding it again, I had the cable secured. The installation of the gaskets went off much better, and then I moved on to putting the guts into the passenger door. After discovering the lock cylinder, like the latch handle, is unique one side to the other, I installed the correct cylinder with its new gasket. A few minutes later, the latch handle was secured with two screws and new gaskets. I then adjusted the latch portion on the body jamb until the door shut nicely. Since I next needed to hunt down the vent window assembly and it was quite dark at 10 PM, I decided to bring the successful evening to an end with a little mental dance of celebration.

Oh yeah, an update on the missing box of bolts. I found it in the back garage stall with Ringo's pieces of trim. Good thing since there was more than just missing screws - there were door bits and pieces to fill the aforementioned passenger door.

Monday, December 12, 2011

Groundhog Day


After a productive Saturday of painting the interior surfaces of Ringo’s doors and safely bolting exterior parts onto him, I want a re-do of the car-related activities that occurred from about 8 PM that day until 5 o’clock yesterday. As Bill Murray eventually made the most of his consecutive Groundhog Day’s, I would only need 1 day before I’d be satisfied to move on with life.

With doors painted, bumpers installed, and wheel-well trim screwed on (all without scratching any of the new paint), I was prepping for the next day’s door installation. I staged the bolts on the floor near each door, and then proceeded to chase the threads in the hinges to clean out any paint that may have gotten on them. Here is the EXACT point at which I’d love a do-over. The driver’s side door (pictured at the top of this post) was sitting on a 2x6 on top of a concrete block leaning against the side wall. After tapping the final hole on the door, I noticed a smudge on the door’s surface. With tap and wrench in one hand, I bent over and wiped the smudge with the cuff of my sweatshirt. I swear I didn’t press hard, but I must have pressed hard enough to move the door since if slid off the 2x6 and fell to the floor. I just stood there in shock and near tears since I just knew I’d now be repainting the outside of the door. I set down the tap and lifted the door. Sure enough, the block had put ugly scrapes through the paint and into the primer. My heart fell even further. Moments earlier I was actually feeling the heat being put off by the proverbial light at the end of the tunnel, and all that was now shattered.

Now a new plan (I must be up to Plan Z by now) had to be implemented. Press on Sunday with installing the passenger door and then sand and shoot primer on the damaged driver door. The lovely Loriann joined me in the heated garage early the next afternoon, and, after discussing what approach to take, we forged ahead. What seemed like two hours later (and it probably was), all we’d accomplished was giving me some touch-up painting opportunities. We just couldn’t get enough clearance at the upper rear corner. We’d filed open the mounting holes in the body and adjusted the upper hinge mounting locating all for naught. My willing wife could get the door centered in the opening with the hinge bolts loose, but as soon as I’d tighten one up the door would shift. She had some errands to run, so I released her from helping me, and I continued on alone. I moved the upper hinge back where it had been, and moved the lower hinge closer to the outside (which would end up installing the lower front corner more inboard). After filing the front side of the body's mounting holes so that the bolts could be further forward, I carefully engaged the door into the opening, jamming a thin piece of wood in the rear gap, before climbing back into the car and installing one upper and one lower hinge bolt, alternating turns until both were torqued tight. This actually got me closer than we’d been all day. One slight adjustment to the lower hinge bolt, moving it rearward, and the door was centered, aligned, and fairly flush. All that’s left there is to properly locate the latch on the body. All that took so long I couldn’t get to the sanding and priming of the driver door.

Oh well, life goes on.

Thursday, December 8, 2011

Where Did I Put that Box of Bolts?

I really tried to religiously bag and tag all the fasteners as they were removed from Ringo during his disassembly. Many of the bolt-on parts currently have baggies with screws zip-tied to them. There were, however, some trim I had Ariel and her boyfriend-at-the-time, Matt, remove and now I can’t seem to find the container they put the fasteners in. I spent most of my garage time last night putting away stuff and staging the rest of Ringo’s bits that have yet to be reinstalled. The only pieces I’ve yet to locate are the wheel opening trim, but I’m confident they’re hiding near where I found the rest of the stainless piled on the LeMans. Who knows, maybe I’ll find a bag of bolts when I find the trim.

On the productive side, I did finish attaching the headlight assemblies and they all tested out fine. I got to do little metal mending by tapping out some dents in one of the bezels.

Wednesday, December 7, 2011

An Uneventful Exchange

After leaving work around 2 yesterday, running home, hooking up the tow bar, chain, and lights, and picking up the lovely Loriann on the way, we met up with Ariel around 5:30. I checked out Heidi, having Ariel turn the key while I listened at the engine. It was immediately apparent the solenoid had died as the engine would just start to turn and then it was just the sound of the starter motor spinning. So we’re now at the point where all three of the fleet’s running members have had or are having starter issues.

We quickly exchanged Heidi for Lucy on the end of the towbar and headed off for dinner. After a fun time together, we parted ways and the lovely Loriann and I were home by 9.

Heidi now sits at the curb waiting for the weather to dry out so I can do a starter/solenoid swap and make her drivable again.

Tuesday, December 6, 2011

At Least It Wasn’t Raining

Yesterday afternoon Ariel’s smiling face showed up on display as my cell phone rang. She immediately asked me if there was any trick to getting Heidi to start since turning the key was spinning the engine, but it wouldn’t catch. I told her no. She went to say it sounds different – not good. So, I went home last evening to prepare to do a ‘vair swap today. There were, however, a number of little things that Lucy needed taken care of before she would be ready to take to Pennsylvania. First, and foremost, I needed to replace a failed exhaust gasket which I did, but it took me a good hour-plus. Then, I installed the red welting from Ringo that covers the pinch welds in the door opening. This was part of the interior swap. Next, I removed the last two panels from Lucy’s interior that will go into Ringo. This exposed the fact that Lucy’s passenger door had no waterproof liner, so I made one from a piece of black plastic sheeting and installed with weatherstrip adhesive. With that in place I could reinstall the window cranks and door latch handle. Finally, I removed the non-working radio and radio housing since I was sick of listening to it rattle. With the wires all zip-tied neatly under the dash, I prepped her for towing by bolting on the tow-bar, attaching the safety chain, and routing the magnetic-based tow lights.

I’m really curious as to what the problem may be.

Oh yeah, almost forgot about the work I did on Glinda over the weekend. Thursday, Victoria had noticed a strong smell of gas when she turned the heater on. Turns out the fuel pump had sprung a leak. Thank God, nothing sparked a fire. Amazingly, the local Carquest had one in their warehouse and $50 later, Glinda had safe and reliable fuel delivery again. Also, she didn’t want to idle, so I cleared out some blockage in a carburetor by holding my hand over each opening and revving the engine using engine vacuum to suck all the crap out. It worked. She still has an issue with starter engagement that I’m afraid is going to require me to replace the torque converter since that’s where the ring gear is that engages with the starter pinion. Not a fun project since the engine has to come out. I need to do a close inspection of the gear teeth.

Fourth Time’s a Charm

After the three failed attempts at laying down a decent paint job on Ringo’s passenger door, I finally succeeded last weekend. While the finish in not perfect - it couldn’t be or it wouldn’t match the rest of the car :-) - there are absolutely no fish-eyes. Since everything other than gun selection was the same, this only confirms my theory that thinner hidden in the gun was responsible for the previous issues. Using three different guns to shoot primer, color, and clear worked out great and will be the approach I use on any future paint jobs. I am very thankful that I only had to do battle with a single door rather than the entire car. Now, with the door’s exterior finished, I can finally move on to painting the inside of both doors and get them installed on the car.

To fill in the time between priming and painting, I assembled both headlight buckets onto the car using silicone for sealing instead of buying new gaskets. Unable to find all the fasteners (now where did I put that baggie of screws?), I could only install one pair of headlights. Once in, I was happy to see them both illuminated when I pulled the switch on the dash. I didn’t try the blinker, but I already know I’ve got some work to do on the column switch.

Friday, December 2, 2011

Easier the Second Time


But I truly did not want to have to do anything twice with Ringo’s roadification. That’s not quite working out for me with the multiple attempts at painting the passenger door and then, last night, when moving the instrument panel housing I’d just replaced, the odometer lens fell onto the floor. Crap! I spent the next forty-five minutes removing, disassembling, reassembling, and reinstalling the instrument panel. It really went rather easily, but was still a waste of my precious time. While the panel was out, I went searching for the missing black wire for the cigarette light – and came up empty. I’m positive the socket had 12 volts before, so I need to do some more hunting.

Once I had the panel back in and tested, I connected the radio to the speakers and tested that – it still works!.

Thursday, December 1, 2011

If Only All Work Can Be Done Lying on My Back

Back in 2007, I swapped Ringo’s entire gage cluster with a GUP I’d bought on eBay. The fascia on the cluster did not match the ’61 style, so last night I went through my GUP collection until I found Ringo’s original cluster housing. I then transferred the speedometer/odometer assembly and lens into that housing, attached the freshly painted hood, and, after lowering the steering wheel column, screwed the whole thing into its home. With all the cables, switches, and bulbs in disarray behind the dash, I spent the next hour plus on my back routing, plugging, and retaining until everything was properly placed except for a missing lead – the cigarette lighter’s black wire has gone missing. I’m sure it will turn up and I’ll get full functionality.