Showing posts with label Engine. Show all posts

Wednesday, January 4, 2017

UPDATE: Luna has sold and is gone. Recurring Theme (i.e. Luna’s also for sale)

UPDATED 1/10/17: Added more photos to the bottom of the post.
UPDATED 1/9/17: Added video links.

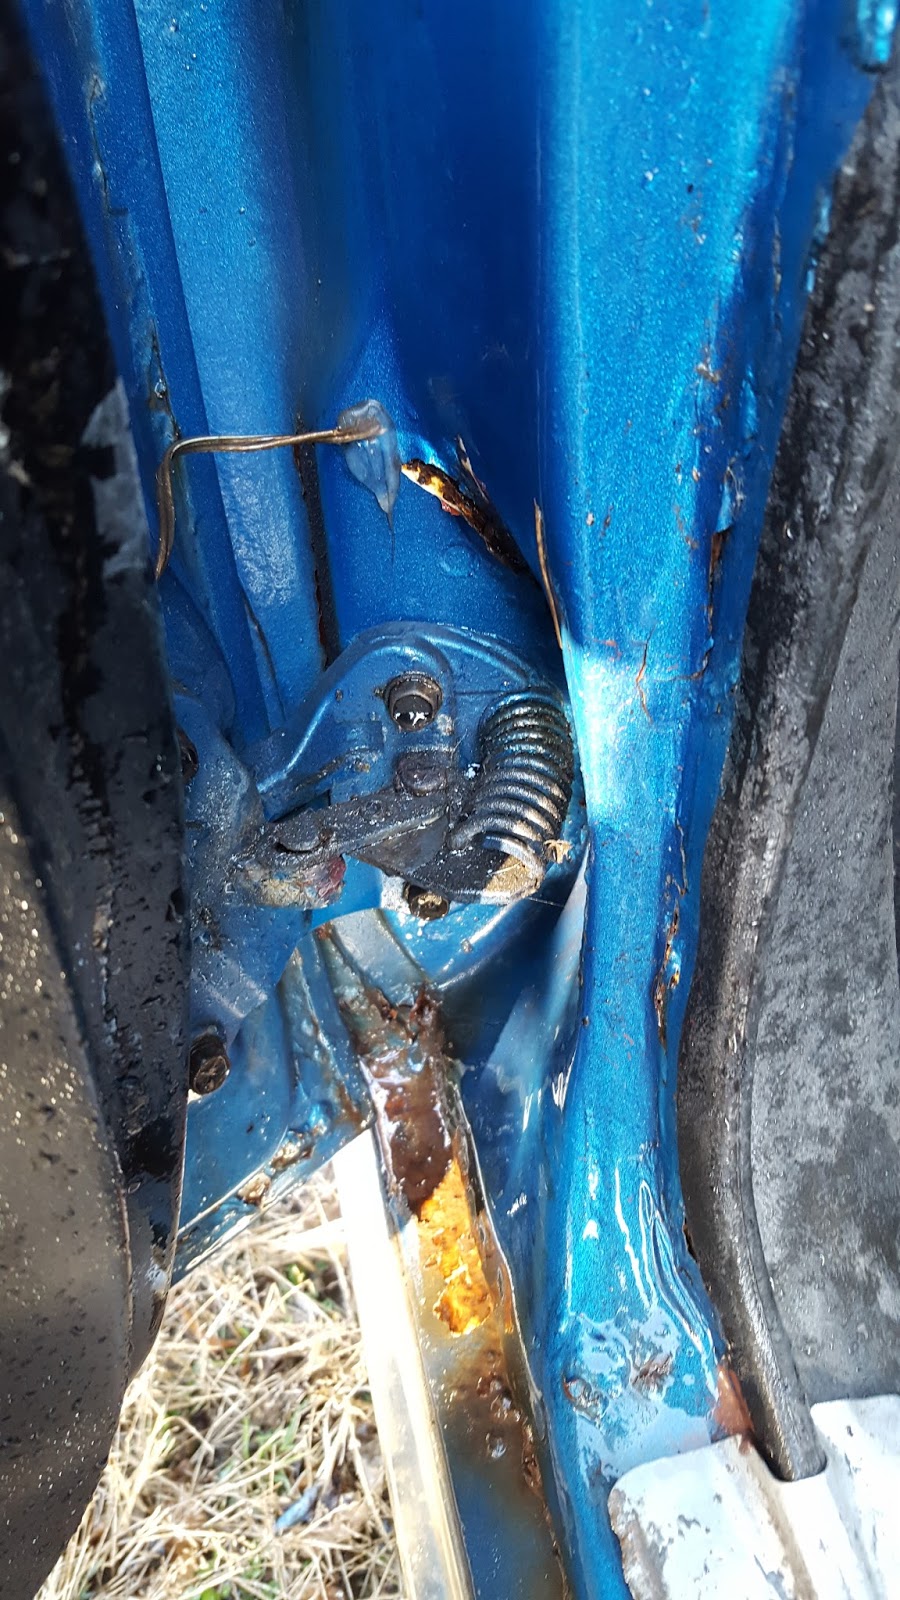
Last week Victoria told me I should sell Luna for her. She has accepted the fact that her life is too busy to spend the time required to roadify the car. I feel badly for her because she really likes the car, but I can’t work on it without her. Add to that her supposedly reliable, modern car sucked all the spare car time she had during the first half of last year, and she’s in no mood to give up what little free time she has on another car. I put a listing on Facebook and Craigslist and have received the following notable responses: trade for a motorcycle (had to say no), low-ball offer, “I’m still looking and will get back to you,” and an appointment for someone to come by Saturday to look at her. Currently, her battery is dead, but I plan on jump-starting her Saturday morning and adjusting the carbs so she at least runs and drives for any prospective buyer. I toyed with the idea of welding in the patch panels in the rockers and the front fender, but there are too many other priorities in my life right now.


With that said, here’s the pertinent info on Luna. She has a 110HP engine with a Powerglide automatic transmission. Currently, the engine doesn’t run since she needs a battery and a tuning of the newly rebuilt carburetors. She has new tires and a new top, but the top’s installation isn’t perfect - needs some adjustments. There are rust issues in the rocker panel, right front fender, and passenger door, but replacement panels and door are included. The odometer reads 24k miles, but I’m sure it’s 124k. The top is manually operated, but goes up and down easily. We’re asking $2000 for the car with the extra parts. More photos at the bottom of this post. Here's a video of the engine running. Here's a video of me driving the car around our neighborhood.


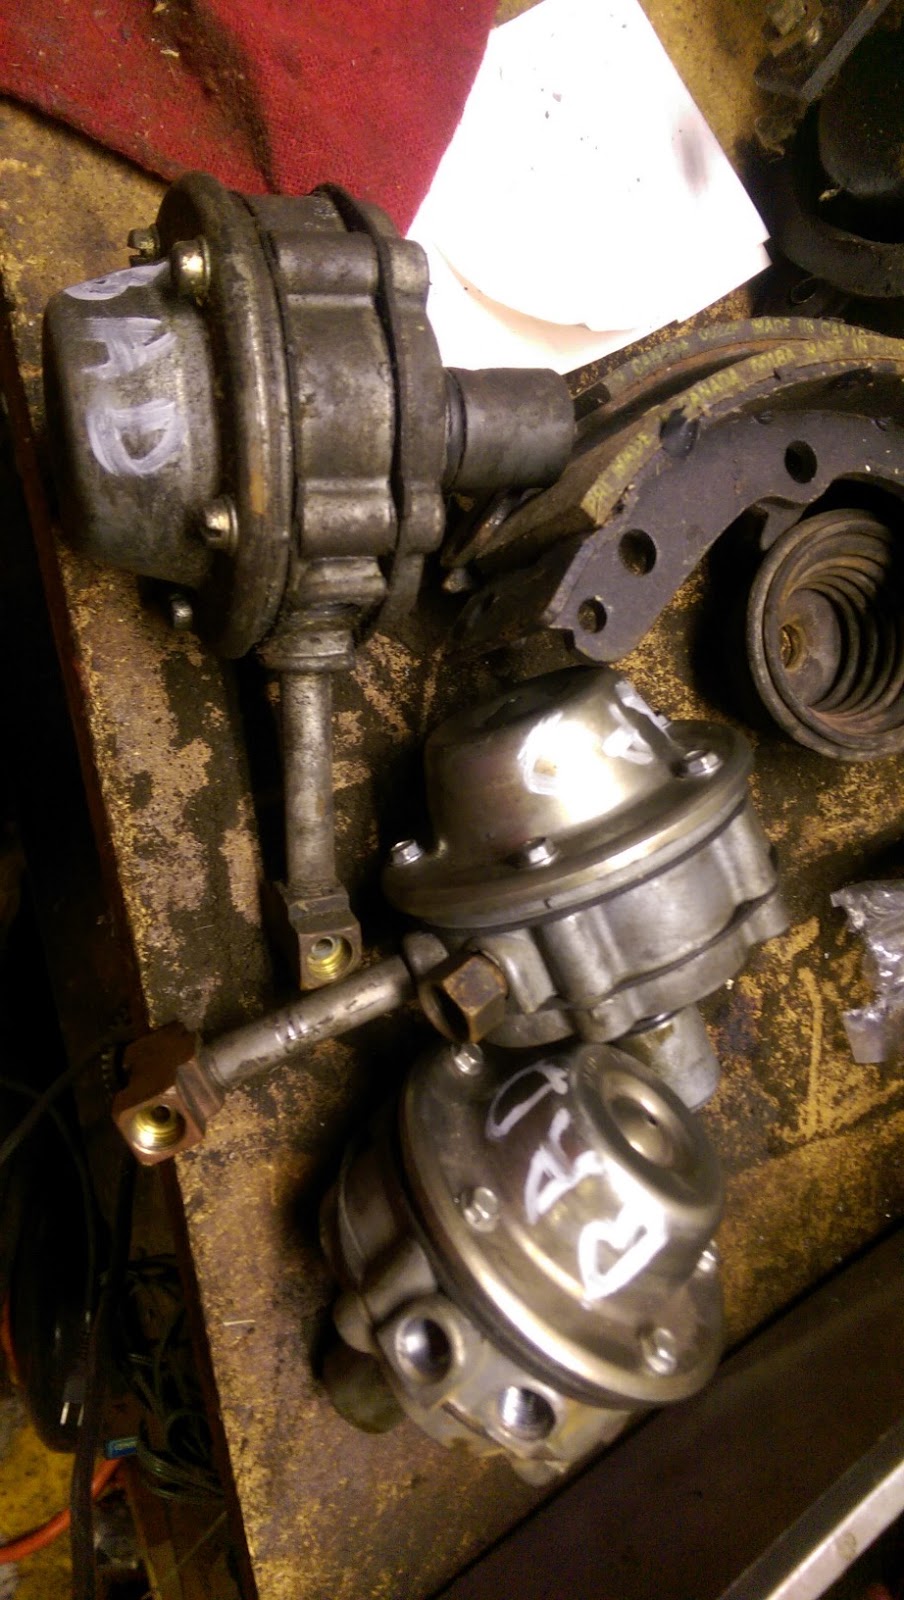
As I mentioned in my last post, I am selling the parts needed to build a 140 HP engine. Here are a couple photos of the major parts included (note buyer gets two blocks to choose from). Also included is a bin of internal parts including the lifters, rods, pistons, oil pan, fasteners, etc.

I’ve not had any offers on Glinda as of yet, but I’m still hopeful a buyer will come along soon.
As part of my Corvair Reduction Plan, I’ve taken another load of GUPs up to the Corvair Ranch. In return Jeff presented me with a front end of another ’64 to use to repair Scarlett. This cleansing has allowed me to take down the storage shelves in the garage making more room for working. Unfortunately, after pushing Scarlett against one wall, there’s still a large part of floorspace is being taken up by aforementioned front clip. Hopefully, this weekend I can cut it down to something that’s closer to what I need and recycle the rest.


Here are more photos of Luna.


Friday, December 23, 2016

UPDATE: Glinda has SOLD. Time For Another Change (i.e. Glinda's For Sale)

UPDATE: Deal went through. Car has gone to VA.
UPDATE: Well, actually I have a deposit on her sale. Fingers are crossed it goes though.


For Sale: 1968 500 coupe. Tripoli Turquoise. Was a 110/PG, now has a four speed manual transmission with a posi rear differential. Engine is the stock 110 with 75k miles and runs strong. All the smog equipment is long gone. This was my daily-driver until the salt hit road here in Baltimore.

Other changes from stock include: relocated jets in the carbs, Z-28 wheels, lowered one coil all around, Koni shocks, polyurethane bushings, quick-steer arms, Roger Parent throttle linkages, Cobalt seats, raised air cleaner, Flowmaster muffler, Pertronix II ignition, Seth's plug wires.

Extra parts included: solid trunk-lid, solid trunk bottom, tight steering box, choice of Corsa dash w/ gauges or manual transmission Monza dash with gauges, driver’s door panel, leftover touch-up paint, rear bumper, 5-point harness.

Also available are the following 140 HP engine parts: '66 RM code block, crank, cam, distributor, like-new heads, exhaust manifolds, '65 throttle linkage, two secondary carbs built by Grant Young and never used, and upper engine shrouds.

I’ve driven this car at NECC events and it is a blast to drive - competitive too. Brett Aston is fast and drives a quick Corvair. At New York Safety Track, his best lap was 2 minute flat. My best lap was 2:03.

The whole package can be yours for $2700. Minus the 140 engine stuff, I’ll let it go for $2100.

Friday, November 4, 2016

Exhausting Work

Night before last, I finally got some time to work on Glinda’s leaky exhaust. I had thought that the donuts (gaskets) between the exhaust manifolds were the only failed parts in the system, so I backed Glinda up on the ramps to do a remove-and-replace (R&R). After letting the pipes cool down, I unbolted the two manifold flanges and the hanger strap and slid the exhaust assembly out from under the car. The next chore was to clean off the old gaskets which had hardened to into rings of rock. My quarrying tools of choice were hammer, small cold chisel, and a couple screwdrivers. Way too many minutes later most of the old stuff was off and I was able to wirebrush the rest off at the bench grinder. I’d previously purchased a couple new gaskets from Gary the Corvair guru a week ago, so I slipped them on and slid myself and the assembly back under the car and bolted everything back together. With the engine fired up, I immediately noticed I hadn’t solved the entire problem. There was still exhaust escaping someplace other than the tailpipe. I slid under the car again and felt around until I found pulsing hot air from the top side of the joint where the straight pipe goes into the crossover pipe. Out came the assembly again and my MIG welder made molten metal closing up the crack. Sadly, the last extraction broke the rubber piece of the muffler hanger, so I had to R&R with a GNP that I had sitting in a cubbie. Once the assembly was properly bolted into place, the only exit available for the exhaust was outlet of the Flowmaster. The car sounds soooo much nicer now.

One other quick task I did before calling it a night was to get out my Vernier calipers and measure the journals of the crankshaft I’d removed from Corsavert. For the mains, I got 2.0985 for all four. The manual says they’re acceptable between 2.0978 and 2.0988 for #1 and #2 and 2.0983 and 2.0993 for #3 and #4, so I’m good. For the rods, I got a range of 1.798 to 1.800. The manual says they need to be between 1.799 and 1.800, so I’m a thousandth low on two. The reason I did this was I wanted to see if I could buy standard bearings and begin assembling a 140 horsepower engine for Glinda. I think I’ll buy the standards and cross my fingers that my measurements are a hair off. The proof will be when I check the assembly using Plastigauge. That’s more accurate than a Vernier caliper.

Tuesday, October 18, 2016

Carburetor Issues Again


Friday evening Mikhaila drove back home from visiting friends and I got the following text,” I'm almost home. Scarlet is driving weird also so I don't want to be broken down. “ Since we had a 10 AM appointment at Gary’s, I was up early the next morning to see what’s what. I climbed behind the wheel, started Scarlett’s engine, and took her for a quick spin around the neighborhood. While she seemed to idle okay, she was definitely sluggish under acceleration. I felt, however, we could still get her to and from Gary’s, so Mikhaila climbed in and we headed out. We did not even get to the corner before we noticed further power reduction and significant pinging. We limped her back to a parking spot in front of the house and took Glinda to Gary’s instead.

Gary came through on all fronts – door lock retainers AND gaskets, the blower bearing greasing tool, and a bare convertible door to take sideview mirror measurements off of. Once we got back home, we immediately went to work on the car. First, we started Scarlett’s engine and, by pulling spark plug leads, determined the right side of the engine was not functioning. So, I grabbed the proven ’68 carb, swapped it for the bad one, and restarted the engine. It fired right up and idled and revved nicely once the new carb had filled with fuel. I didn’t take the time to balance it since we had other tasks I wanted to get to before running out of time.

We then disconnected the linkage so we could mount the blower bearing greasing tool. I pumped grease into the tool's Zerk fitting, but wasn't sure any was making it into the bearing. After removing the tool, I noticed a gob of grease on top of the shaft, but none around the seal. I tried the process again, but the result was the same. Irr. Giving up, we put everything back together and started the engine. The howl wasn't gone, but it did seem somewhat quieter as we backed the car down the driveway for a successful test-drive.

Since the lovely Loriann returned and parked the awesome Challenger in the driveway, we parked Scarlett at the curb and moved onto the next items on the to-do list. While Mikhaila swapped courtesy light bulbs, I installed the two door locks. The trick was getting the finger of the mechanism into the slot in the latch. Pushing the retainers in place took some tapping on the end of a flathead screwdriver, but they eventually were seated.

Finally, we carefully measured and marked and re-measured the location of the two screws for the side-view mirror retaining plate before drilling the two holes. The plate was installed followed by the barely GUP gasket and attaching the mirror with its Phillips screw finished the job. At that point, it was time to quit for the day.

Monday, Mikhaila took her car out for a drive and came back informing me it wasn’t idling nicely. I believe she used the terms “rumbling” and “rough.” She and I then headed to the curb with a flathead screwdriver, dwellmeter (with tachometer), and the length of clear plastic tubing. The engine was already warmed-up, so I unhooked the throttle linkage to the left carburetor thus isolating the two carbs from each other. Then I hooked both ends of the tubing to the vacuum ports of the carbs and had Mikhaila fire up the engine. Watching the small amount of fluid in the tube, I adjusted the idle speed screws until it the fluid didn’t move. Then I spun the left side linkage until it just lined up with its hole in the carb and secured it into place. Blipping the throttle didn’t cause the fluid to move, so I considered the carbs synchronized. With the engine off, I put the proper vacuum hoses back into place and hooked up the dwellmeter. Mikhaila restarted the engine and put it into Drive, so I could fine-tune the idle speed and mixture. I slowly turned the idle mixture screws in and out until I’d maximized the rpms. Then, I turned each idle speed screw out in equal increments until the engine was turning at a smooth 550 rpm. A spin around the block showed all was operating satisfactorily.

Then, yesterday, she shared with me that things were still not right with the sluggish acceleration. I confirmed the symptoms this morning before I left for work. The car seems to have decent power everywhere other than acceleration from stop. I checked the ATF level and it’s right on. I also pulled plug leads and both sides seem to respond, so I’m thinking there’s still something amiss with the right carb. My plan is to pull the non-modified carb off Glinda and swap it onto Scarlett. Then I’ll deal with carbs on Glinda instead of Scarlett.

Wednesday, September 21, 2016

Second Seat In

Yesterday, after dinner, I donned grungies and proceeded to do what had to be done to get the front passenger Cobalt seat installed in Glinda. I placed the seat in the car lining up the outboard rear mounting screw, and marked the locations of the four feet on the floor. The angle grinder with a wire brush made quick work of removing all coatings from the areas to be welded to, while the bench grinder’s wire wheel cleaned up the four pieces of square tube. The angle grinder, now with a cutoff wheel installed shorted the feet so they’d fit into the tube pieces. After rolling the MIG welder out to the car, I welded the four pieces of tubing to the floor. For some reason the welding was not a nice as the driver’s side even after adjusting the feed rate a few times. I remembered that I’d put the heat setting on C, but I’d forgotten what had worked for the speed before. It also could’ve been that the connection to ground was farther away than last time. So while it didn’t look as good, the weld was still complete enough to provide good anchors. Once the four tubes were attached and the welds had cooled, I covered all the exposed steel with primer and let things dry while I turned my attention to the clutch again.

This time I decided to actually follow directions when setting the locations for the two clevises (or is that clevii?). After putting Glinda up on the ramps, I slid under the rear and disassembled both clutch linkage pivots. I tugged on the cable with roughly 15 pounds of muscle and spun the first clevis down the thread until the pin lined up with the hole in the fork (z-bar). All this with the fork set as close to 7/8ths of an inch from the cross-member as I could measure. With the fork engaged with the clevis, I then pulled all the slack out of clutch and spun the second clevis until the pin lined up with the corresponding hole in the other end of the z-bar. The final instruction was to, “Back off (3) Adjusting Rod three turns and assemble to lever with (2) Clip.” When something’s underlined, I tend to think it’s important. Well, I backed it off three from being inline and now the clutch grabs as soon as it’s off the floor. I think three should be two. Since the rear was up on the ramps, I

Having given the primer some time to dry, I decided I could install seatbelts and the front passenger seat. The seat bolted right in, so now I've got the ability to transport a passenger.

Before calling it a night, I started Scarlett’s engine to see if my vacuum blocking had fixed the right side’s cool running. The engine fired right up and there’s now a significant amount of vacuum at the right carb’s air horn and no hissing when I put my hand on top. However, the choke still didn’t move much from cold, but I can attest to the exhaust manifold putting out the heat. Not sure what the deal is – maybe the thermostat is bad. I’m thinking of investing in a new tool – an infrared gun to compare right and left sides. Also, thinking I’ll swap right with left carbs to see if the problem stays with the side or follows the carb.

Wednesday, August 17, 2016

Smoke 'Em If You Got 'Em


Last night, the lovely Loriann came out to the garage and warned Mikhaila and I about the dangerous atmosphere we'd created in the garage. At the time we were standing in a fog of Scarlett's exhaust and blow-by, but I'm getting ahead of myself.

Monday evening Mikhaila and I traveled to the home of the local Corvair guru, Gary. He had the balance tube we needed for Scarlett. He joked that if she was missing hers, the one in his hand may have been it. He’d helped the previous owner get the car running about fifteen years. He warned me it was a hot engine – “the strongest 110 Powerglide I ever drove.”” The only problem,” I replied, “it’s got low compression now in at least one cylinder.”

Yesterday, after dinner, Mikhaila and I headed out to the garage to, hopefully, get Scarlett running. We installed the aforementioned balance tube using new hoses to the carbs and transmission. Thinking positively, we screwed on the taillight lenses and bezels with new gaskets. Next, we opened the garage door, turned on all the fans to keep air moving through and out the space while we poured in about three gallons of hi-test and half a bottle of Marvel’s Mystery Oil into the gas tank. During the pour, I had Mikhaila check for drips and puddles under the car. Thankfully, all remained dry below.

A check for fuel at the carbs by blipping the throttle showed they were empty. Using a large syringe I squirted about a half-cup of gas into vent holes to refill each carb’s bowls. Before starting, we checked the dwell (31 degrees – close enough) and set the timing. The former was checked with the dwell-meter while cranking the engine, while the latter was accomplished by turning the engine until the rotor was pointing to the #1 terminal on the distributor cap and the timing mark was sitting at about twelve degrees before top dead center and then slowly turning the distributor counter-clockwise until the timing light (connected to the #1 lead) blinked. Jumping the starter’s purple wire to the positive battery terminal got the engine spinning and a few seconds later we had a running engine.

The first thing I noticed was the excessive blow-by coming out the crankcase vent tube. The second thing I noticed was the lack of a clacking lifter. Okay, bad news balanced by good. We let the engine warm up watching the chokes slowly open – oops, the left choke is not opening very quickly. After tweaking the timing to get it up to around 12, and adjusting the idle speed down to around 600, we pulled spark plug leads off the distributor one at a time to gauge whether individual cylinders were contributing. Pulling #1 – no change in engine rpm. #3 – no change. All others appear to be functioning. This is odd since the last compression test (if my notes are correct) showed #2 to be the dead cylinder. Ah, old cars; consistency is a myth. The last thing we checked before turning off the engine was the transmission. Mikhaila put the shifter in Drive and the left rear wheel spun (the rear of the car’s still on jackstands), but only half-heartedly. I asked her to put the shifter into Reverse and the only change was a backup light came on. The left rear wheel kept spinning forwards. Irr. Looks like we need to reinsert the shifter cable.

What to do next? In addition to fixing the shifter cable (hoping that it really is installed wrong and not a deeper problem with the trans), we’ll do another compression check on each cylinder to see if things have changed. I was going to do a top-end engine clean using Sea-Foam, but I want to know what we’re dealing with first.

Thursday, August 11, 2016

Reversible Sharing

Last night, in support of getting Scarlett on the road ASAP, I made the hard decision to pull perfectly good parts off Ringo and install them on Scarlett. The other option was to rely on recently rebuilt carburetors and a suspect fuel pump, and buy a battery. Since I expected it to only take a few minutes to remove the requisite Ringo parts, I went the cannibalization route. I figured if someone wanted to test-drive Ringo in the next few days, I’d swap everything back – not too big a deal.

While Mikhaila installed the final engine seal retainer on the passenger side, I remove Ringo’s fan belt, loosened the fuel pump retention bolt, spun off the four nuts holding the carbs to his heads, and disconnected the throttle and choke linkages. With Mikhaila helping, we pulled the carbs, fuel pump, and fuel lines as one assembly and dropped it onto Scarlett’s engine. Mikhaila went to free the battery while I began tightening bolts and fittings. Once all that was in place, I realized we hadn’t installed the choke linkage into the thermostat ends. We got it done, but it would have been MUCH easier prior to putting the fuel in the way. Mikhaila bolted down the carbs and then busied herself cleaning chrome while I finished hooking up and adjusting linkages. Ringo’s battery was then yanked from its home and dropped into Scarlett’s engine compartment. After cleaning the terminals, we established electrical power to the car. Next needed part? A vacuum balance tube. I searched the washtub of Scarlett parts – nothing. I searched the shelves and walls and I was able to turn up four tubes, but they were all for LMs. Cool that one of them was from the 140HP engine from the Phil collection. I briefly thought about pulling Ringo’s, but the thought of finagling the tube out didn’t thrill me since it violated the easy-off easy-back-on rule I’d applied to this cannibalization episode.

When I shared my frustration at not have the right piece amongst my stash, Mikhaila pulled out a pen and a used part box to start a list. I guess she figured if we were missing one part, there’d be more. I scanned the engine compartment to see what else I was forgetting to install and came up needing the two brackets that position the bottom air cleaner cans over the engine (circled in red in the image below – taken from the excellent source corvanatics.com. A little explanation here since the Corvair enthusiasts among you readers will recognize that this style air cleaner (two separate elements) is not correct for a ’64 engine. I had given Mikhaila a choice as to which air cleaner style she wanted (correct ’64-‘69 style with a single, larger element or ’61-’63 dual element style). She chose the dual style, so many months ago I made sure I had the cans, lids, and crossover for that. Sadly, I’d forgotten the two brackets. Another deep search of the shelves turned up nothing, so those went on the list. I was, however, able to unearth all the parts necessary for the LM style, so that’s what we’ll go with until the correct brackets are obtained from the Corvair Ranch.

The next scan of the engine reminded me we needed to plug the large hole on the front right of the top engine cover. GM’s design had a hose go between the pressurized volume under the cover and the heater box to provide air to mix in the heater box. That AIR knob under the dash controls the door that lets or restricts this flow. Since stealing any cooling air from an air-cooled engine is not a good idea, many folks remove the hose and block off the exposed opening, and we did that exact thing. Without explanation I cryptically directed her to go to our recycle bin and bring back an aluminum can. She was then instructed to cut the can leaving only the unrolled flat side piece. Using the adapter as a template, she crudely cut out the sheet to fit, we poked holes where the three attachment screws went coated the mounting perimeter of the sheet and adapter with RTV and screwed the parts in place over the hole.

The final act of our evening in the garage was testing the lights. With the key in the ON position, I flicked the blinker lever to the right and left with each position providing the resultant blinking of the front and rear lights. The shifter lever was moved to the R position and one of the two backup lights illuminated. I think I know the issue with the balky passenger side – grounding, and we’ll deal with that soon.

Once back inside I grabbed my phone and sent my buddy, Gary, a quick e-mail to see if he had a balance tube he'd be willing to part with. This morning's response was positive, so I'll be paying him a visit next Monday evening.

Tuesday, August 9, 2016

Full Speed Ahead, Scarlett


As the sun shone through the garage windows Saturday morning, Mikhaila and I could tell it was going to be another hot, humid day – finally time to dig out the garage-only A/C unit from the basement. It’s marked garage-only since the fan doesn’t start without some help and never gets up to the spinning speed it should, but it’s still makes cold air, so into the window it went.

The second order of the workday was to make Scarlet rollable again, and that meant dealing with wheels and tires. We pried the damaged tires off Ringos rims and the good tires off Glinda’s green wheels. The good tires, whitewalls out) then went on the black four-lugs and were filled with air until they their beads popped into place (much to Mikhaila’s surprise). Once we pumped them high enough (40 psi), the bubbling at the bead stopped and they were ready to go on Ringo. First the rear, then the front, we freed up Scarlett’s smaller tires and made Ringo sit flat again. Scarlett got her 185-75R13s back and we rolled her into the garage and quickly shut the door to keep as much cooler air in as possible.

I’d decided we needed to do the minimum required to quickly get this car roadworthy for Mikhaila, so we focused on getting the engine ready to run. The seals on an EM are 3” or so wide pieces of leather-like rubber. Originally, they are stapled to the top sheetmetal shrouds. While this is the preferred way of attaching replacements, riveting is MUCH easier, so that’s the route we took. With a GUP front shroud (good, pliable seal still in place), we only needed to deal with the two side ones. After marking drill locations, I had Mikhaila put in holes using the drill press. With me holding the shroud and the seal, she then poked holes in the seal using an awl followed by the rivets and the shrouds were ready for installation. First, though, we needed to remove the old front shroud, and that necessitated disconnecting the battery cable and throttle linkage that pass through a hold in the shroud. Of course, that little task wasn’t so simple since we had to remove the left rear wheel to get access to the solenoid. We then snaked all three top shrouds into place as well as the engine’s top cover and bolted them all into place. Finally, working under the car and with the wheel already out of the way, we installed the outer seal retainer to the driver side. We tried to do the passenger side, but the muffler and wheel made it too difficult, so, since it was past dinner time, we quit for the day.

Sunday, Mikhaila had to work, so I did a couple quick Glinda tasks – adjusted the clutch and sewed the headliner. Yes, the same headliner I just finished writing that I’d be replacing. Well, I’m such a cheapskate and the needle and thread were handy so I just stitched the gap closed.

Friday, July 22, 2016

Venting

Warning – no Corvair content in this post. What does follow is a missive on the frustrating follies of an amateur mechanic.

Short back-story. Our adventure began on a quiet day in early February when Victoria’s GMC Acadia had a timing chain failure. The vehicle was 3,000 miles past GM’s warranty on this issue. The local mechanic told her it’d be $5000 to replace the engine – not willing to quote just replacing the chains because he didn’t know how deep into the engine he’d have to go to complete the repair. We chose the less expensive route of fixing it ourselves. Four months of sporadic weekend and evening thrashes resulted in the car going back on the road with five check engine codes and a puddle producing transmission fluid leak. Cleaning the MAF sensor (one of the codes) and putting an o-ring in the suspect transmission line joint didn’t do a thing, so we bit the bullet and delivered the car to the local mechanic to sort out and deal with the problems.

Today Victoria retrieved her repaired car and was told a small piece of foam had become lodged between the upper and lower intake manifold pieces causing the air leak triggering many of the codes. I apologized profusely to Victoria while kicking myself over my lameness for having this happen. She was gracious in reminding me there were other issues that the mechanic needed to deal with (new transmission line seals, leaky O2 sensor, and a malfunctioning manifold control valve).

Now we wait and see what happens next. Do the codes stay away? Are all the leaks alleviated? Does the A/C blow cold (we had to have it evacuated in order to drop the engine to do the timing chain replacement)? Time will tell.

Wednesday, January 6, 2016

Baby, It Was Cold Outside

With Scarlett still occupying the garage, work on getting Ringo back on the road had to take place in the twenty-something degree discomfort of the driveway. I had quick to point the finger at a carburetor, but a Facebook posting by my Corvair-buddy Geoff reminded me of the saying, “95% of fuel problems are electrical.” So, the first thing I did after donning layers of grungies was hook up the dwell meter and crank the engine. Dwell was still reading 32, but I went ahead and put back on the previous point’s plate with a GUP set of points with the contacts slightly sanded. Since the cold battery didn’t have enough oomph left to set the dwell by cranking with the starter, I went old-school and set the point gap. As I was turning the engine with a wrench to get the point’s rubbing block on top of a cam, I noticed gas dripping from the fuel pump. Irr. I pulled off the offending part and replaced it with the newish-looking one off Scarlett. After a little gas went into each carb, the engine fired right up and settled into a nice idle … for about a twenty seconds before dying. Irr. Figuring the supposedly functional fuel pump wasn’t so functional, I cracked open one of the fuel line fittings and cranked the engine – sure enough, no gas. Off came that pump and I immediately marked it BAD. On went the next newish-looking pump from the
stash. After attaching the inlet tube, I poured a little gas down each carb, started the engine, and crossed my fingers that I’d see pulses of fuel come out of the outlets. Nothing. Another pump gets BAD written on it. The final pump from my stash was seized, so I had no choice but to put the original back on. With all the fitting tightened, I started the engine and tightened the pump’s screws to stem the drops to just a slow ooze. The dwellmeter indicated my gap-setting, while good enough to get the engine running, wasn’t quite where it needed to be. A tweak or two with a screwdriver and dwell was back to about 32 degrees. That was followed by a re-setting of the timing to 12 degrees BTDC.

At that point my fingers were too cold to continue. Replacing the muffler had to wait until another evening – hopefully one with temps at least in the thirties.

Monday, January 4, 2016

Two Steps Forward; Blah, Blah, Blah


Yeah, I like making strides forward, but I abhor going backwards. That, however, is how the last couple days have been.

Yesterday, Mikhaila and I spent an hour or so in the garage adjusting Scarlett’s valve lash. With the low compression ratio in cylinder number two, I was hoping maladjusted valves would be the cause. We started by lowering the front end off the jackstands and onto wheels for the first time in quite a while. We then put a wheel on the right rear and lowered it to the ground. Up went the left side as high as the heavy-duty jackstand and jack would put it. Mikhaila wielded the wrenches while I directed the removal of the valve cover and the checking of the valve lash. All valves seemed to be too loose (meaning probably not the cause of low compression). We got them up to spec and then repeated the same procedure to cylinders one, three, and five. We were going to move on and begin bolting shrouds back onto the engine (being the optimist that I am), but that was stymied by the fact that I’d forgotten we hadn’t yet riveted the rubber seals to the side shrouds, or the front shroud for that matter. With the hour heading towards nine PM, we decided to turn out the lights and heaters and head into the house.

On to Ringo’s and his frustratives (see sidebar).

About a week ago, I went out to the driveway to tackle two issues. First, the maddening driver’s door. It took a few minutes to remove the fresh air grill and carpet from the left front footwell exposing the door-hinge bolt heads. I loosened all six of them, but not so much as to let the door move. A rubber mallet provided the impetus to adjust the door in its opening. I was trying to bump the lower hinge slightly forward, but all I accomplished was knocking loose some rust from the bottom rear corner of the door. With each hinge bolts a turn looser I was able to get the door moved where I wanted it. I screwed the latch plate back into place and now the door closes without slamming. We’ll see how long that lasts. Out came the power grinder with a wire brush on to clean up the rust mess I’d just made. After getting rid of all the loose stuff, I liberally applied a coat of POR-15 to stem the rusty tide.

On to the second issue – no choke on the left carburetor. I backed Ringo’s rear up onto the ramps and, after exhaustively (pun intended) trying to get the coil and rod out, I ended up having to lower the left exhaust manifold to provide passage. A spare head gave up a new rod and the stash gave up a set of three GNP exhaust donuts. A few minutes later, the engine was running and I was listening to make sure the exhaust was leak-less. With that confirmed I reinstalled the dangling lower shroud, rolled the car off the ramps, put away the tools, and called it a day.

Now, jump to this morning – the first time I’ve driven Ringo in a week and a half. While his engine started right up and settled into a proper idle, pulling on to the beltway a few minutes later seemed to require more effort than usual. As we neared the end of my ten mile commute, the engine started stumbling, and as I made my last turn into the parking lot a steady stream of backfiring ensued. I dropped the transmission into Low and matted the gas pedal to ensure I’d make it into a parking spot. That maneuver was rewarded with a very loud backfire, but I did barely make it into a spot. As soon as I braked to a stop, the engine died. I got out and surveyed the damage – yep the entire seam of the muffler had been blown out. I quickly pulled the tops off the two air cleaners to see the state of fuel. The right side seemed okay, but the left side seemed to have two problems. One, the throat had a cloud of gas in it (stuck needle and seat perhaps – running rich = exhaust backfiring), and two, I couldn’t see a shot of gas when I blipped the throttle. Good thing the towing equipment’s in the bed of the truck.

Wednesday, December 30, 2015

Holidays are made for Car Work

Yesterday, Mikhaila finally had a day off from work, so we went out to work on Scarlett. I told her the primary goal was to get her engine running, and that we needed to borrow some stuff from Ringo in order to make that happen. With me directing and her turning the wrenches, we removed the carburetors and linkage as an assembly and bolted them onto Scarlett’s engine. After transplanting the battery and rigging up a gravity feed for filling the carbs with fuel, we were ready to go. First check was dwell. I hooked up the meter and had Mikhaila turn the key to on and energize the purple wire to get the engine to turn. It took a few tweaks of the points, but I was finally able to get the meter to point at 32 degrees. Next, we rotated the crank until the groove on the balancer was lined up with 8 degrees on the engine block scale. With the timing light now connected, we twisted the distributor trying to get a spark, but were unsuccessful, so I had Mikhaila aim the timing light with the engine spinning by the starter and we turned the distributor until we could get the groove to show anywhere on the scale. With the timing somewhere within reason, I poured a little gas down each carb’s throat and had Mikhaila start the starter cranking. It took a few tries, but we finally got the engine to fire and run. The strange thing was, that even after twenty-plus years of sitting, there was no lifter clatter and not a whole lot of smoke. We went through a few refills of fuel before calling the exercise a success and I Mikhaila out to the driveway to clean engine shroud pieces while I did a compression check on each of the six cylinders.

Last October we did the same test on the engine and came up with the following results: one @ 160 psi, three @ 150 psi, one @ 120 psi, and one @ 60 psi. This time, with engine warmed up, testing showed two @ 140, one @ 135, two @ 130 and cylinder number two at 45. I squirted some oil down in the spark plug hole and did another check. It went up to 60, so there are still issues. All-in-all, though, the test run was a success since nothing banged, clattered, or untowardly spewed fire. My next move on this will be pulling the left valve cover and checking the rocker arm adjustment on the two valves to that cylinder.

#1 #3 #5
#2 #4 #6

The testing complete, I returned the carburetors and battery to Ringo’s engine compartment. By this point, Mikhaila had finished separating the engine seal retainers from the shrouds, so I released her from working. I, however, still had another project to attend to – this one on Ringo’s distributor. When I’d previously checked the dwell, I’d noticed that it would change with the revving of the engine. In my experience, this indicates a loose pivot pin on the points’ plate. At that time, I’d just plugged the vacuum hose, verified the dwell was holding steady at 32 degrees and moved on. Yesterday, I decided to replace the points’ plate with one that I had removed from Glinda when I’d installed the Ignitor II ignition system a few months back. After the swap, I hooked up the dwell meter, set the dwell to 32 degrees, hooked up the vacuum line, and fired the engine. It would start, but barely and wouldn’t idle. It took me a few minutes to discover my error – I’d neglected to tighten the fitting where the fuel line enters the fuel pump. Sucking air was never going to re-fill the carburetor bowls. With the fitting tight, it only took a few cranks of the engine to get gas in the carbs and the engine running smoothly. Sadly, the dwell still wouldn’t sit still as I revved the engine, so it looks like the distributor shaft bushing gets put on the list for replacement. With a golf tee securely plugging the vacuum hose, I checked the timing – still sitting at 12 degrees BTDC.

At that point I called it a day, put away the tools, and locked up the garage.

Tuesday, February 3, 2015

A Day of Waste and a Day of Headway

Last week I e-mailed a response to a Craigslist seller of Corvair bumpers. The body of my e-mail made an offer and told the seller I could drive up Saturday morning to get the two items. His short reply on Thursday was, “Sure, that’s fine.” My immediate response back was a request for an address and a phone number. Friday came and went and no reply, so I sent another e-mail. Saturday morning the lovely Loriann, Mikhaila, Victoria, and I decided to head north even though I still hadn’t received confirmation for pick up that day. I had my Blackberry, so while I waited we shopped (not for car parts) and took in some Lancaster-area attractions. By 4 that afternoon, there was still nothing, so we headed back home bumper-less. It wasn’t until Sunday afternoon the guy finally checked his e-mail and replied. I guess all the optimism in the world won’t trigger someone to respond to an e-mail. While he’s still holding the good price, I’m not sure I’m willing to blow off another day driving up into PA to fetch them. We’ll see what happens with the rest of this month.

On the headway-front, Mikhaila and I spent a fruitful couple of hours in the garage Sunday afternoon. She applied POR-15 to Scarlett’s underside and to a few of her own body parts. Hard to believe she was able to spread it so far since she was covered head-to-toe. While she was spreading paint, I was readying the engine for starting. I bolted on two carburetors with fresh gaskets, found the best gas lines in my stash and installed them to the new-looking fuel pump. Wanting to save some tasks for Mikhaila to accomplish, I diverted my attention to the brakes. I installed the two new rear brake lines and screwed in the tube fittings coming from the front of the car. We’ve still got a ways to go with brake system including bolting in the dual master cylinder new lines up front.

Once Mikhaila was up from under the car, I had her help me install the alternator (yes, Scarlett has been converted from generator to alternator). Next we were going to put on the fanbelt, but I vetoed that due to a dry-feeling bearing in the idler pulley. I know I’ve got a few spares in much better shape, so we’ll catch that next time. The last item before we fire up the engine is a new set of spark plug leads. I’ll be ordering these from Silicone Wire Systems, but I need Mikhaila to pick out a color first.

I just noticed I've now had over 75,000 hits on my blog. Cool!

Thursday, November 13, 2014

Update Time

I’ve been very, very busy with home projects so ‘vair projects have been off limits. That changed the last couple evenings when the lovely Loriann’s not-so-lovely daily-driver needed some mechanical attention. Since determining it needed new rear brake pads took no time Tuesday and doing the replacement took no time last evening and I was already in grungies and out in the garage both evenings, I figured, “what the heck, get Glinda back on the road.”

So, I did just that. Tuesday I adjusted the clutch cable and threaded on the retaining nut, unhooked the vacuum advance, set the dwell and timing (more on that later), removed the racing seat and belts, and pushed the front bench back into place. Last night I bolted down the seat, bolted in the factory seatbelts, zip-tied up wiring, and installed passenger door sillplate. That meant that finally, after over two months of being out of service, Glinda came down off the jackstands and was driven down the driveway.

This morning I drove her into work without issue. Well, without issue is a bit of a stretch. While the engine didn’t die and she didn’t strand me on the side of the road, her engine is not running smoothly at all. I don’t know if it’s clogged carbs or something electrical, but it’s not right. That brings me back to the question of timing. The shop manual for 1968 states timing for a manual transmissioned 110 HP engine should be set at 4 degrees BTDC (before top dead center), while Powerglide engines get 12 degrees. I’m not sure what drives this difference, so I decided to go with the higher number and just listen for pinging. Since it’s been cool and will only get colder, engine heat shouldn’t be an issue. In the meantime I’ll search the web for some smart person’s explanation of why there’s a difference.

In hopes that the chuggy running is fuel related, I’ll make sure I do some full-throttle no-throttle runs this evening to try and suck anything that might be clogging the tiny passages in the two Rochesters. It is my goal to install the Pertronix II electronic ignition module and associated new coil, so if the problem is spark related, that will cure it. Just not sure when I’ll get to it.

Hopefully, the snow (and thus the salt) stay away a little longer so I can put some miles on the car.

Tuesday, October 28, 2014

With Thanks to Mikhaila

Sunday should’ve been a work on the bathroom day, but thanks to Mikhaila’s father-daughter project, I went outside to work on cars instead.

She joined me around 1 in the afternoon to work on Scarlett. Since she’d twisted her ankle (Mikhaila, not Scarlett - cars don't have ankles although some have knees), I had to come up with activities that would limit her standing, so I started by taking out the seats, so she could brush, vacuum, and coat the inside floor with POR-15. I decided it would be a while before we’d be able to reinstall so the seats, so a good storage place had to be found. Since I’d planned on reinstalling Glinda’s bench seat, it came off Luna’s engine lid and Scarlett’s seat took its place.

We then pulled Ringo’s battery, dropped it into Scarlett’s engine bay, and hooked it up to the cables so we could determine the state of the electrical system. It was encouraging when the first thing we checked, the ignition switch, resulted in both idiot lights illuminating. The check-out went downhill from there. I had Mikhaila push down on the turn signal stalk – green light on dash, nothing at the front or rear connector, same thing on left turn signaling except no green arrow on the dash. Finally, pulling out the headlight knob provided no electricity to any of the outer connectors. The next step for this will be checking fuses (something we couldn’t do with wet POR-15 on the car floor.

Finally, we oiled the engine. First, though, we removed the distributor after carefully marking it’s location against the engine as well as the location of the rotor. That gave us access to the end of the pump shaft, which she spun clockwise with the drill-mounted special shaft. She kept this up as I slowly rotated the engine through two revolutions. With the distributor back in place, I had her pull the #1 plug and insert the compression tester fitting. Then, with the gauge attached, she energized the starter spinning the engine and causing the needle to rise. We checked all six with the following initial results: one @ 160 psi, three @ 150 psi, one @ 120 psi, and one @ 60 psi). By pumping a little oil in the low cylinder and retesting, we got the gauge needle to point to 80 instead of 60. That gives me some hope this low one will come up after we run the engine a bit. We’ll need to borrow a couple good carbs first but that’ll have to wait until next weekend.

Amongst working on Scarlett, I fiddled with Glinda trying to get her roadworthy again. I pulled back the carpet to find the end of the clutch cable and inserted it back in its place. I hooked up the clutch linkage, fuel lines (with a fresh filter), and battery, and tried to start the engine. The latter activity didn’t go so well as the engine just spun and spun and refused to fire. I pulled out the timing light to check for spark and found there was none. I hooked up the dwell-meter and found there was none. Arghh. After adjusting the dwell, the engine fired right up, but as I revved it, I watched the dwell-meter’s needle jump around – not good. Since this was occurring with the vacuum advance hooked up, I surmised the points’ plate had play in it. Knowing I had the electronic ignition to install which would solve this problem, I didn’t get too upset. On second thought, isn’t this a fairly new points’ plate?

At that point it was time to put the tools away, and call it a day. The only problem was I had a bench seat sitting in the driveway – a bench seat that wouldn’t fit in Glinda while the racing seat was still installed. I lugged the heavy seat into the garage and it’s now sitting on end blocking the path around the back of Scarlett.

Tuesday, October 21, 2014

Wonderful Weekend of Work

It ended be a very car-full weekend for me. Along with changing the oil and filter in the truck and the lovely Loriann’s daily-driver, I got to spend more than three hours of quality time with Mikhaila working on her car Saturday. I had her clean the engine’s sheetmetal pieces; remove the rusted muffler hanger and disassemble it to prep the bracket for painting; clean a set of sparkplugs, gap, and hand-tighten them into the heads; and finish cleaning the seats.

While she was laboring away, I did the minimum repairs necessary to get Ringo roadworthy. I need to take the lovely Loriann’s car off the road to replace a front wheel bearing, so a Corvair must be pressed into daily-driver service. Since Glinda was still many hours of reassembly away from being drivable, Ringo was the best candidate. There were two issues that were keeping him in the driveway – a broken muffler strap and a seized carburetor shaft. I removed his left carb and thoroughly soaked the throttle shaft with penetrating fluid, working the shaft back-and-forth until it moved freely and completely. With the carb bolted back to the head, I went hunting for the replacement strap I’d bought from the Corvair Ranch a couple months back. I could’ve sworn it was in a small box of parts, but after fifteen minutes of fruitless hunting for the package, I decided to check my shelf of GUPs and GNPs, and there it was – in the cubby marked Exhaust. Go figure. I’d actually put it away. A few minutes of fiddling and Ringo’s exhaust system is now properly restrained. Since his starter has been very reluctant of late to function properly, it was quite a surprise when a turn of the ignition key resulted in a spinning engine. It fired up almost immediately and settled into a clanking-filled idle (a lifter bled down). After about fifteen minutes of idling, the noise went away and I took him for a test drive around the neighborhood. It took a few stops before the rust was rubbed off the drums and the brakes stopped grabbing and squeaking. It’s strange to see an EM parked in front of the house – it’s been a very long time.

Sunday it was Glinda’s turn. As I left off in last weekend’s antics, I needed to install a helicoil before reassembly could commence. I cut the new threads using the supplied tap and followed that up with the helicoil twisted in to the prescribed depth. The last step in the repair was knocking off the tang which I accomplished with make-shift punch.

Next, the drivetrain halves (engine & transaxle) had to come together. Amazingly, after installing the input shaft onto the engine, I got the transaxle to slide into place without any problem. The bolts that hold the halves together were then installed and the drivetrain was pushed into position and lifted into place. I had to remove the center rear seal retainer to get the edge of the oil filter housing to clear. It took some jockeying up and down and back and forth, but by lunch I had the back of the engine attached to the rear motor mount.

Next was the front of the drivetrain. The three bolts that hold the transmission to the crossmember went in nicely. I held my breath as I carefully torqued the one bolt into the newly repaired hole, but it pulled the joint together just fine. With the jacks out of the way I moved on to reinstalling the u-joint caps on the differential hubs. Remembering to use the ratcheting strap to pull the wheels together, this task was quickly completed followed by bolting up the brackets at inner ends of the strut rods. That job went quicker than expected, so in not time I was realigning the shifter coupling with the transmission shift shaft. Once centered, I installed the pin, washers, and cotter pin. Next on the list were the throttle linkage pieces. I found the new rubber grommet that I’d bought and popped it into the hole in the transmission pivot plate before poking the ends in and retaining them with the little c-clips (my caution was rewarded by me not having any pop off into oblivion. The clutch linkage assembly was supposed to follow, but, after getting the engine side of the linkage attached, I discovered the pedal end had popped out of place and wasn’t connected to the pedal anymore. That was a show stopped since I’ll have to pullback the carpet, remove the cover, find the end amongst cables and brake lines, and then put back in place. There needs to be a retainer that holds this stupid thing in place if tension is taken off it.

Sliding out from under the car for the umpteenth time, I spent the last half-hour before dinner putting things right in the engine compartment. That included reseating the engine seal; connecting the ground strap, ground cable, and oil pressure switch; putting the fanbelt back on; and installing the air cleaner. All that’s left on the topside is to connect the battery.

Thursday, October 16, 2014

Suspicion Confirmed


As most of my free time over the last couple weeks has been devoted to house projects, there hasn’t been much going on in the garage or driveway. However, I was able to spend a couple hours working on Glinda last Sunday. Previously, I’d removed the starter, disconnected clutch, shifter, and throttle linkages, and unbolted the transmission from the cross-member. That left disconnecting the drive axles, strut rods, fuel lines under the car and disconnecting the electrical plugs in the engine bay which I made quick work of. With the transmission and ATV jacks in place, I removed the two nuts at the rear engine mount and lowered the drivetrain down. At that point, I remembered the exhaust system had to be removed, so back up went the jacks, off came the four nuts and muffler hanger and the exhaust from free. With the jacks lowered again, I unscrewed the remaining bolts holding the trans-axle to the bellhousing. With the help of a prybar, I separated the engine from differential and exposed the clutch area. With the pressure plate and clutch disc removed, my suspicion was confirmed – I had left off the ring that was supposed to be under the heads of the flywheel bolts. I grabbed the ring off the workbench, and, with the aid of air tools, had all the clutch parts properly assembled in less than fifteen minutes.

Now all that stands between me and an installable drivetrain is bolting the trans-axle back to the bell housing and helicoiling the stripped transmission hole. Maybe Saturday.

Monday, September 15, 2014

Done With Racecars For a While


Sunday afternoon Mikhaila joined me in the garage for some quality Corvair time with her car. While I returned to Luna her borrowed wheels, Mikhaila continued cleaning Scarlett's (this post marks the date where she agreed to give her car a decent name in place of RedVert) seats. So far it appears the original upholstery will be usable.

Once Luna was down on the ground and the jackstands were available, we put Scarlett up in the air and removed her wheels to give us access to the hub ends of the brake system. I had given Mikhaila options as to where we start first on her car: engine, brakes, bearings, fuel. She chose brakes. We’ll be doing this job in stages with stage 1 being inspection of what’s there. From what we could see, the lines and hoses are actually in pretty good shape, but we’ll be replacing the rubber hoses anyway. To improve access to the rear fittings, we undid the outer ends of the heater ducts. While under the car, I noticed the exhaust pipe has rusted through in one spot, so I decided we should also remove the exhaust system which helped with brake fitting access as well. We sprayed both ends of all four hoses before moving on.

I’m anxious to determine the condition of the engine, so Mikhaila and I went to work prepping the engine for starting. After removing the spark plug leads, we discovered mice had moved heater box insulation to the volume under the Upper Shroud (turkey roaster). That meant that we needed to remove that shroud to clean out all the finned passageways of the heads and jugs.

We accomplished that in surprisingly quick order by removing the alternator (this EM’s been modified), the vacuum balance line between the carburetors, the PCV valve tubing, and all the screws holding the shroud in place. Since the top shroud is sandwiched by the front shroud, the three screws for that piece had to be loosened. With the top now free, we finagled it off the engine. Mikhaila then gave each spark plug a generous shot of penetrating fluid which we decided to let sit and work its magic for a day or so.

Some of the parts Scarlett is missing include the side shrouds. John had allowed me to go through his stash of used parts and I did uncover a side shroud, but it ended up being for a turbo engine, and won’t work for us. The last task for Mikhaila and I before knocking off for the day was to go through my GUPs and see if I had the sheetmetal that Scarlett required. We found side shrouds (with good seals), a rear engine mount cover, and a couple lower shrouds (both with good thermostats). I really need to get rid of all the excess crap I’m keeping on shelves. It makes it very difficult to find the right GUP. Wait, the crap are the GUPs.


Friday, August 22, 2014

Almost Ready for the Drop

Yesterday evening, I rushed home with the plan to take tiles off a bathroom wall. It was supposed to rain, but when I arrived home, and the skies unthreatening, I decided to don grungies and head out to the driveway. It took less than a half-hour to re-re-drain Glinda’s gas tank, re-re-remove the gas sender, re-flip the float, and reassemble.

With the fuel gauge issue considered put to bed, I turned my attention to completing steps one through sixteen under ENGINE ASSSEMBLIES (POWER TRAIN) Removal in Chevy’s 1965 Corvair Shop Manual. Just before nine the raindrops began falling on the bodyparts not lying under the car. At that point, I crossed off every pertinent step except for 3, 7, 15, and 16. While not instructed to completely remove the strut rods, I did so. Also, I removed the exhaust system (Step 18) and, since I need to replace the front transmission mount, I unscrewed the nuts and bolts retain the left and right stabilizer rods.

This weekend Victoria and I have a date to install Luna’s top. I made a visit to Harbor Freight to purchase an electric stapler to aid our assembly. I also picked up a tarp to cover up the rips in the portable garage cover.

While on the subject of buying stuff, I‘ll share the status of depleting the THRaF. After recent orders with Clark’s (Shifter Boot, Tunnel Pan parts, and gaskets for the Diff and Trans covers) and the Corvair Ranch (right side muffler hanger and a couple muffler straps), it’s now sitting at $261. $50 of that is already committed to the House of Balance (they promised the flywheel and pressure plate would be ready early next week) leaving a little over $200. I want to give Glinda a tune-up, so a tune-up kit from Clark’s will leave me with roughly $120. With that I need to buy a couple mufflers.


One of the items I bought during Rich’s big part’s sale was a dual exhaust pipe with crossover. This should allow me to use fairly loud mufflers without the 60 MPH drone I dreaded when I was running duals on Lucy. I’ve always loved the sound from my buddy Jonathan’s Corsa equipped with Flowmasters but they run about $90 apiece. Next down in price are the Thrush Cherry Bombs at $46 each (within my budget). Finally, I could go cheap with Flowtech Raptors like I had on Lucy for less than $30 each. I’ll sleep on it.

Monday, February 17, 2014

Spinning Wheel

It’s always a unique experience waking an engine after decades of dormancy. The last time I’ve done this was when Ariel and I were working on Redvair (http://corvairfleet.blogspot.com/2009/12/cpotd-18-eternal-optimist.html). This time TwoTone’s powerplant joined the land of the living after at least twenty years of inactivity. It all happened as follows:

Yesterday afternoon it only took about fifteen minutes for the heaters to get the garage warm enough that I could comfortably remove the stocking cap from my hair-challenged noggin. First task of the afternoon was to install the borrowed starter/solenoid which went in easily including attaching the battery cable and the Start and Run wires. After turning off the heaters, I touched the purple Start wire to the battery’s positive terminal, but got nothing but sparks. I swapped in another battery cable and was rewarded with a spinning engine once the starter wire was energized. I let the engine spin a little before it was apparent it wasn’t going to start. I’d forgotten to set the point gap, but once that was set, and the static timing checked, I gave the starter the juice again and the engine caught and smoke filled the garage. Success! I let the engine run just above idle for the few second it took to burn all the gas from the carburetor bowls. Doors and windows were then opened to dissipate the fog that had enveloped the rear of the garage. I escaped to the backyard catch some fresh air and snagged the gas can from the garden shed – yay, it contained some fuel. Back into the garage to remove the other rear wheel so I could test the tranny. With TwoTone’s rear securely raised on jackstands, I then refilled the carbs and refired the engine. The smoke was less, but the valve clattering didn’t seem to be any quieter. After it ran out of gas, I put the shifter in Drive, refilled the carbs, and energized the starter. This time, instead of staring at the engine, I gave a quick glance at the rear wheels. The right rear hub was happily spinning clockwise – the correct direction. I repeated the fill-shift-start procedure this time testing Reverse, and the right rear’s rotation had reversed. Success.

After escaping the exhaust-filled garage to let it air out for a few minutes, I returned and pulled all the spark plugs and then proceeded to do a compression check on all six cylinders. All but #2 came in at 160 to 180 psi. #2 could only move the gauge up to 92. I think that it would improve with some more running. I’m going to call the drivetrain a runner.

With that experiment complete, I pulled the borrowed the starter and reinstalled a placeholder. Off the jackstands and then off with the loaner carbs. Other than pushing her out of the garage once the snow melts, I think we’re done with TwoTone.

However (and it’s a huge however), I’m toying with the idea of trying to push out the front dent. The metal seems to all be there and it’s un-torn, so who knows what kind of result I could get. I figure it’s worth a try and then the car would be more saleable.