Wednesday, September 29, 2010

CPotD #156 (One Photo For Three CPotDs)


It occurred to me that today’s CPotD actually qualifies for three different days: Motor Monday with its enormous engine, Track Car Tuesday since it’s built for blasting down a drag strip, and Wacky Wednesday with no explanation needed.

Carpet Installation, Part 2

Last night Victoria and I worked on her car installing carpet. It’s slow-going -much slower than I’d expected. I remember it being easier with the EM installs I’ve done. We did get the front piece trimmed and basically all in. Both of us are now sporting blisters from the cheap Harbor Freight scissors. In their defense, I don't think they were designed for cutting carpet. After marking the location of the dimmer switch, we cut a hole in the carpet and installed the grommet. We then had to remove the kickpanels with the fresh air vents. While the passenger side was easier than an EMs, easy ended when we got to the driver’s side. To get it out, I had to remove the dimmer switch from the footwell. We cut the excess away and reinstalled the panels. The issue now was I couldn’t have the dimmer switch in place to install the kickpanel, but once the kickpanel was in, I couldn’t install the dimmer switch. I ended up forcing the panel to bend around the switch. Not something I like doing with 42 year-old plastic, but thankfully nothing broke.

With the front done, we moved to the rear piece. There are flaps of carpet sticking out from each rear corner and it appeared they needed to go under the rear seat mounting brackets. NOT GOOD. The directions did NOT tell us we needed to remove these parts and they're not easy to get loose, so I decided we'd ignore the flaps and just glued down the back edge where directed. The seat bottom will hide the flaps anyway. With bricks holding the material in place while the glue dried, we knocked off for the evening.

I know Victoria is running out of patience, so I promised her I wouldn’t leave the garage tonight until the car was ready for the road. All that’s left is installing the door sill strips while pulling out all the bumps in the carpet. Then the seatbelts and seats go in. Both of those, however, will require melting holes at each bolt location. I’ll go into that in tomorrow’s post. Finally, Glinda will be ready to come down off the dollies and drive out the door.

Tuesday, September 28, 2010

Carpet Installation, Part 1

We didn’t get a lot of time in the garage last night since we were out so late celebrating Victoria's successfully passing her MD driving test, so accomplishments were minimal. I was able to find all the hardware and install the antenna. Then she and I went to work on putting the new carpet in. The front and rear carpet pieces come with pads glued to most of the bottoms. The pads are cut to fit around features of the floor; one of which is the accelerator pedal and shaft. Following Clark’s directions, we were able to set the front piece in where we thought it should go. Unfortunately, this didn’t place the shaft in its associated padless region. We adjusted the carpet forward to get it to line up and I cut the hole. We then slid the carpet over the shaft and installed the pedal. We were disappointed that the pedal now sits right at the edge of the heel pad instead of slightly offset, but the pedal does rotate smoothly and that’s what’s important. By that point, it was nearing 10 PM and time to head back inside. Tonight we trim and glue the pieces down followed by seat and seatbelt installation

Monday, September 27, 2010

So Close


This weekend was to be it. The weekend Victoria and I finished working on Glinda. Obviously, by the title of today’s posting, we didn’t make it. By the way, some in-process pictures are in a Flickr set here.

Friday evening we finished masking the car. My approach to this partial paintjob is each coat covers a slightly larger area than the previously applied one. The epoxy primer barely covered all the exposed metal. The urethane primer extends about a half-inch outside that, and the paint layer another half-inch out. That lets me sand off the ridge of the newly applied coating to blend it with the surrounding surfaces. T
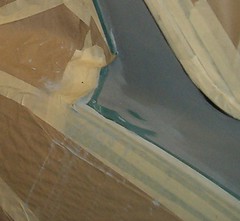
his photo was taken after I’d sanded the Urethane primer and it shows where the edge of tape had been. With that scheme in mind, we laid down two overlapping strips of masking tape followed by the paper. That meant we didn’t have to re-mask the entire car, just tear off the top layer of tape. By the time we’d completed that task, it was too late to prime.

Saturday morning I shot three coats of urethane primer finishing around noon. The data sheet on the primer states I could wet sand four hours later, so I busied myself with watching college football while the coating cured. After dragging myself away from an exciting game, I pulled off the first run of masking tape and attacked the primer with 400 grit sandpaper. I removed the slight ridge and scuffed the small strip of paint. Repeated rinsing in buckets filled with slightly soapy water kept the paper clean. With all the ridges blended, I moved to 600 grit and smoothed out the primer. Once that was completed, several passes with a sponge and clean water removed a majority of the sanding dust from the car body.

Sunday morning I had planned on going to church, but a funny thing happened. The lovely Loriann and Mikhaila were off Girl Scout camping in Delaware with one of the keys to the PT Cruiser in its official parking spot - clipped to Loriann’s purse. When Victoria and her friend left for church before I was ready to go, I had no idea she had the second key on her key ring since she’s been driving this car so frequently. As soon as I was aware I had no key to the Cruiser and was keyless and Lucy was blocked in, I called her. She was already at church, so I told her to stay there. Her mom would be arriving back at church at noon so she had a ride home then.

I still had three hours to kill before the primer would be fully cured, so I busied myself with a couple home projects and two episodes of Top Gear off Netflix streaming video. By the way, I highly recommend Series 10, Episode 1 where the hosts drive incredibly wonderful cars through incredibly beautiful parts of Europe.

But I digress. With lunch out of the way and the family home, I headed out to the garage for the last phase in the bodywork project – painting. As I stated in a previous update post, the lovely Loriann rejected the first batch of paint the store mixed up so he mixed a second quart per the GM paint code and gave her the first can for free. I opened the can that was labeled GM Code K and carefully laid down four coats on the car. Not wanting a replay of the sags Heidi ended up with, I used my paint gun with the smaller opening and started off with a very light coat. By the last coat it was impossible to detect where the primer ended and the scuffed paint began. Not wanting to use up all the Code K paint, and since the mis-mixed paint was close, I pulled out the can that was marked with the paint formula and used it to shoot four heavy coats on the anniversary present engine lid. I got some sags, but they’ll just add to the artsy-ness of the finished product.

After waiting an hour for the paint to cure enough to open up the garage, Victoria and I proceeded to remove the sheets from the unpainted portions of the body. We immediately saw that the new paint did not match the old – it was too blue. My eyes then fell to the engine lid I’d painted with the supposed mis-mixed paint. It matched perfectly. With plenty of that color left and enough hardener and reducer for more painting, Victoria and I decided to put the sheets back on and I would shoot the right paint. I shot two coats and then set the engine lid next to the newly coated surfaces and they matched. Job done, and it was only 5 PM. Plenty of time for the paint to harden enough for us to pull the sheets off and finish the last few items on the to-do list.

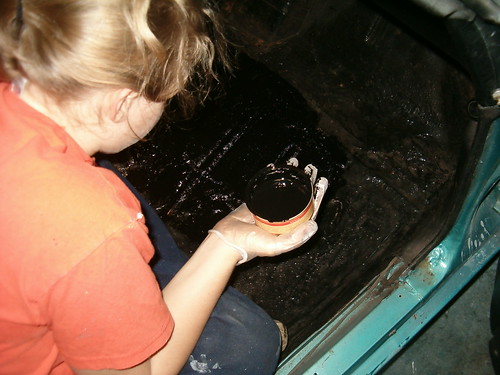
After dinner she and I headed back to the garage and carefully removed the sheets and masking paper from Glinda. We then removed the front seat belts and bench seat along with the bottom portion of the back seat. After marking the position of the accelerator pedal, we popped that off its shaft and we were ready, we thought, to install the carpet. As she vacuumed up the dust off the painted metal floor, bits of the coating flaked off the passenger foot well exposing quite a bit of rust and a dozen or so holes. She was not happy when I handed her gloves, a paintbrush, and a cat food can half full of POR-15. She applied a liberal coat and then embedded fiberglass cloth over the holes with more of the magical stuff. With a trouble light shining up from the floor, I identified where more POR-15 was needed and she filled in all the pin-pricks of light.

Needing to let the floor paint dry, we moved on to reinstalling parts that had been removed prior to the bodywork. We carefully mounted the fresh air grill in front of the windshield, the windshield wipers, the left headlight bezel, and the license plates. We adjusted the engine lid latch, lubricated the glovebox latch, greased the front suspension, and popped on the hubcaps before calling it a day.

Tonight we’ll install the carpet, reinstall the seats, seatbelts, and the two side marker lights. Then she’ll be ready to be pushed into position, lowered off the wheel dollies, and driven out of the garage.

A One-of-a-Kind Anniversary Present

The lovely Loriann and I celebrated twenty-eight years of marriage last August the fourteenth. She had asked me prior to the special day what I’d like for an anniversary present. It took some thought, but as I was swapping Heidi’s engine lid, a posting on the Ferrari Craft blog surfaced from the depths of my inept memory. A photo of a restored Ferrari with a rectangular section carefully sanded to show all the different prior paintjobs was accompanied by an explanation of why a European restorer would leave this flaw on a million-dollar car. The blogger stated, “Europeans prefer to celebrate history, while many Americans prefer to erase it…”

Anyway, as I was deciding whether or not to send the slightly dented engine lid to the scrap bin, I was struck with how cool it would be to paint the part using the different colors I had leftover from previous paint jobs I’d done and then have my artist wife go at it with sanders to create a work of art. I shared my idea with her and she agreed it would be a very unique and special present.

Currently, the lid’s got a coat of primer, Heidi’s Glacier Gray, and, since the lid was in place when I shot Heidi’s current coat, there's a band of Summit Racing Silver around the outside edges. When I do any more paintjobs I’ll make sure it’s in the garage with me and gets a few coats of whatever I’m shooting.

Thursday, September 23, 2010

CPotD #155 (Betty's New Template)


Looking through the photos that have been posted on the aforementioned Custom Corvair thread has got me pondering the path I should take with Betty. The sad thing is I’m probably months, if not years, from tackling that project. Well, it doesn’t hurt to dream.

Today’s CPotD presents a number of deviations from stock that I may implement on Betty. First are the later GM wheels painted body color. Second is the removal of script. Third is the lowering (of course). Fourth is the addition of aftermarket of shoulder belts. Fifth is moving the spare tire to the trunk. Sixth is the dual master cylinder. Seventh are the color-matching sideview mirrors. Eighth is the custom speaker panel on the package shelf. Ninth are the headrests. And last, but not least, is the gorgeous shade of orange the car is painted.

Wednesday, September 22, 2010

CPotD #154 (Another Hi-Rise ‘Vair)


Last week’s CPotD got high marks for wackiness (pun intended). Today’s CPotD raises the wacky bar a notch (yes, yes, pun intended again). There’s an active thread on the CorvairCenter’s forum called Custom Corvair pictures and it’s rife with CPotD prospects.

CPotD #153 (Red Racers Rock)


Dan Giannotti owns and drives an awesome LM. He’s one of Corvairdom’s biggest racing crusaders. Today’s CPotD of his beautifully prepared car at speed is a testament that he does more than just promote – he practices what he preaches.

This post is a good segue into the amusing results of the NECC’s recent track event. Sadly, I was unable to make it Monticello Motor Club, but true to form, a few participants quickly wrote up their experiences and posted them on Fastvairs. The track was dry though the practice and the early timed runs. Unfortunately, the skies opened and drenched the track right about fifteen minutes after hot laps began. Most of the Corvairs and one waterpumper (non-Corvair) were able to make their runs before the deluge. After the rain started, the cars couldn’t run anywhere near their potential and lap times dropped significantly. In the end, a VERY unlikely car sat at the top of the waterpumper results. A Toyota Yaris had beaten a mix of hot cars that included BMWs, Mitsubishi EVOs, a ‘vette, a Porsche, and a Maserati.

Tuesday, September 21, 2010

Overdue Weekend Update

I wish there were other times in the week where I could be as productive as the weekend, but work and life keep getting in the way. Anyway, this last weekend was a nice one.

Saturday Victoria was tied up babysitting all day, but I spent a couple hours in the garage focused on finishing Glinda. The trunk and engine weatherstripping were number one on the agenda. I made sure all exposed metal and Bondo were primed with Rustoleum and then brushed on a nice, heavy coat of gloss black Rustoleum. At this point, protecting the metal that’s not seen is my highest priority. With the hood closed and the engine lid lowered, no one will know.

While letting the paint dry, I moved on to the front windshield sealing. The 3M black sealant in a caulking gun is a very tough squeeze. I hope the difficulty in applying is indicative of the quality of the seal. I finally got a nice bead laid in the groove and then used a glove-covered pinky to make sure it was forced into any gaps between window and car-body. That complete, I was finally able to remove the masking tape. I was concerned about leaving the tape on any longer since removing it from other parts of the car actually pulled some of the paint off the primer – big L. Careful pulling resulted in all the paint staying adhered. I then pre-assembled the stainless windshield trim and pressed and gently hammered (rubber malleted?) until all the clips had completely captured the lips of the trim pieces.

Sunday, Victoria and I were back at it. While I emptied and vacuumed the trunk, she cleaned all the backlight (rear window) trim. Then, after I emptied the tube of window sealant around the glass, she did the pinky pushing. Together we installed the trim. The clips were missing from the sides and it shows. The trim did not want to stay flush to the opening. I’ll have to pull the pieces back off and somehow get clips installed. We dinner time fast approaching we had just enough time to put down double-tracks of masking tape. The first track is where the re-paint will stop, the second, inner track, is where the primer will end. Once the primer is applied, we’ll pull off the inner track of tape and carefully sand off the ridge and scuff the paint before shooting the single-stage Tripoli Turquoise.

Speaking of paint, the lovely Loriann and her artist eye went to the paint store (Superior Auto Paint in Windsor Mill, MD – highly recommended) and got a quart of single-stage last week. The first batch the computer said would match the sample didn’t, but mixing to the GM code got us something VERY close. The paint guy gave her the “wrong” quart for free. Must’ve been her smile.

Friday, September 17, 2010

CPotD #152 (Low Isn’t Just for the Cars)


It’s in my head that just about every old car looks better lowered. Many new cars too for that matter. Maybe it was the affect of spending my formidable years in the presence of many lowriders. I am so amped with the stance Lucy’s got and I am positive that Betty will be far below what the General intended. I’m not sure I’ll be able to convince Mikhaila to lower her as-yet-to-be procured FC truck, but I’ll be trying.

Lowering a C95 just exaggerates the forwardness of forward control. Today’s CPotD is a beautiful photo of a beautiful Corvan. I found it on a Chevy truck forum site where this posting has plenty of other photos. These ‘vairs turn up everywhere.

Thursday, September 16, 2010

CPotD #151 (One Wacky Day Late)


Surprisingly it’s getting harder to come up with meaningful CPotDs. There are plenty of wonderful JPEGs out there of deserving Corvairs, but I’m trying to find ones that I can make a special connection to. That’s why this one’s a day late.

As a child I built quite a few models –planes, ships, and, of course, cars. While none of the latter 
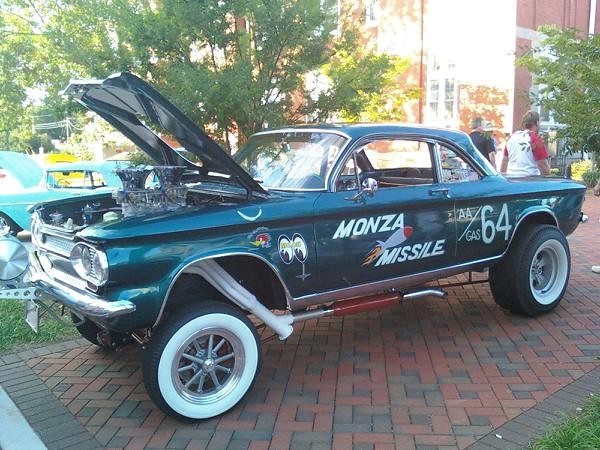
were Corvairs, one of my favorites was a ’55 Chevy Gasser. I think it was probably the last one I undertook, so it turned out pretty nice. The most distinctive feature of a gasser was the raised front end over a solid front beam axle. The axle replaced the stock front suspension to cut down pounds thus improving weight transfer to rear when launching for those quarter mile runs.

Someone has applied all those gasser mods and much more to a ’64 Monza. Today’s CPotD was photographed for Street Rodder magazine at the Sixth Annual Rat Rod Rumble at 411 Dragway. Pretty wild, eh?

The Last Carb has Been Repaired

Last evening, I disassembled Glinda’s driver’s side carburetor and found the accelerator pump cup needed replacing and the pump discharge needle was stuck closed. With a new cup in place, needle cleaned and moving freely, and all the passages blown out, I reassembled and reinstalled the carburetor. I also played musical chairs with batteries. Unfortunately for Ringo, he drew the short straw – so to speak – and ended up with the dead battery that was in Glinda. Lucy got the smaller one from Ringo, and Glinda got the LeMan’s larger one that’s been Lucy’s for that past few months. Once Victoria and I get the windshield channel sealed, the trim reinstalled, the antenna re-mounted, and the tags put on, Glinda will be hitting the road.

Tuesday, September 14, 2010

One Layer Down, Two More To Go

Nearly a week has passed since my last blog. Things got very busy at work and at home, but I’ve got a few minutes to peck out an update on Glinda.

With more tape and paper, Victoria finished off the masking last Friday. Saturday morning I did some garage rearranging and tarp spreading to try and prevent primer from undesirably coating. While I was doing that Victoria was making one more round wiping down all the exposed sheetmetal and bondo to ensure good primer adhesion. After making sure all the compressed air lines were drained and the valves subsequently closed, I filled up the tub of my compressed air cooling apparatus (CACA) with cold water and donned my painting apparel (jeans, long sleeve shirt, vinyl gloves, balaclava, and respirator). I decided to use my smaller paint gun since the largest area I was spraying was only a foot or so wide. I had roughly a pint of primer and the same of catalyst left from the Heidi adventure, and I used all of it to get two good coats applied on Glinda.

Sunday I pulled all the masking off except for around the windshield. I wanted to leave that on to protect the surfaces when we apply the black, goopy sealer into the groove. Victoria joined me at that point so I put her to work cleaning and polishing the window trim. I installed the replacement clips and then set to work cleaning carburetors. The issue I hoped to alleviate was the lack of squirting when the throttle was blipped. After disassembling most of the base, I blew out all the passages and then tested the accelerator pumping ability. It was nice to see a stream of liquid shoot out. Once I got that carb reassembled and installed, it was time to knock off for the day.

Wednesday, September 8, 2010

The Car’s Almost Covered

Last evening Victoria, Mikhaila, and I used up all the tape and a bunch of paper and sheets to mask off the portions of Glinda that are NOT supposed to get new primer or paint on them. I was amazed that has taken far more time and material to mask Glinda than it did to mask Heidi. That’s the difference between painting only painting certain sections instead of the entire car. We ran out of tape before we ran out of sections needing masking, so I’ll stop by Home Depot this evening and get another roll so we can shoot the epoxy primer tonight.

I also finished cleaning and regreasing the right front wheel last night. I love finding more differences between LMs and the EMs I’m so used to. Glinda, like all other LMs, has a cable running from the left front wheel to drive the speedometer. The wheel end of the cable is driven by a square recess in the dust cover of the wheel bearing. Since the cable goes through the center of the spindle, the typical cotter pin is replaced by a nifty little stamping to retain the main nut. The other side still uses a cotter pin. As an engineer I am not a fan of side-to-side differences. I’m sure GM did it just to save a few pennies per vehicle.

This morning I made the dreaded journey to MD’s Motor Vehicle Administration to register Glinda and get her tags. I arrived fifteen minutes before the doors opened, and was already thirtieth or so in line. At 8:30 we all calmly filed into the building and stood in a new line to get our little slip of paper with our number on it - C16 for me. I then took a seat in the registration area and caught up on my e-mail courtesy of my Blackberry. I didn’t get too far since my wait was less than ten minutes. Five minutes later and one-hundred forty dollars lighter, I walked out tags in hand. Mission accomplished and I didn’t kill the entire morning.

Tuesday, September 7, 2010

CPotD #150 (Driving On Salt CAN Be Fun)


Wanting to give recognition to all forms of racing, today’s CPotD is of a ‘vair modified to go fast and straight on the salt flats of Bonneville. There’s at least one poster on the CorvairCenter’s forum who’s deeply into the SpeedWeek scene. Today a thread was started as to whether CORSA’s historic arm (Corvair Preservation Foundation) should accept a LM salt flat’s racer and what they would do with it. Some of the replies include nice photos including today’s image.

Two Steps Ahead, One Step Back

Saturday I took my first drive around the neighborhood in Glinda. Believe it or not, this was my first time behind the wheel of a LM. Surprise, surprise - I really liked it. It definitely feels different than the EMs I’ve tooling around in. Before I took it on the road, however, I dealt with the leaky return fuel hose. I ended up replacing both rubber hoses (supply and return) since I had the wheel off and the car up on the jackstand. Wouldn’t you know it, fixing that end of the line exposed the fact that the other end – the one that dumps the returned fuel back into the filler pipe also leaked. Since it was not spewing out madly, I decided the car was safe for my maiden drive.

The real purpose of the drive was to make sure there weren’t any more issues that needed adding to the to-do list. Unfortunately a couple things popped up – new cups on the carburetors’ accelerator pumps and a bump down in timing to reduce the pinging under load. The latter may go away with the carb repair – we’ll see.

With the drive over, I drove Glinda’s front end up on the ramps to replace the leaky rubber hose. What a joy it is to work a project with gas running down one’s arm. NOT! I was ready to catch the fuel with a drain pan when the old hose just pulled apart. What I wasn’t ready for was the constant dribbling of gas as I cleaned the outside of the tube. Here’s a newsflash - gas burns! Not only that flaming kind of burn, but the skin hurting kind of burn. With the rubber residue gone, I slipped the end of the hose over the tube and the dribbling ceased. Fortunately, I had just enough hose left from the two foot length I’d bought to bridge the gap between tube ends. With new clamps tightened that task can be crossed off the list. I did take a close look and feel of the last piece of fuel hose – the one between the outlet of the tank and supply tube. It still feels flexible and showed no signs of cracking. I would have liked to have replaced it, but the full tank of high-test convinced me otherwise.

Yesterday, Victoria and I worked together on her car. We moved Glinda out into the driveway where Victoria cleaned off all the Bondo dust wiping and vacuuming every surface. I reinstalled the ductwork and front pan. Then we pushed the car back into the garage where she scraped all the tape residue off the windows and began the arduous task of masking off the areas that aren’t going to be painted. While she toiled away on that, I cleaned and repacked the right front wheel bearing. With that side of the car on a jackstand, Victoria cleaned the Zerk fittings in preparation for the shots of grease. Sadly, we only got one balljoint filled before the gun ran out of grease. Another FLAPS trip is in my future. Issues with other family vehicles prevented me from doing the passenger side wheelbearings, but I’ll get to those this evening.

My hope is that I’ll be able to shoot a couple coats of epoxy primer Wednesday. With that waterproof primer in place and the rest of the lubrication completed, the car will be good to drive. To get there, we’ve still got quite a bit of masking left to do.

Friday, September 3, 2010

CPotD #149 (The Gambler's Greenbrier)


Staying with the theme of Corvairs used as service vehicles and with the help of the CorvairCenter forum, today’s CPotD shows a fleet of Greenbriers lined up outside Harvey’s Casino in Lake Tahoe, Nevada. As a child growing up in CA and making summer trips eastward, there’s a good chance I saw one of these when it was doing its shuttling thing.

Thursday, September 2, 2010

Whittling on Glinda’s List


Last night I had to get dirty investigating a clunk in the lovely Loriann’s daily-driver. BTW, Loriann is the lovely one, NOT the car. After diagnosing a loose tie-rod end, I figured since I was already dirty I may as well work on Glinda. I decided to tackle one of the non-Bondo repairs on Glinda’s to-do list. The easiest one was replacing the two fuel hoses. With the one clamp loosened and the end of the return line hose slid off its mating tube, I rolled the jack into position and lifted the left rear of the car into the air. After pulling the wheel off, the rest of the clamps came loose and the hoses pulled off without difficulty. I had the right sized hose for the supply line, but since this is the first Corvair I’ve worked on with a fuel return line, I didn’t have any 3/16 diameter hose. I don’t like leaving a project unfinished, but it was too late to run to the FLAPS (see sidebar).

Wednesday, September 1, 2010

CPotD #148 (Wedding Day Wednesday)

Brianna has posted some of the photos from her wedding day and I had to snag the wonderful one of her and her husband cruising down the street in Heidi. I’m making it today’s CPotD.

I wonder how long it will be before I can look at these wedding pictures and not have that welling feeling in my eyes.

It's a Far, Far Dustier Day

Here it is Wednesday, and I haven’t shared the automotive activities of last weekend. It can be summed up in one word, “dust.” Victoria and I spent a few hours sanding down the Bondo that had been applied to Glinda’s sheetmetal. It’s turning out pretty good considering our inexperience. When all the dust was wiped away, it was, however, apparent that further applications were necessary. I got out the spatulas and mixing board and laid down another layer over the low spots.

Sunday I sanded down the new Bondo and then put down what I hoped was the last coat.