Thursday, June 30, 2011

Will I Return?


While perusing this morning’s edition of Craigslist, I found a FREE add for hot rod magazines and a valve compressor tool. So, instead of getting a haircut, I took a drive south of work at lunch today. Sadly, by the time I arrived at the address in the ad, all the good stuff was gone. Since it was right on the way back to the office, I guided Lucy into a parking spot outside the gate to Crazy Ray’s in Jessup. After donning my grease-stained cap, I paid my dollar, signed away any rights to sue when they drop a car on my head, and headed into the yard. Hoping to find the MX-6 with the nice seats, I bypassed the domestics and wandered out to the aisles of imports. While weaving my way watching for my quarry, I also scanned across the roofs hoping to find a nice, new coupe that may have un-sullied seats. It was soon apparent that maneuvering through the mass of hulks was going to be much more difficult here than it was yesterday. This yard is far fuller than the Curtis Bay location, so the cars are nose to tail blocking walkways and forcing customers to clamber around engines and axles and climb over bumpers and gas-tanks. Rather risky when wearing slacks, silk shirt, and loafers, but I pressed on cautiously. After perusing every import, I came up empty-handed on all accounts. It was the same struggle searching the section of GM offerings. I did find a new-ish Cobalt with stained seats and a Saturn with torn seatcovers.

The ONLY upside to the visit was spying the Austin American in the parking and then another one inside the yard. My apologies that the only camera I had available was the sorry one in my cellphone.

Given the current state of organization at the Jessup Crazy Ray’s, it’ll be a while before I waste another lunch hour there. The Curtis Bay location will get my business – even if it’s just the dollar admission fee.

Wednesday, June 29, 2011

Savoring the Seat Search

Nissan
Cobalt
Saturn

In light of selling Lucy’s racing seats; I’m in the market for seats more suited to daily driving. I used to drive a Mazda MX-6, and found the driver’s seat quite comfortable while having sufficient side bolstering suitable for coddling my carcass in place during spirited cornering. I’d visited the Crazy Ray’s yards in Jessup and Curtis Bay recently, and saw an MX-6 with front seats in nice condition at one of them. Sadly, I couldn’t remember which yard the car was in. So I made a guess and today spent my lunch hour walking the aisles of the Curtis Bay Crazy Ray’s. After weaving past all their imports, I didn’t find the MX-6, but I did find a Nissan with nearly new-looking tan seats with decent bolters. I tried them out and felt they were worth considering if the MX-6 seats didn’t pan out. Knowing that the Ford Probe was nearly identical to the MX-6, I headed over to the Ford section and continued my seat search. I found a few Probes, but each had seats with significant wear or damage. The area I wandered through last contained the GM cars. Focusing on newer wrecked cars, I came across a 2-door Cobalt with tan buckets. I tried them out and, while they weren’t quite as nice as I remember the MX-6 seats to be, I found them to be better than the Nissan seats and I really liked the cloth used in the covers. I also like the adjustment for the rear of the bottom portion – you can crank up or down the tilt of the seat bottom independent of the seat back. Also, when you pull up on the seat back release the entire seat slides forward to aid ingress for the rear passengers. Not that I ever have rear passengers, but just in case. The only problem was, like the Nissan seats, these were tan, and would stand out in Lucy’s black and red interior. Further down the same row, I found a new-ish Saturn coupe with the same seats in very nice condition, only in gray. Yay! These will work out nicely if I strike out with the MX-6 search at the Jessup Crazy Ray’s.

Tuesday, June 28, 2011

Plastigage is Cool Stuff

Yesterday evening I finished cleaning the 110 hp engine block and rear housing. After wiping down all the crankshaft bearings that were in the 110 hp, I reinstalled them into each block half. With the left half sitting with its center surface facing up, I carefully placed pieces of plastigage onto the inside surface of each bearing half and then carefully laid the 95 HP crankshaft into place. Mating the other half and installing the block bolts completed assembly check. Reversing those steps exposed the crushed plastigage which indicated that all crank bearing clearances are only slight over spec.

I then removed the crank bearings from the 95 HP block and installed them in to the 110 block. Repeating the plastigage, assembly, and disassembly steps brought a little frustration. One of the oil holes in the crank lined up with the plastigage in one of the bearings, so I couldn’t get an accurate indication of clearances. It was nearing my bedtime at that point, so the re-measuring will have to wait.

Monday, June 27, 2011

A Plethora of Auto-Related Activities


It was a wonderful weekend with a plethora of auto-related activities. Friday afternoon I stopped at the Corvair Ranch where I found the reworked cylinder 95 HP heads cleaned up with the newly installed valve guides and a couple boxes filled with gaskets, seals, and piston rings. I now have all the new parts necessary to build Ringo’s engine. As Jeff and I were settling up, I asked if they still had six of the cylinders I’d previously dropped off for evaluation. Brent found a LM set all cleaned up and we loaded all the parts into the back of the lovely Loriann’s car.

Much of Saturday was spent hand-in-hand with the lovely Loriann wandering the aisles of show cars and vendors at Carlisle’s GM Nationals. Corvair-wise, the event was a relative bust with only six ‘vairs sighted and a couple hubcaps being the only parts found for sale. One guy from PA provided four of the cars on displayed - all very nicely restored. His Rampside being the vehicle featured in this post’s lead photo. We thoroughly enjoyed drooling over the lovely Loriann’s favorite model, the Camaro, and my favorite make, Pontiac, of which there were plenty of awesome examples of both. Also, memorably slobber-inducing was a knock-out ‘59 Oldsmobile.


Yesterday evening, I tore down the York-bought LM Corvair engine that will provide the block for Ringo’s engine rebuild. I removed the bearings and cleaned half the block out in the driveway. Before I could get the other half cleaned, dinner signaled the end of my workday.

Thursday, June 23, 2011

Going to Carlisle


When the lovely Loriann asked me what I wanted to do for Father’s Day, I quickly responded that a car show would be an awesome way to spend the afternoon. Sadly, I already knew there were no shows in Maryland that Sunday. I also knew, however, that Carlisle’s GM show and swap meet was scheduled for the next weekend, so I proposed she and I go there instead. I added that this year they’re celebrating Camaros – her favorite. She agreed and recommended we include a Friday night stay at a B&B. So we are now booked for a one-night stay at the Red Cardinal B&B and I am now psyched for a one-day walk at one of the biggest all-GM shows in the world.

As part of this trip, we’re including a stop at the Corvair Ranch to pick up the reworked 95 HP heads and new piston rings and gasket sets That should finally get me everything I need to put together a complete low-compression engine for Ringo. I do, however, need to deal with the cylinders. My cubicle neighbor at work is a motorhead and has the equipment necessary to, first, verify each cylinder and piston is usable, and, second, hone the cylinders so the rings seat properly. I’ll impose on him in the next week or so.

In preparation for the Carlisle meet and the multitude of vendors that will be there, I’m working on a wish-list of tools and materials. The list, so far, only includes:
  • Zip-ties
  • Sandpaper for the straight line sander
  • Assembly lube
  • Brad Penn 30 wgt oil (with plenty ZDDP for breaking in a rebuilt engine)
  • 4-carb linkage (if cheap)
  • Pertronix 2 (if less than $100)
  • Flamethrower II (if less than $35)
More preparation for Saturday included mapping out a back way to get to the neighborhood by Gate 7. We scored a nice, close, and cheap parking spot in someone’s backyard last time we were there, and I’ll try and find it again.

Also, note to self: don’t forget the camera and extra batteries. There’ll be plenty of Haiku4photo subjects I’m sure.

Wednesday, June 22, 2011

Ups and Downs of My Time in the Garage

Last evening’s automotive efforts focused on engine work. First up was trying to remove the remnants of the broken stud. After at least an hour and many broken drill bits, I gave up. I’d been able to get much of the stud out, but there still remained metal at the bottom of the now-threadless hole. Very frustrating.

Between all the chips I’d just released into the engine area and the dust and grit spewed into the air by the grinding of bodywork, I was not going to rebuild any of the disassembled engines I now have sitting around without first completely tearing them down, cleaning all surfaces, and re-lubricating bearings and the other slippery surfaces. With that in mind, it was time to finish taking apart the 95 HP engine. On went the air compressor and out came the sockets, wrenches, and air guns. After removing the rear splash pan, harmonic balancer, and rear engine cover, Ariel came out and helped me lower the engine off the stand and onto the floor. Next I removed, in order, the torque converter, flexplate, bellhousing, the bolts holding the block halves together. With all that out of the way, a few taps with the dead blow hammer and the engine parted to release the crankshaft and camshaft. A quick inspection of the bearings showed them to be in good condition. I’ll plastigage them against the shafts before calling them good-to-go.

During all this, the buyer of Lucy’s race seats showed up. About a week ago, I decided that the seats the lovely Loriann agreed to give me for my last birthday were not the smartest way to go. Given that 1) I don’t foresee heading to the track any time soon, 2) no one else would be comfortable sitting in the seats, and 3) the seat tracks still needed to be modified before they’d fit Lucy and I don’t expect to be able to get to that any time soon, I decided to repair the welds, fix the adjusters, clean the covers, and put them on Craigslist. And that’s what I did putting a $120 price tag on them. I only received two calls, but the second guy was adamant that these were exactly what he was looking for and he’d be out the next evening to get them. He was good to his word, and I now have six crisp twenties to cover the cost of more reasonable bucket seats. The last time I was at Crazy Ray’s, I found an MX-6 with immaculate cloth-covered buckets. Once Victoria brings back the Suburban from her camping trip, I’ll make a lunchtime trip with fingers crossed and wrenches ready.

Tuesday, June 21, 2011

Father’s Day Present

I spent a very nice Father’s Day enjoying fine food, marvelous music, and some quality garage time. The latter consisted of Ringo bodywork and engine work. I attempted to empty the welder’s gas bottle by making molten metal attaching the outer pads for mounting the rear foot of the front seats. Since the replacement floor is different than the original, I had to fabricate some spacers to ensure the seats will go back in level. With that done, I still had a few pounds left in the bottle.

Without enough gas to get serious about attacking the patchwork required under rear seat, I moved on to engine work. Months back, I made a few frustrated attempts at removing one of the head studs from the 95 HP engine. It was time to get back at it. Instead of trying to turn out what was left of the stud, I decided to go route of drilling out the remains and re-tapping the hole. After grinding the stud’s broken end down near the surface of the block, I punched a dimple in the center and started drilling with my sharpest smaller drill bit. After going down about a half an inch, the bit broke off flush. Crap! At that point, it was fortunately time to get ready for the picnic dinner I was treated to, so I averted doing any more damage to the block.

Since it’s now impossible to drill out a broken drill bit, I will attempt to drill around the center with the small bit. Hopefully that will free up the broken bit so I can pull it out and proceed with drilling out the broken piece.
By the way, the present this post’s title refers to was the opportunity to spend an afternoon in the garage doing what I love to do.

Thursday, June 16, 2011

Running Out of Floor Patches


I’m down to just having to weld in the replacement footwell panel and a few small pieces and Ringo’s floor will be ready for sealing and painting. Last evening I welded in a panel and then emptied my Rustoleum primer can by coating a bunch of bare metal.

I also, sadly, had to cut away more rusted metal from the under-body area just ahead of the left rear wheel. I’m not sure how I’m going to patch some of those complex pieces, but it needs to be done.

Thursday, June 9, 2011

It’s Getting Hot Here

And Lucy’s starter is not a fan of the heat. Twice in the last few days, she has decided to annoy us by not even clicking when Ariel turned the key. It only seems to be an issue if the engine is hot. Let her sit for a couple hours, and she behaves (Lucy not Ariel). I’ll start with replacing the solenoid. I think I have a GUP or two on the shelf to choose from. Other than that, Lucy cruised along just fine for Ariel on her trip back and forth to Millersville, PA. A little warm in this high-nineties weather we’re experiencing, but no red lights of idiocy were illuminated.

Yesterday, circumstances were such that I got to drive Glinda to work. The first thing I noticed was how nicely she ran. The second was how squeaky she is sitting at stoplights. The third was how off-center the steering wheel is. I thought I’d put it on in its appropriate orientation after replacing the turn signal switch assembly, but in my frustration at having to do it twice, I may have missed. Then again, maybe Victoria hit a curb and knocked the alignment out. Regardless, I’ll reinstall the wheel rotated a few teeth on the splined shaft and be watchful of odd wear on the front tires.

Later, I mentioned to Victoria that I would tighten the nuts holding the loose driver's door handle on. In response, she asked me to adjust things so the door would open and close more easily. She proceeded to show me the issue and I noticed the two bolts holding the upper door hinge to the body were loose. I grabbed a ½ inch socket and wrench and tightened them only to be rewarded with significant misalignment at the latch. I cut out a couple shims from my floor patching stock (i.e. old, rusty hood), loosened the bolts, tapped the shims into place behind the hinge plate, and re-tightened the bolts. I was ecstatic to see I’d put exactly the right thickness in since the rear edge of the door now lined up perfectly with the body. TYL.

Wednesday, June 8, 2011

The Newest Corvair


Well, it isn’t actually the newest still in existence - that one resides in the Corvair museum in Michigan - but it’s the newest one I’ve ever seen. The last four digits of this 1969 VIN are 5927. That’s out of only 6000 built the last year of Corvair production. This car was finished on May 12, 1969 only two days before the last Corvair rolled out the door. Long before this day, all assembly had been moved off the line and into a special room at the Willow Run assembly plant, so this car could almost be considered hand-built like a Rolls-Royce or Bentley. There’s some great history on the building of ’69 Corvairs at this link.

As I posted a couple weeks back, I came upon this Frost Green (paint code 59) Model 500 at the Corvair Ranch’s Open House. The enthusiastic owner was quite willing to share information, and I was quite willing to listen. He told me how he’d found the car in a town just north of Pittsburg sitting in a garage where it had spent a considerable amount of time out of action. He went on to say it had all its original bits and pieces when he hauled it home including the dog-dish wheelcovers. Sadly, one fell off soon after he’d gotten it back on the road, so the Pep Boy’s wheelcovers are only temporary. The engine that was in the car had some issues, so Corvair philanthropist Pete Koehler helped him out with a surrogate until the woes are addressed on the original. He had been fortunate enough to find the elusive build sheet tucked in the bottom springs of one of the seats. Out of all the Corvairs I’ve torn apart, I’ve never found a build sheet. Maybe someday.

Tuesday, June 7, 2011

Much To Share

Sorry for the lack of postings. There have been a lot of distractions in my life of late. Not the least of which is company visiting in celebration of daughter Victoria’s graduation from high school. On the plus side, however, plenty of house projects have been completed by my dad and me.

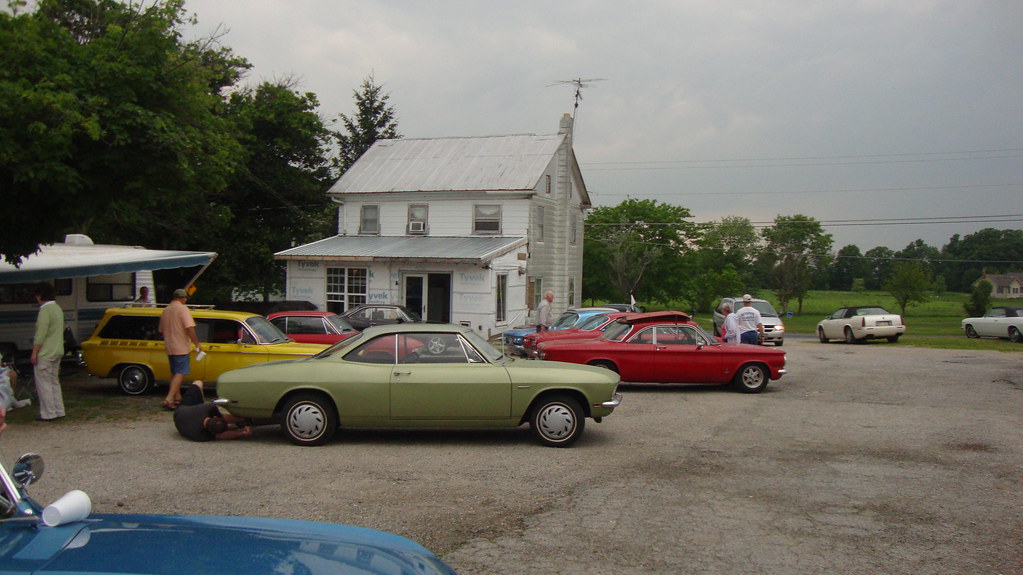
When last I posted, I had recently returned from the Corvair Ranch’s Open House. I’d promised to post more information on the “newest Corvair,” and I will. Just not right now.

So, what has been going on with the fleet? Well, let’s start with the photos of the 4-carb linkage build.


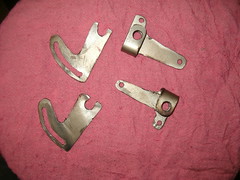
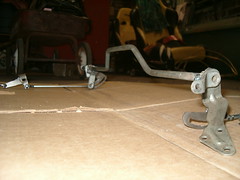
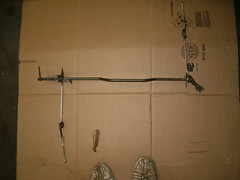
The next step is to disassemble another 2-carb linkage to get the two brackets that will mount on the secondary carburetors. Onto those I will attach 3/8” diameter bolts for the final pivots. All of this, however, will wait until Ringo is back on the road.

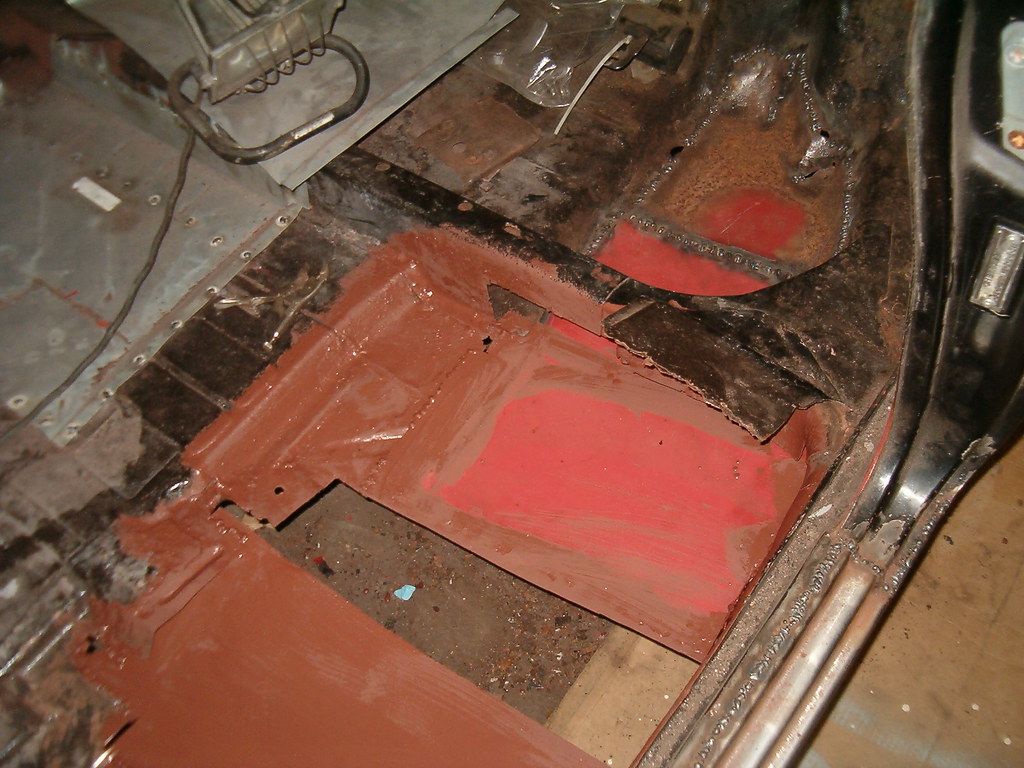
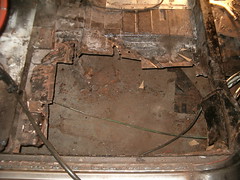
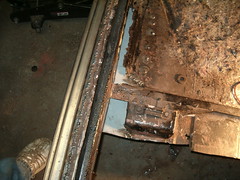
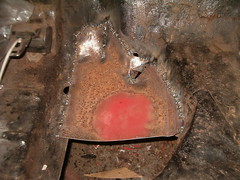
Speaking of Ringo, I feel like I’m seeing the light at the end of the tunnel sheetmetal-wise. In the past couple weeks I’ve formed and welded in two patches and cut out and prepped two more patches to go with the purchased footwell piece. All that’s left is the welding. Oh yeah, then there’s the grinding and the priming and the painting, but I expect those portions of the project to move along quickly. Regarding the other major portion of Ringo’s roadification part two, I stupidly took the wrong heads up to the Corvair Ranch two weekends back. I grabbed the heads from the disassembled ’64 110 instead of the ’66 95 HP that I’d settled on. Fortunately, Ariel was heading up to visit her boyfriend in nearby Hanover, so she made the swap for me. I haven’t talked to proprietor Jeff since then, so I don’t know how much the work’s going to end up costing me. When I go and pick them up, I’ll also get the rest of the parts for the engine rebuild.


On to Glinda. At the open house, I’d bought a GUP rearview mirror and a GUP turn signal assembly. The mirror was installed the next evening – only one screw holds it in place, so the swap was a five minute job. The turn signal assembly, however, was much more of a project. To remove the old one, I had to pull the steering wheel and the horn components, remove the three screws retaining the assembly, take off the plate that holds the wires in place, and, most scarily to me, take off the snap ring retaining the top bearing and its housing. Of course, even with all my precautions, it popped off and went flying, but thank God I was able to find it rather easily. With the ring off, the bearing and housing slipped off allowing the connector of the switch assembly to slide through the opening in the column housing. Reassembly with the replacement switch went well, and with my optimism raging, I even reinstalled the steering wheel before testing anything. Of course, the new switch didn’t work. Irrr. While the hazard switch activated blinking lights, the toggling portion for the right and left blinkers wouldn’t set the correct lights to blinking. My first check was to verify I hadn’t blown a fuse – all was good there. Next, after taking off the steering wheel and horn parts AGAIN, I grabbed the old assembly and plugged it in place of the replacement. Everything electrical worked again. I then began probing the wires on the old assembly to see where I needed power. After re-plugging in the replacement, I discovered there was no power to the wire that energized the blinker circuit. I ended up soldering a jumper wire from hazard’s hot lead to the blinker’s hot lead and that fixed everything. A few minutes later the steering wheel and horn were back in place and it was time to move on to the other pressing issue – Glinda’s dangling muffler strap. The strap is held in place by an eyebolt that’s looped through a hole in a bracket that bolts to the engine. Glinda’s bracket is rather rusty, but for the most part, solid. Sadly, the vibrating muffler caused the bracket to break at the hold. I drilled a new hole in the bracket and reinstalled the strap. I’m crossing my fingers this fix lasts longer than a few months.

Finally Lucy. Well, thankfully, she has been extremely undemanding. I’ve kept track of every tank of gas I’ve put in her since I put her on the road back in June of 2007 (yeah, I’m finding it difficult to believe she’s been my daily-driver for nearly four year). The first entry reflected an odometer reading of 69769, while the current odometer reading is over 102000. That’s over thirty-thousand miles! I feel so blessed to be able to drive a cool, old car that is so reliable. TYL!