
Wednesday, February 22, 2012
Lucy's Got Her Brakes Back
Last night I ran the longer, correct brake line and attached its ends. After making sure the reservoir was topped off with Synthetic Dot 3 brake fluid, I pumped and I pumped and I pumped and I pumped some more. Finally, after what seemed like hundreds of brake pedal actuations, I got fluid to come out the bleeder hose. With the brake work done, I reinstalled the gas tank only needing one new j-hook and connected the fuel lines and sender wires without issue (TYL). Then I reinstalled the swaybar, but did not tighten the bolts since I remembered the weight of the vehicle needs to on the front wheels to prevent undue twisting of the bushings once the suspension settles under load. That means tonight I’ll double-check the brakes to ensure I’ve got a good pedal and no leaks, put the front wheels back on and lower the front back onto the ramps, tighten the swaybar hardware, and roll Lucy out of the garage and back onto the road. Wish me luck.
Tuesday, February 21, 2012
All Brake Lines are not Created Equal
My garage time last night started with some carb work on Glinda’s right side. She wouldn’t idle for Victoria, so I played with things trying to clear out any crud that might be lurking in passages and was successful. Glinda stayed running for Victoria on her commute today.
With that success, I moved on to Lucy and the routing of the two new front brake lines. The first one (the shorter of the two and, ironically, the one procured by the lovely Loriann) took me about 45 minutes to install. It took a litany of under the car, inside the car, at the front wheelwell, repeat before all the bends were perfect and the fittings at both ends were snug. After bending the second one and attempting to thread the inside fitting into its car-board mate, I discovered the line fittings were metric. Both the NAPA counter guy and I missed that 3/16ths brake line could come with metric fittings (it was in the wrong display tube at the store as well). Anyway, by the time I'd pulled the tube back out, I'd wasted over an hour. Needless to say, I was MIGHTILY frustrated. I ran by a different NAPA today and bought the correct line, I should be able to get it installed and the brakes bled by bedtime. I'll still have to install the gas tank before she's ready to drive, but I have everything to do that job and I’ve done it before, so it should go smoothly. I really want to get her back on the road tonight since I’m leaving for a west coast visit with my fabulous folks Thursday morning VERY early and I want Lucy to be the car that sits in the parking lot the five days I’m away. I feel strongly that, given Glinda’s recent misbehaviors, the Suburban needs to be available as back-up.
With that success, I moved on to Lucy and the routing of the two new front brake lines. The first one (the shorter of the two and, ironically, the one procured by the lovely Loriann) took me about 45 minutes to install. It took a litany of under the car, inside the car, at the front wheelwell, repeat before all the bends were perfect and the fittings at both ends were snug. After bending the second one and attempting to thread the inside fitting into its car-board mate, I discovered the line fittings were metric. Both the NAPA counter guy and I missed that 3/16ths brake line could come with metric fittings (it was in the wrong display tube at the store as well). Anyway, by the time I'd pulled the tube back out, I'd wasted over an hour. Needless to say, I was MIGHTILY frustrated. I ran by a different NAPA today and bought the correct line, I should be able to get it installed and the brakes bled by bedtime. I'll still have to install the gas tank before she's ready to drive, but I have everything to do that job and I’ve done it before, so it should go smoothly. I really want to get her back on the road tonight since I’m leaving for a west coast visit with my fabulous folks Thursday morning VERY early and I want Lucy to be the car that sits in the parking lot the five days I’m away. I feel strongly that, given Glinda’s recent misbehaviors, the Suburban needs to be available as back-up.
Quite a Weekend

Friday night I got some garage time and used it to mostly disassemble the PowerGlide automatic transmission that will eventually go into Ringo’s drivetrain. The last couple times I’ve driven him, the transmission has upshifted fairly reliably, but a different issue has not gone away. That is the propensity of the transmission to shift itself out of Drive and into Neutral by letting up on the throttle. To my mind, the reduction in rpm reduces the pump output and then there’s not enough pressure to keep things engaged properly. Regardless of the actual mode of the misbehavior, I don’t believe that it will get better, so I’m proceeding with a replacement.
 Following the instructions laid out GM’s manuals for the 1961 and 1965 models as well as their instructional film printout I bought from Clark’s I was able to tear down the unit to the point of removing the rear oil pump. I posted the in-process photos I took on this Flickr group.
I got a little bit of time on Saturday to work in the garage, but yesterday afternoon and evening were both filled with automotive exploits.
First, Glinda got some much needed attention. I fixed one of the speakers; the other will need to be replaced, so I pulled that one for Victoria to find a new one. I tightened the oil pan bolts and topped off the crankcase with a qt. of Shell Rotella 30 weight. I checked the fanbelt - it’s snug, but not tight. I found the source of the steering squeak – it’s a bad pittman arm bushing and a replacement from Clark’s has been ordered. I checked the lube level in the steering box – it’s fine. I rotated the tires front to back since I saw the right front has some odd wear on the outer edge. Once the bushing has been replaced, I’ll have her take it in for an alignment. I lubed the sticky catch on the driver’s door and both ends of the heater cable. I pulled the wheel hubs and checked the brake shoe thickness – all’s good there. While I’d have liked to have addressed the cold-start idle issue, I instructed Victoria to just let Glinda idle a bit before pulling away from the curb and she’ll be fine. Sadly, Victoria reported to me that this morning the speedometer and odometer were not working. Looks like jacking up the front end caused the old speedo cable to fail. A GUP replacement has been ordered from the Corvair Ranch.
Lucy was next to take up residence in the garage. She had a blown brake line due to rust and, of course, it’s the one that runs on top of the gas tank, so with the car up on the ramps, I drained and removed the gas tank (only broke one j-hook and a couple of hose clamps). I decided to do both front lines with the better access, but that doubled the number of fittings I had to break loose – three of the four required vise-grips, but thankfully none broke off. Today I visited the NAPA near my work to get replacements, but they only had one new bendable Poly-Armour line so the lovely Loriann ran by the other local NAPA to get the other. I’m hoping to have them installed and bled tonight.
Tuesday, February 14, 2012
Ringo’s Tranny is at 80%
Last evening I removed Ringo’s headlight switch assembly from behind his dash and, after doing some testing – all of which it failed, I tore it apart, cleaned it up, reassembled it, and reinstalled. Everything, headlight and dashlight-wise, are now working again. After pouring a couple gallons of gas into his tank, I took him for a nearly 30 minute tour of our part of town. I was very happy to note that the clackety-clack of the mal-adjusted rocker(s) was absent – just the purr of a well-running GM flat six. Maybe a bit louder than it should be though so I need to pull the lower shrouds off and check for exhaust manifold leaks. I was even happier to have the transmission upshift nearly every time it should. The few times it didn’t I was able to get it to shift either by letting up on the throttle or shifting in Neutral and then back Drive. This is a huge improvement from the last few times I’ve driven him, and I’m hopeful a few more outings will cure the tranny of what ails it.
While I was out and about, I did discover a few more issues needing attending to. First, the blinkers wouldn’t blink – I think that’s going to be the blinker unit at the fuseblock needing its leads cleaned. Second, the brakes need some adjusting. Stomping on the left pedal results in a pull to the left. That side probably needs a little adjusting. Third, the gas gauge is registering just above Empty while I believe there’s more gas in the tank than that. Checking that for accuracy will have to wait until I get the tank filled with fuel. Finally, the driver’s door is still a pain to close – far harder than it should. Yanking on the armrest to slam the door shut has resulted in stripped threads in the forward captured (speed) nut for that big screw. I’ll need to adjust the door hinge and replace the nut. All-in-all I’m pretty confident this re-roadification is nearing an end.
While I was out and about, I did discover a few more issues needing attending to. First, the blinkers wouldn’t blink – I think that’s going to be the blinker unit at the fuseblock needing its leads cleaned. Second, the brakes need some adjusting. Stomping on the left pedal results in a pull to the left. That side probably needs a little adjusting. Third, the gas gauge is registering just above Empty while I believe there’s more gas in the tank than that. Checking that for accuracy will have to wait until I get the tank filled with fuel. Finally, the driver’s door is still a pain to close – far harder than it should. Yanking on the armrest to slam the door shut has resulted in stripped threads in the forward captured (speed) nut for that big screw. I’ll need to adjust the door hinge and replace the nut. All-in-all I’m pretty confident this re-roadification is nearing an end.
Monday, February 13, 2012
Some More Garage Time …
… but no time on cars.
In response to being burgled, I had to make my garage more secure. A stop at Home Depot netted me a replacement deadbolt for the man-door, a heavy-duty lockable slide bolt for the shed doors, a pair of carabiners, and a motion-sensing light fixture with two 150 watt halogen lights. Existing chains near each side of the main garage door were fastened with the carabiners to prevent opening, the slide bolt and new deadbolt were then installed. I still need to put in a couple more slide bolts to fix one of the shed doors on the inside so the main slide bolt on the outside is totally effective.
Fortunately, there’s a light fixture on the eave at the front corner of the garage. This is a perfect spot and it’s already wired to a switch inside the garage. Should make installing the motion sensing fixture a breeze.
Thursday, February 9, 2012
First Night Without Air
For the first time in a VERY long time, I removed a rear wheel from a Corvair without the aid of compressed air and an impact wrench. I certainly miss that feeling of NASCAR pit-crew-ness, but the wheel came off without issue regardless. This event was in the course of readjusting the rocker arm nuts on Ringo’s left side – the side that’s been doing the clackety-clackety. The first step in the process of cold valve adjustment is to rotate the engine until the timing mark is on zero and the rotor is pointed at the #1 spark plug lead on the distributor cap. After doing that, I jacked up the right rear as high as I could safely get it, place a jackstand underneath the lower control arm, and removed the driver’s side rocker cover. The manual says to tighten the rocker arm nuts of the #4 exhaust and #6 intake valves until you just get rid of any play in the pushrod. Once you’re there, add another 1-1/4 turns on the nut and you’re good-to-go. I did all that and then rotated the crankshaft 180 degrees and did the same adjustment to the rest of that side’s rocker arm nuts. I did, I believe find the offending loose lifter when I wiggled #2 exhaust and it was loose when it should have been slightly snug. All did not, however, go as smoothly as that little description would lead one to believe. When I went to tighten the #2 exhaust nut, I found it took far more torque than the previous nuts I’d turned. I decided to replaced the stud and nut with a GUP I’d found in a box of engine parts. These studs, by the way, also double as head nuts, and the rocker nut was on so tightly, I ended up spinning the stud/nut right out off the end of the engine stud. The replacement stud/nut was installed to the requisite 27-33 ft-lbs, and the rocker nut went on as smoothly as its neighbors. The last nut I went to adjust ended up also being too tight, so it was replaced with GUPs as well. With the valve cover back on and the wheel in place, Ringo was lowered to the ground and I called it a night.
Wednesday, February 8, 2012
My Abilities are Diminished
My tool collection has been amassed over many years of being in the hobby. My earliest acquisition is a hammer my dad bought me when I was in the Boy Scouts building a kayak. Other than a nicer ¼-inch drive Craftsman socket set, I’ve been very fortunate in that I haven’t had to get replacements for the tools I’ve acquired.
All that changed in a big way when, at some point between last Friday evening and yesterday afternoon, some thief made off with my air compressor and MIG welder. I totaled the monetary damage and it’s going to probably cost me about a thousand dollars to replace all that was taken. Sadly, my insurance company is of absolutely no help. Any claim made would jack up my premium by $300 per year for the next three years. So, figure in my $500 deductible, and I’d be paying $900 to $500. I’m no math whiz (don’t tell my employer), but that’s not a very difficult financial decision.
Beings I don’t have that kind of money available, I will be saving and scouring Craigslist ads in hopes of scoring a good deal on some good replacements.
A pair of possible opportunities recently popped up to earn some more money and help my fellow Corvair owners at the same time. Last night a group of ‘vair owners held a club meeting for the first time in months. As we went around the room chatting about our cars and projects, one guy bemoaned the fact that he’d recently received a quote of two to three thousand dollars to do a Powerglide swap and a gas tank flush and seal. The guy next to him also complained that, because of a bad back, he’d have to pay someone to install a new exhaust system on his Monza. Hmm. I can do both those.
I pulled up a spreadsheet and plugged some numbers in for hours and parts and came up with about $1300 for labor and parts to install the tranny swap and gas tank seal for the one guy and $360 for the other guy’s job. There’s no way I can work on someone else’s car before finishing Ringo, but once he’s on the road I may pursue these opportunities.
Friday, February 3, 2012
Thank You Lord

Last evening I planned on finishing getting Lucy ready for Ariel to take back to PA. After a quick stop at the FLAPS for a 1-7/8ths pipe clamp, I changed into freshly laundered grungies and headed out to the garage. In no time I had the clamp installed and the system checked for leaks – all was good. Next, I moved on to the left side for the speedometer cable swap. While jacking up that side of the car, I noticed the brake line leading to the left rear wheel looked really rusty, so I decided it was time to give Lucy’s brake system the “hard, harder” test (basically stand on the brake pedal to see if you can make it fail). On the “harder” part of the test, the pedal went to the floor. Not good. I asked Victoria to come out and pump the pedal while looked around for the leak. As she pumped, we could hear the fluid squirting out somewhere, but only after a small puddle formed under the fuel tank, did we know which tube had failed - the one to the right front. To replace that line, I’m going to have to drop the fuel tank. Irrr.
I am SOOO thankful that I thought to do this test. I can’t imagine having this failure occur while driving. Even though Lucy has a dual master cylinder that would supposedly still stop the car using the rear circuit, I wouldn’t want to test its ability. Thank You Lord!
With Lucy now out of commission, Ariel would have to drive Heidi back to school. Since I know it’s going to get cold again and the only item on Heidi’s to-do list is the squealing speedometer that’s even worse when it’s below freezing, I decided to spend the rest of my garage time cleaning and lubricating her speedometer. After carefully driving Lucy to her parking spot at the curb, I put Heidi in the garage and had my déjà-vu moment for the day. It hadn’t been more than a week since I’d torn down Lucy dash to get the gauge cluster out, and here I was doing it all over again. The only difference being Heidi’s transmission shifter made things a little more difficult. After disconnecting the shifter cable, I was able to remove the cluster, clean the speedometer and odometer mechanisms and shaft with break cleaner, and then take a break while letting the cleaner completely evaporate.
During my break, I took Ringo for drive around the neighborhood to see if the magic trans fix fluid I’d put it had miraculously done what it touted it could do. Amazingly, the Powerglide sorta’ did its shifting thing without any special machinations. It wasn’t a perfect shift, but it was certainly a step in the right direction. I drove it around and, while things didn’t improve, I’m not ready yank the drivetrain quite yet. Regardless, I'll use the newly arrived rebuild kit to get my spare transmission ready just in case these improvements don't continue.
Back in the garage, I sprayed the liquid graphite into the guts of the speedometer and also coated the odometer wheels and the input shaft before screwing everything back together and reinstalling the cluster into the dash. All the bulbs and switches were put back in their proper places, the battery was reconnected, and everything worked like it should. This morning’s drive to work proved the efficacy of my efforts by the needle being rock-solid with no noise whatsoever.
Thursday, February 2, 2012
Exhausting Work
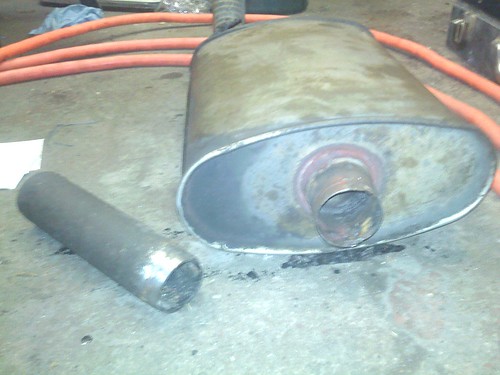
I had high hopes going into the garage last evening that I’d be able to quickly and easily weld up the crack in Lucy’s right exhaust pipe. Sadly, however, even with the MIG’s voltage setting around 1, the metal left was so thin, I burned through it immediately. Back to plan A – installing a GUP. Step one was removing the glasspack from the u-pipe. That went easily using my die grinder with a cutoff wheel. Step two was removing what was left of the old pipe from the inside of the muffler’s input tube. It was delicate work carefully cutting a slot in the pipe without damaging the muffler, but I was successful – TYL. The muffler was designed to accept an exhaust pipe of 1.75 inches in diameter. The failed pipe was smaller than that, so to get a good seal, I had to put some serious torque on the nuts and deform the muffler’s tube with a groove that now prevented the insertion of the replacement pipe. Using my vise, I pressed out the groove as best I could, but that left me with an out-of-round tube. I ended up finding a old piece of cast iron piping that was roughly 1.88 in diameter, grinding a lead chamfer (angle) on one end, and pounding it into the tube to make things round and get rid of the last vestige of groove. I was impressed the inexpensive muffler (Flowtech Raptor) was up to all the pounding. With the tube round and the walls straight, the replacement pipe slid right in. Step 3 was to install the u-pipe/muffler assembly to the exhaust manifold with a new donut (gasket, packing). I rotated the pipe as close as possible to the mirror image of the left side before snugging down the fasteners. Step 4 had me going to the shelf for a hanger GUP and installing it in place of the previous one with the broken rubber portion. Step 5 was re-aligning the u-pipe,muffler, and hanger so the tailpipe was right where I wanted it. After re-tightening the hardware, I slid on the available 1.75 diameter pipe clamp only to find it was too small. By then it was too late to make a run to the the FLAPS, so the conclusion of this project had to wait until this evening.
My plan/hope/necessity is to have Lucy ready for Ariel to take back to school by the end of this evening. In addition to the aforementioned clamp, I still need to install the new speedometer cable, and I’d really like to drill the holes and install the last three interior panels.
Wednesday, February 1, 2012
I Can Weld…If I Have Gas
The other night, when I discovered the crack in Lucy’s exhaust pipe, my immediate reaction was, “replace it.” Hence the reason I drug a GUP pipe and glasspack off the rafters and set about separating the two in preparation for swapping the good for the bad. For some reason, the easy way out escaped my blindered mind. I’d successfully welded a crack in Glinda’s exhaust pipe that’s still holding out, so this evening I’ll be in the garage making molten metal. That is, if the welding gas bottle still has some CO2/Argon mix left in it.
Subscribe to:
Posts (Atom)