
Wednesday, December 22, 2010
Lucy's Fixed Fuel Issue
Yesterday evening I bundled up to face the cold and then went out to get Lucy running again. Just to rule out something easy, I cranked the engine with the coil wire’s end off to make sure I had spark. It sparked nicely, so it must be fuel. I unscrewed the fuel line at the left carburetor and cranked the engine again with the coil wire disconnected. While I should have seen pretty healthy squirts of fuel with each engine revolution, all I got was repeated dribbles. I swapped fuel pumps with the one I’d recently removed from Ringo’s engine, and retested. Nice gushes of gas just like it was supposed to. All’s good-to-go and she drove fine today.
Tuesday, December 21, 2010
Which Do You Want First?
The bad news or the bad news?
During my morning commute, I got about a mile from home when Lucy's engine died like she'd run out of gas. I coasted to a stop a hundred feet short of a gas station and hopped out to verify the fuel issue. Even though the gage read about half full, there was little to no gas squirting into the left side carb (the one I exposed) when I blipped the throttle. I thought that maybe the gas gage was wrong since I haven’t been driving the car, I wasn’t sure when it was filled with gas last. Using the starter, I “drove” the last feet to the gas station and filled the tank. Only 5 gallons, so there’s plenty of gas in the tank.
I called the house and asked Ariel to come rescue me. I returned to Lucy with the towbar in the back of the Suburban and towed her home. Now I have something to do this evening (like finding something to do with my evenings is a problem).
Thank You Lord this didn't happen when Ariel was driving back from school.
On the other negative note, I got a call from Jeff at the Corvair Ranch yesterday. While I had measured, with my crude instruments, the diameters of Ringo’s cylinders and found them to be within spec, his machinist, with much more accurate instruments and skills, found them to be unsuitable for just honing. That means this engine rebuild is going to run me an additional $300 or so. Ouch!
I do have a possible option. Bolted into Betty’s engine bay is a 95 HP engine of unknown condition. I do know it starts and runs, but I don’t know what kind of compression each cylinder has. This engine came out of Old Betty before I hauled her up to the ranch. Before I commit to spending the $$$ on rebuilding Ringo’s engine, I’m going to check out Betty’s old engine. If the compression checks out for all cylinders, I’m not averse to playing musical motors again.
Thursday, December 16, 2010
It's Cold Out There
Last night, I braved the frigid weather and went out to the garage to finish disassembly of Ringo’s engine. I was able to easily get the final five rod caps off. It must’ve been the cold temps that made them more cooperative. Then I scraped the gaskets and cleaned off the workbench until 9. At that point it was time to go inside in and defrost. Since I knew I wasn’t going to be out there that long, I’d only lit one of the kerosene heaters.
Monday, December 13, 2010
A Tale of Two Corvairs
On the drive home from school Friday, Ariel told me that Lucy's TEMP/PRESS light was on for most of the drive and complained that his engine wouldn’t idle. Every time she put him in neutral, the engine would die. Saturday evening I fired him up and immediately saw that the right side was the culprit. While there was visible steamy exhaust out the left tailpipe, the right side was just blowing cold air. I put my hand over the top of the right carb and the idle smoothed out – big vacuum leak in the carburetor. I pulled that carb and installed one of my racing carbs, re-fired the engine, and it idled smoothly. After balancing the carbs using my clear piece of tubing and adjusting the linkage, he was good-to-go. Ariel confirmed success when she told me last evening the light had stayed off during her entire drive back to school and he idled properly. I guess the right side was running VERY lean and actually WAS too hot.
On the negative side, Glinda spent Saturday afternoon in the heated garage with a new, extensive layer of Silicone around the windshield and backlight. After feeling cured to the touch, I put him out in the rain. After a few hours, I checked, and all seemed dry. But then Victoria took him out to run some errands and found some dark, wet spots on the front carpet. I am majorly bummed about that.
On the negative side, Glinda spent Saturday afternoon in the heated garage with a new, extensive layer of Silicone around the windshield and backlight. After feeling cured to the touch, I put him out in the rain. After a few hours, I checked, and all seemed dry. But then Victoria took him out to run some errands and found some dark, wet spots on the front carpet. I am majorly bummed about that.
Thursday, December 9, 2010
Glinda's Got Her Own Carbs Back
Yesterday afternoon Victoria shared with me that Glinda had died a couple times at stop signs. Knowing how bad the gas mileage has been, I decided last night was the time to address these issues. After donning thermal underwear under jeans and a sweatshirt, I braved the cold. No heated garage this time since I’d be running the car and didn’t wish to prematurely cause my own death. I pulled the carbs off and removed the six spark plugs. They all looked pretty good, but I cleaned and re-gapped them anyway. After bolting on and hooking up Glinda’s recently rebuilt original carburetors, I started up the engine and checked the dwell. It was supposed to be 31 to 34 degrees, but was reading 28. I adjusted the point gap and got it to read 31 at idle, but as soon as I blipped the throttle, the dwell needle swung ten degrees from 31 – an indicator of distributor slop caused by worn bushings. Irr. From the shelf I pulled my one GUP distributor and, after swapping points plates, it was installed in place of the old one. While it too had some slop, the re-set dwell’s change off idle was only a couple degrees. At this point, the engine had warmed up, so I balanced the two carburetors by turning the idle speed screws on each until a slight turn of either screw affected the engine’s rpm. With idle speed at 600 rpm (with the transmission in Drive) and vacuum advance line disconnected and plugged, I set the timing to roughly 11 degrees BTDC (before top dead center). The factory says to make it 12, but I’m concerned about pinging so I went slightly less. When I’d set the timing initially (months ago), I’d gone for 6 degrees and I’m sure that contributed to the bad gas mileage. With all the adjustments complete, I put the air cleaner assembly back on and took it for a test drive around the neighborhood. It runs and idles smoothly, and according to Victoria’s recent report didn’t die on her today.
I still have the whole windshield sealing issue, but Glinda roadification to-do list has shrunk significantly.
I still have the whole windshield sealing issue, but Glinda roadification to-do list has shrunk significantly.
Tuesday, December 7, 2010
CPotD #192 (This Car is Funny)
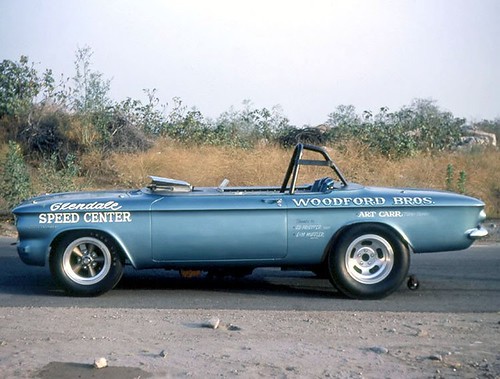
This EM ‘vert drag racer is so awesome. The geometry of this funny car is amazing. Some of the truly interesting features include: the front engine-rear drive is really a mid-engine; the driver is sitting in the back seat; the windshield is only a few inches high; and the wheelie bars are located just behind the rear axle. This CPotD-worthy photo was posted on a thread about drag racing Corvairs on the CorvairCenter Forum.
Monday, December 6, 2010
Kerosene Heaters Kept Me Functional
I burned through quite a bit of kerosene this weekend. It was brutally cold in Baltimore, so all three heaters were pumping out the warmth to keep things comfortable in my un-insulated garage. I spent quite a bit of time out there, but only a relatively small portion was Corvair related. Friday evening was spent trying to get Ringo’s pistons separated from the crank. I started with the #3 since it was closest to being in the best spot to access the two rod nuts. With the nuts almost all the way off, I carefully tapped the ends to pop the cap loose. I got it about halfway off, but no more. I remember having this fun when I replaced Heidi’s pistons. Since I want to re-use all these parts, I’m going to have to be more careful with Ringo’s engine. After about thirty minutes of frustration, I gave up for the evening.
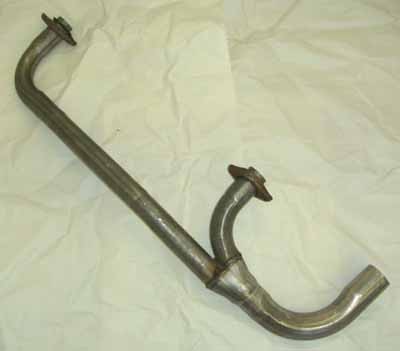
Yesterday evening was my next opportunity to service the fleet. Victoria had shared with me that Glinda was making a metal scraping noise when she drove her last. Given the extreme cold we’re seeing, I immediately assumed the fan bearing needed greasing. I gave Gary (Baltimore Corvair guru) a call to see if I could borrow his special tool that’s used to force grease into that bearing. He said I was welcome to it, so I made plans to stop by their later in the afternoon. Before making the drive I decided to see what else could be an issue. When starting up Glinda’s engine, I expected to hear the bearing noise, but instead exhaust noises assaulted my ears. I looked under the car and discovered the exhaust gasket had failed on the driver’s side. Easy fix, I have the gaskets, and no need to borrow a tool. After calling Gary and cancelling, I put Glinda into the garage and up on the ramps. After turning all the heaters up, I took an hour off to have dinner and let the garage heat back up. Once I was back out, I thanked God the bolts and nuts retaining the pipe ends came free without breaking – always a concern when working on old exhaust systems. With the pipe/muffler assy off the car, I chipped away at the old gasket residue and wire brushed the interface clean. Everything went back together cleanly, and firing up the engine, I verified that all the hardware was tight and the gaskets were doing the job properly.
Yesterday evening was my next opportunity to service the fleet. Victoria had shared with me that Glinda was making a metal scraping noise when she drove her last. Given the extreme cold we’re seeing, I immediately assumed the fan bearing needed greasing. I gave Gary (Baltimore Corvair guru) a call to see if I could borrow his special tool that’s used to force grease into that bearing. He said I was welcome to it, so I made plans to stop by their later in the afternoon. Before making the drive I decided to see what else could be an issue. When starting up Glinda’s engine, I expected to hear the bearing noise, but instead exhaust noises assaulted my ears. I looked under the car and discovered the exhaust gasket had failed on the driver’s side. Easy fix, I have the gaskets, and no need to borrow a tool. After calling Gary and cancelling, I put Glinda into the garage and up on the ramps. After turning all the heaters up, I took an hour off to have dinner and let the garage heat back up. Once I was back out, I thanked God the bolts and nuts retaining the pipe ends came free without breaking – always a concern when working on old exhaust systems. With the pipe/muffler assy off the car, I chipped away at the old gasket residue and wire brushed the interface clean. Everything went back together cleanly, and firing up the engine, I verified that all the hardware was tight and the gaskets were doing the job properly.
CPotD #191 (To Each Their Own)
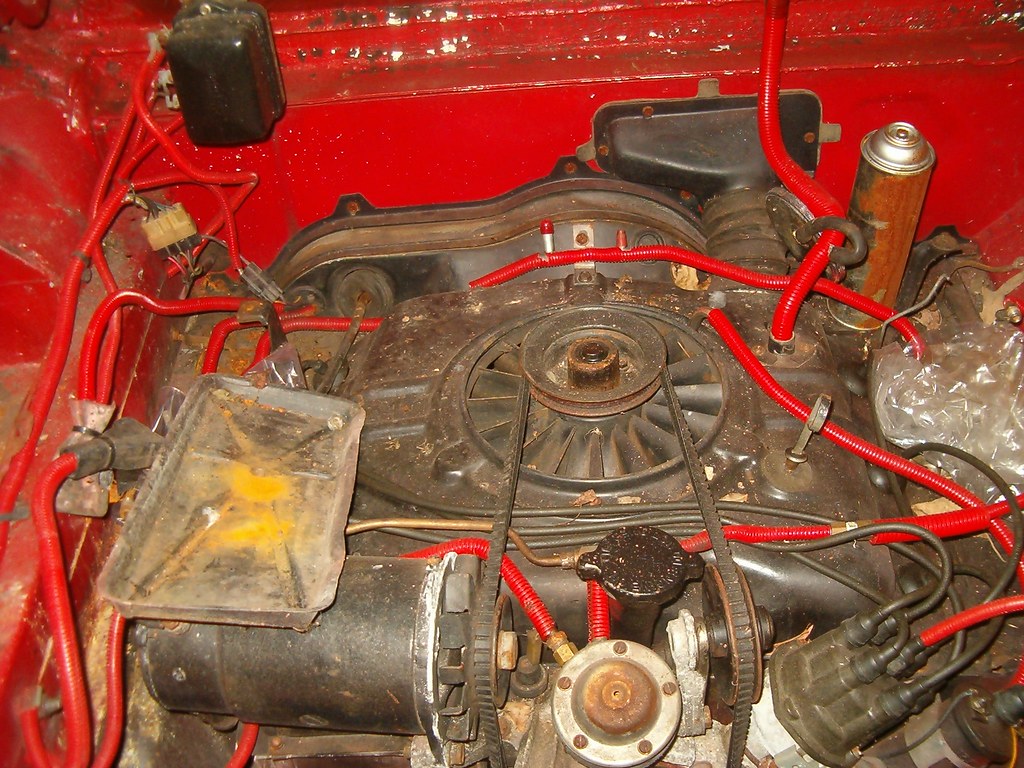
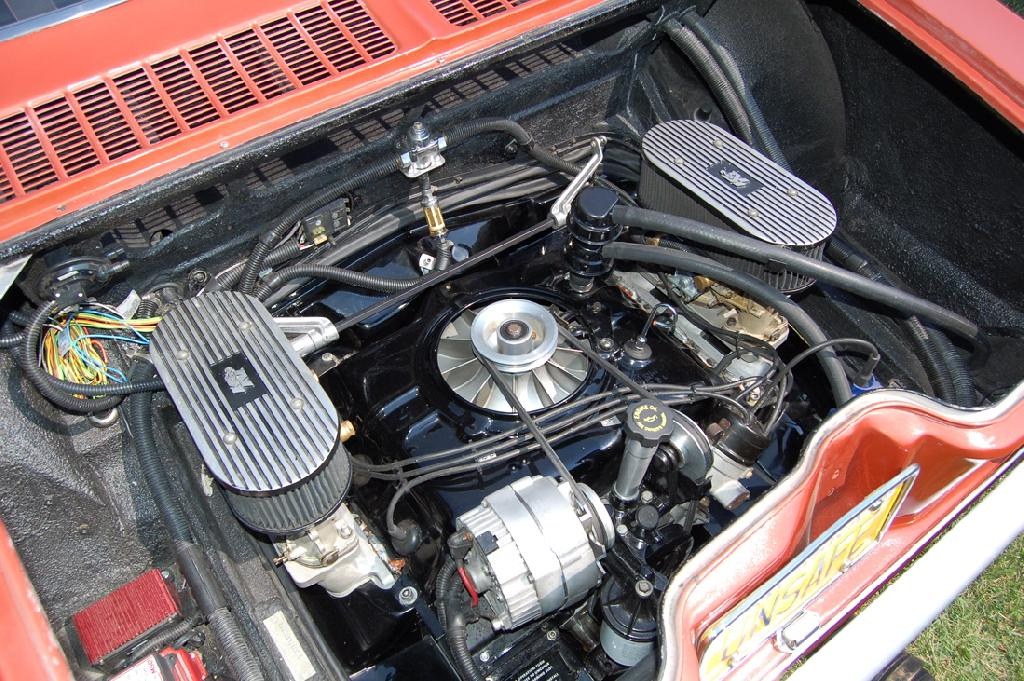
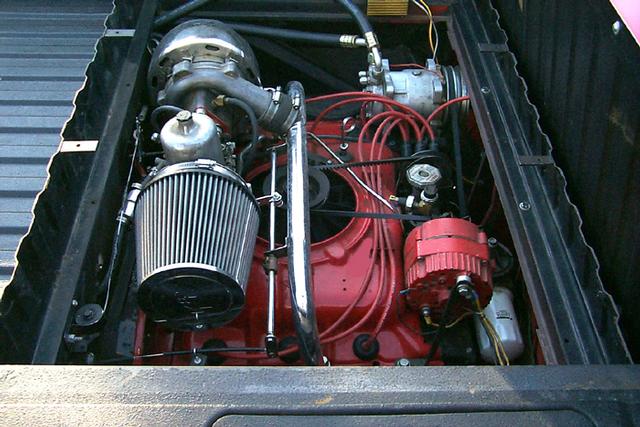
Maybe it’s the engineer in me that prefers not cover up functional items. I’m not a fan of the current fad of using a huge piece of molded plastic to cover up engines and their rat’s nest of hoses, pipes, and wires. I think the auto manufacturers are doing it to keep from confusing today’s car owner. Heaven forbid, we should have to hunt for a dipstick – about the only drivetrain items accessible anymore.
The real purpose of today’s CPotD is to highlight what one of Lucy’s previous owners thought was a cool feature to add to the engine compartment. They carefully cut and installed the red plastic covers over every wire, tube, and hose under her hood. What must have taken someone an hour or so, I had ripped off and discarded in about five minutes. One of the reasons I’m into old cars is because everything is so accessible. Covering it up with pieces of molded plastic just doesn’t work for me.
Friday, December 3, 2010
Not So Good News
Victoria filled Glinda’s gas tank last evening, so I was finally able to get an idea of the gas mileage she’s been achieving. Fifteen. Only fifteen. Not good. So this weekend I’ll bump up the timing and replace the carburetors. The former will bring it closer to factory spec since I’ve got it currently retarded to prevent pinging. Since it’s gotten colder, I feel okay about bumping it up a few degrees. The latter will reinstall her original carburetors in place of my racing carbs. These should be jetted smaller so the mileage should go up. We shall see.
CPotD #190 (And The Chrome Lives On)

It appears from today’s CPotD, that chromed bumpers will outlive every other part of a FC once it’s been parked in a junkyard. This came from Flickr poster forwardlookguy’s Chevrolet Trucks set. He’s uploaded a ton of junkyard photos. Fun to look through.
Thursday, December 2, 2010
It’s Good News
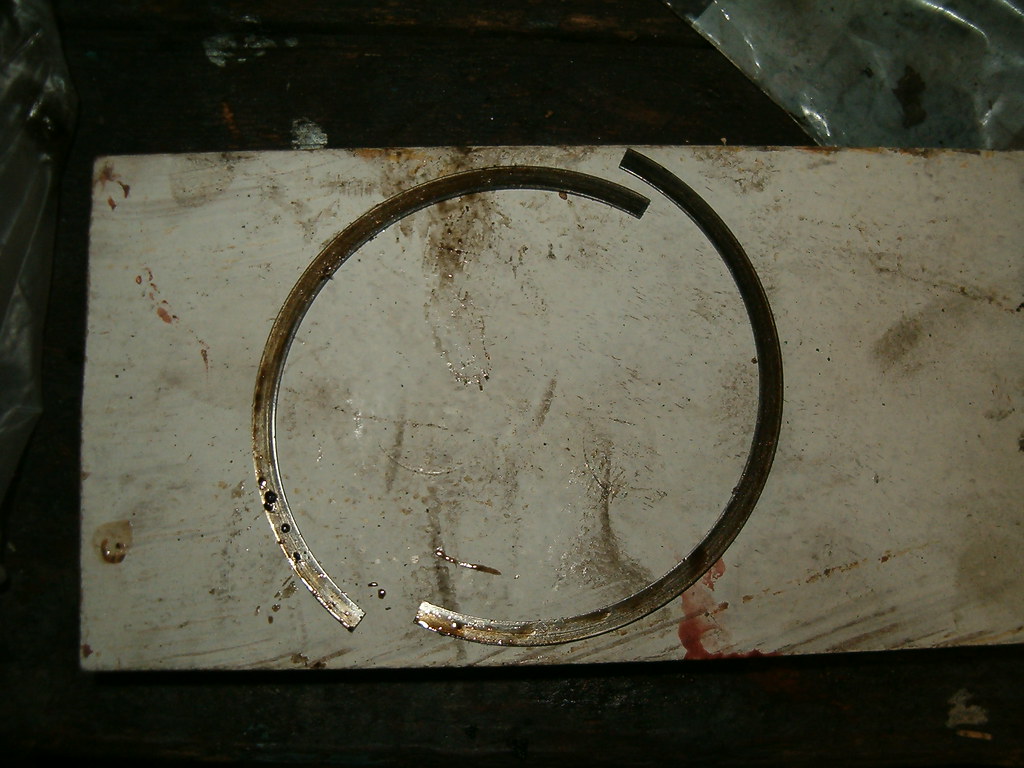
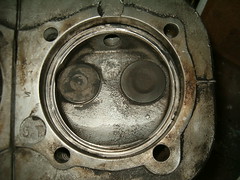
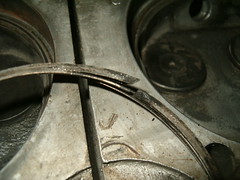
While the photo above shows something ugly, last night activities all pointed to the positive. After marking each cylinder jug, I removed, cleaned, and measured each bore three places (top, middle, and bottom). All measurements were within spec – yeah! As I was pulling off the #3 cylinder, I discovered the outer compression ring had broken in half (see above photo). Fortunately, neither that cylinder nor any of the others showed any evidence of scratching, so since they’re not oversized, I’ll be able to re-use them and the current pistons. As mentioned before, however, they’ll need a re-hone to re-establish the cross-hatch that allows proper lubrication of the walls.


Wednesday, December 1, 2010
Ringo's Rank Cylinders
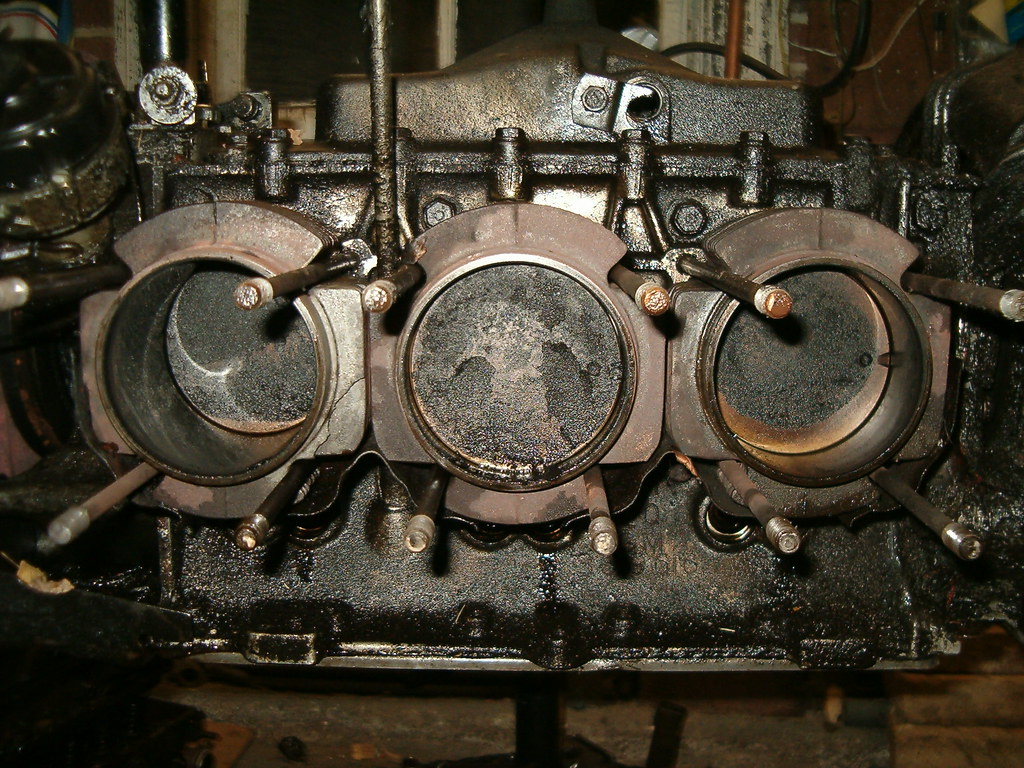
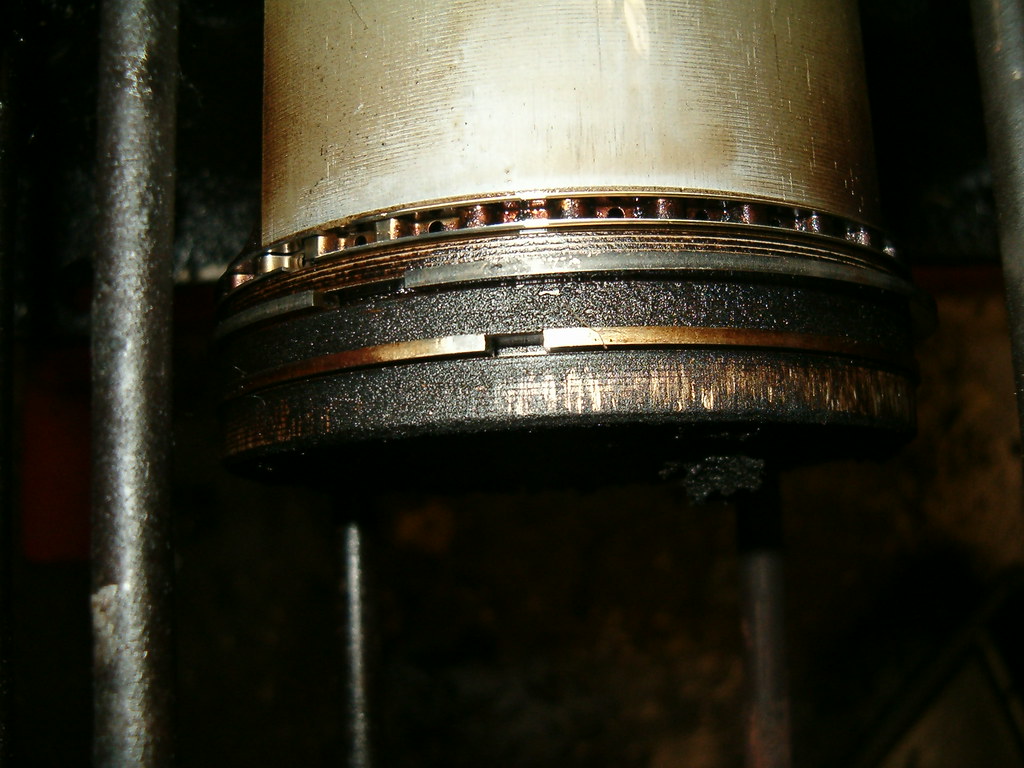
A couple of hours in the garage last and I could peer into each cylinder. What I saw, while rather unpleasant, was not as bad as it could have been. While there was oil and crispy burnt oil residue in at least four of the cylinders, I didn’t see any scratching on the cylinder walls. This evening’s task is to remove and mark each cylinder jug, measure the bore’s condition in each and determine if replacement is required or if a simple honing of each will get the job done properly.
To get to the point of removing the heads so I could see down in the cylinders, I had to remove the generator, fuel pump, all the sheetmetal, the fan, and the oil cooler before pulling off the valve covers, unbolting the rocker arms, removing and carefully storing the pushrods and rockers in a box with each rod poked through its position in the lid to ensure each went back into its original location. With the rockers off, the studs (which are the lower head nuts) came off followed by upper nuts. I had a couple of studs that wanted to come out with the nuts, but a well-placed vise-grips kept them from turning. By jiggling each head, it eventually slid off over the studs and the associated photos could be taken. Nasty, huh? More photos here.

CPotD #189 (Get Me To The Hospital ASAP)

Not surprisingly I couldn't find a posting where I've featured a Greenbrier converted for ambulance duty. Today’s CPotD, from a posting to the CorvairCenter forum entitled “Ambulance Corvai in Hungary,” has changed that.
Yes Hungary! First, I’m amazed there were Greenbrier’s there, and second, that some company chose to convert one into an ambulance. This one certainly has all the correct features.

 Much thanks to Lior Baruch for providing me with these photos and story. Visit his Back On Two website for some great photos of his cars and motorcycles.
Tuesday, November 30, 2010
CPotD #188 (Another Fast EM Track Car)

When I was first making modifications to Lucy, I sent out an email to the FastVairs list asking for help. One of the respondents was Jim Dallas. He’s prepared and raced the subject of today’s CPotD. This hot ’64 with a turbo-charged engine doesn’t typically travel too far east, so I’ve not had the pleasure of meeting Jim and watching him scoot around the track or thoroughly inspect his handiwork. I’m planning on travelling to Indianapolis next summer and participate in the NECC’s Corvair Olympics and I hope that Jim and his racy EM are there too.

Monday, November 29, 2010
CPotD #187 (Where Are The Wires?)

I’ve gushed about David Clemens and his skills at building Corvairs before. For today’s CPotD, I found this photo on the NECC’s website taken at this spring’s Summit Point NECC track day. When I walked up to it, I immediately noticed the unpopulated distributor cap. David has this engine set up for electronic triggering of the three coils with each one firing into two cylinders. Look closely in the photo and you can see the triggering wheel to the left of the distributor and the bank of coils mounted on the firewall.
So why is the distributor still installed? It drives the oil pump.
Ringo's Second Roadification
I've got grease under my fingernails this morning. Ringo's drivetrain is out and split. Next task is getting the engine up on the stand. It started with Ariel and me pushing Ringo into the garage. With his rear up on jackstands, I disconnected wires and removed topside bits such as carb linkage, vacuum balance tube, and forward seal retainer. From the underside, I removed the side seal retainers and the engine grill, and I disconnected the fuel line, two heater hoses, and transmission linkages and shifter cable. With the ATV and tranny jacks in place under the drivetrain, I removed the front mount nuts and the rear mount bolts. After lowering the jacks, I raised the car enough to roll the power-pack out and off to one side of the garage. To split the differential and transmission from the engine, I first had to remove the three flexplate-to-torque converter bolts, and then the differential-to-bell housing bolts. A simple jiggle and I rolled diff/tranny out of the way. I then bolted the engine stand hub onto the bellhousing and left the project there. The tricky part is safely raising the engine high enough to engage the hub with the rest of the stand. Slow and steady with lots of blocks will do it, but that’s tonight’s project.
What’s got me quite concerned about this roadification project is the rust that’s taken over parts of Ringo’s underside. The floors I can, and will, deal with, but there are other structural portions that are going to require some serious repairs. I’m hoping I can find suitable body sections at the Corvair Ranch to weld in. Once the engine’s disassembled, I’ll be stripping Ringo’s interior and assessing what needs to repaired. Photos to follow.
What’s got me quite concerned about this roadification project is the rust that’s taken over parts of Ringo’s underside. The floors I can, and will, deal with, but there are other structural portions that are going to require some serious repairs. I’m hoping I can find suitable body sections at the Corvair Ranch to weld in. Once the engine’s disassembled, I’ll be stripping Ringo’s interior and assessing what needs to repaired. Photos to follow.
Wednesday, November 24, 2010
CPotD #186 (Someone Went Wacky)
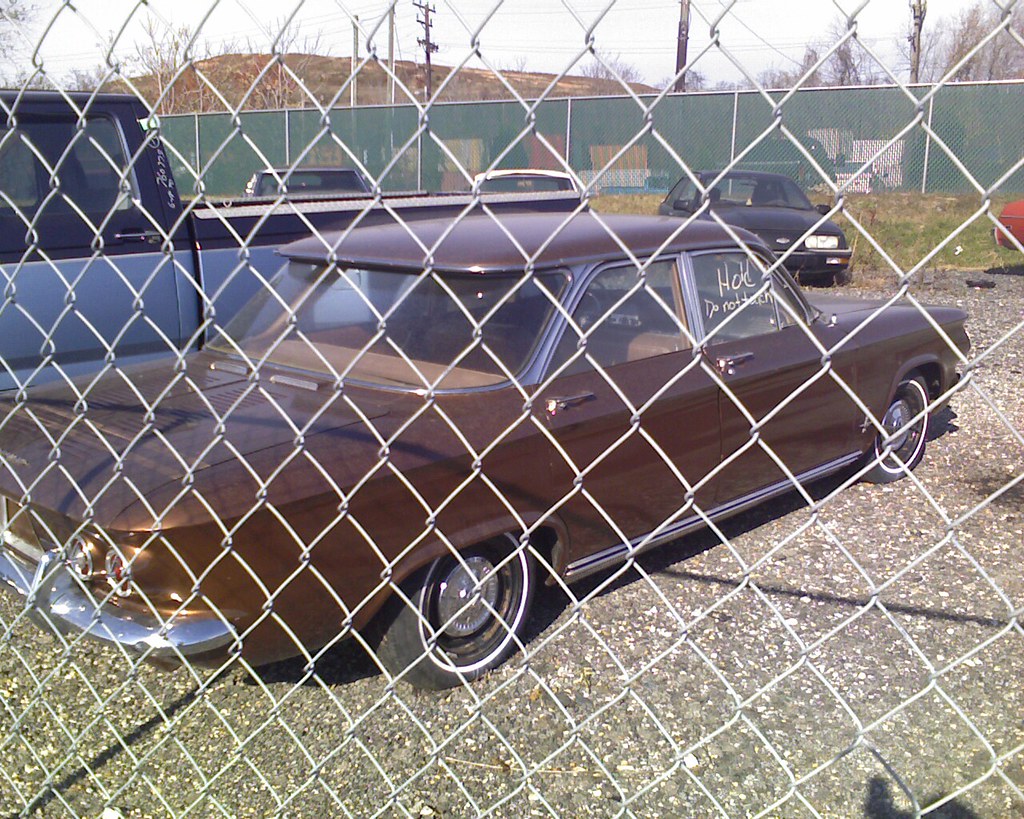
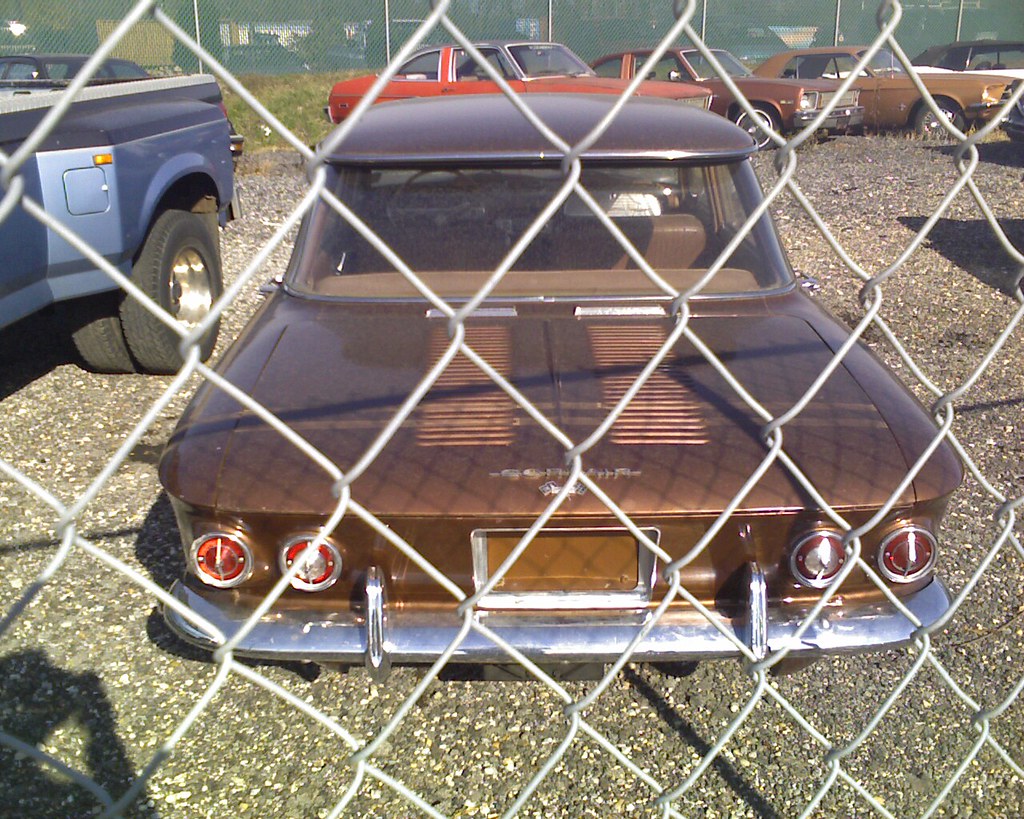
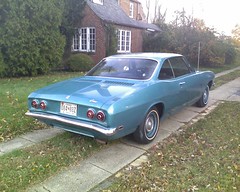
While the condition of this 1963 Monza is far from wacky, the scenario it’s in definitely is. Today I decided to spend my lunch hour wandering the rows of wrecks at Crazy Ray’s in Curtis Bay. I kept my pace brisk as I used my cameraphone to snap photos of anything older than 1975. As I zig-zagged through the yard, I was amazed by how many older vehicles there were. I was scoping for things like seatbelts and wheels that I may have a use for. My walk took me out one side and back the other, and as I neared the front of the yard, I spied their caged collection of “do not touch” cars and trucks. Amongst these couple dozen classics sat today’s CPotD subject. The paint looked relatively new, the chrome on the bumpers and wheel covers appeared unpitted, the interior seemed intact, and I couldn’t see any rust. The fence prevented me from getting any closer.
Who in the world would just junk a perfectly good car? That’s just wacky! I walked into the office and asked them what they wanted for the car. $2500. I’d say that’s a bargain for a ‘vair this solid. It’s got the optional bumper-guards and a 102HP engine with the Powerglide transmission. Here’s their phone number if you want to give them a call (410-354-4800), but don’t’ expect them to fall all over themselves helping you out, but they’ll probably let you know if it’s still available.
Tuesday, November 23, 2010
CPotD #185 (A Cheap Way to Go Racing)
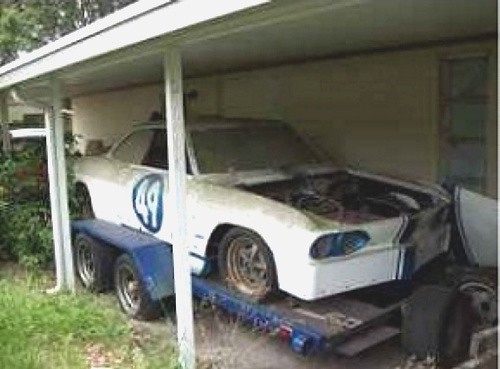
$4k now and some hard work over the winter and you’ll be ready to hit the track come spring. Someone’s done the hard work. Tube frame – check. SCCA approved roll cage – check. Light-weight fiberglass panels – check. Molds to remake anything you bust up on the track – check. Race engine with Webers and Porche fan – check. Wide wheels ready for slicks – check. A trailer to haul it to and from the track – check. All that’s left is refurbish what’s there, drop a few hundred on some tires, and get your physical in preparation for earning your driving license.
Here’s a copy of the ad off Craigslist. Can't promise the links still work.
1966 Corvair SCCA race car - $4000 (Holiday Fl)
Date: 2010-11-16, 8:51AM EST
66 Corvair & trailer. If you're into SCCA racing, you may have seen this car race at Sebring in mid to late 90's. Car is all fiberglass with a full tube frame. Comes with body molds to make replacement panels. Car & trailer have been parked since 2003. Call Jim at 727-869-2230 if interested.
Location: Holiday Fl

PostingID: 2063045197
Monday, November 22, 2010
CPotD #184 (Italian-made, German-used, Corvair-installed)
My buddy, Jonathan, has a beautiful Track/Street LM that I’ve featured a few times as CPotD. His car is powered by a Corvair engine, but it’s far from stock. In addition to running larger diameter pistons/cylinders, he uses two 3-barrel Weber carburetors to mix and meter the fuel.
Weber is an Italian company currently owned by Fiat. Many
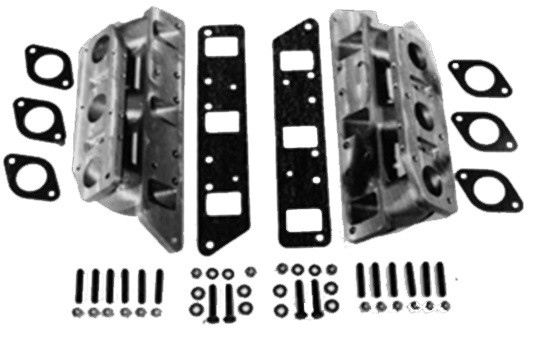 different Weber carbs have appeared on many different cars. Jonathan’s came from a Porsche 911 he found sitting in a junkyard. In order to mount this radically different form of carburetion, the heads have to machined and adapters installed.
Today’s CPotD was taken from a thread on the CorvairCenter forum all about Weber carburetion. Pictured is the skillfully modified engine in Kevin “Unsafe” Willson’s ’65 Monza. I have enough trouble keeping two stock Rochester’s running right; I couldn’t imagine how much “fun” I’d have with a pair of temperamental Italian assemblies under the engine lid.
Glinda’s Leaks Continue To Frustrate
Yesterday Victoria and I teamed up on testing my last sealing attempts. While I peered up from under the dash, she selectively sprinkled water first into the air grill and then around the windshield. Glinda passed the first test, but miserably failed the second. As soon as the water hit either of the bottom corners of the glass, it trickled into the car. More RTV is required to seal off the two drain holes in the channel. It’s a trade-off since Chevy put those drain holes in for a reason, but since I can’t seal the seams from the inside, I’ll be keeping my fingers crossed that our metal coating in the channel keeps the standing water from rusting the steel.
The backlight was a different story. There, when she aimed the stream at the edge of the glass, the water came past the joint and into the car. These leaks require more RTV in the channel all the way around.
To give me the necessary access, I had to pull the trim off AGAIN. I couldn’t apply the RTV right then since everything was too wet. Hopefully, I can do it this evening so we can test again Tuesday. This is NOT fun.
Friday, November 19, 2010
Glinda Saga Continues
The lovely Loriann drove me and a small box of tools to Glinda’s parking spot on the side of Interstate 70 yesterday during rush hour - poor timing on my part. Under the illumination of her car’s headlights I determined my initial diagnosis (with limited input I must say) was incorrect. The exhaust pipe had not broken; instead the muffler had worked itself off the exhaust pipe due to an insufficiently tightened clamp. I do like easy fixes. Within five minutes I was done, the tools were in the trunk, and we were speeding quietly down the highway. I can’t get over how differently it feels to drive a LM over all the EMs I’ve been behind the wheel of. Glinda is my first, and hopefully, won’t be the only LM I get to wield the wheel of.
Once I had her in the garage, I loosened the clamp, adjusted the orientation of the tailpipe, and used an impact wrench to really crank down on the nuts. It won’t slip apart again. Since the right rear was up on a jackstand and there was no sign of oil leaks, I decided to finally reinstall the rear engine grill (piece under the rear bumper). With that and the front air grill installed, the car looks complete again. That inspired me to get out the tire cleaner and attack the whitewalls which, until then, were more like tanwalls.
This morning, as I walked down the front walk to begin my morning commute, I took a glance back at Glinda sitting in the driveway. I just had to record the moment, so out came the cellphone camera and I snapped the following photos.
 We’ve been struggling with gas mileage ever since Glinda was put back on the road. The last few times Victoria has attempted to fill an apparently empty tank (according to the gas gauge), the pump has shut off at far less than the 14 gallon capacity. Convinced the gas gauge has been wrong and the pump was shutting off because the tank was full, I told her to not to worry about the gage reading empty; there must be plenty of gas; just drive. Well, that was very bad advice. Today, on her drive home from school and with the needle below E, she ran out of gas. She pulled the gas can from the trunk, poured a gallon into the tank and drove the $#%^&%^ car home. I am confident that when I go to fill the tank this evening, I’ll get 13.8 gallons or so to go in before the pump shuts off.
CPotD #183 (I’m Digging this Keen Upholstery)

Ah, the 60s. What a creative decade. I wonder how deep the designer of this interior had to dig to find the cloth for the seats in today’s CPotD. The rear seat, like the rest of this 1961 Greenbrier Sportwagon, looks like it’s been well used, but also well cared for. That’s the way I like ‘em.
Flickr user Ate Up With Motor posted a set of photos of what looks to be a California original. While the legendary black license plate is missing, the plate frame says Wagon City in Inglewood, a used car dealership in the Los Angeles area.
Thursday, November 18, 2010
Only a Slight Warning
 A few days ago, while driving Glinda, I heard a new noise from her engine area. I listened under the car and decided it was coming from the driver’s side exhaust pipe-to-manifold area. I figured all the removing and reinstalling I’d done on the exhaust system had taken its toll on the gasket. Having replacement for both sides, I put that task on the to-do list.
This morning, Victoria’s school was shut down due to a water issue, and all the students were dismissed at 11 AM. At 11:14, my cellphone rang with Victoria calling me. She explained that the exhaust was dragging on the ground. Specifically, the driver’s side end of the pipe. She’d immediately pulled far off the interstate and asked me if she should call her mom to bring her a ride. I sighed and said yes. A few minutes later, I received the following text message from the lovely Loriann, “I’m gonna blow the damn car up!” Needless to say her patience is wearing thin. I completely understand and share her frustration.
This evening she and I will drive out to the car (Victoria’s babysitting), I’ll wire up the pipe end so it’s not dragging and drive it home. I’ve got at least one GUP exhaust system in the garage. My evening is planned.
Fingers Crossed
The intent was to empty the tube of windshield sealer into the channels of Glinda’s windshield and backlight. The reality was there was only enough in the tube to do the bottom portion of the windshield. The rest of the sealing was done with high-end silicone RTV. With gloved fingers I smooshed and smeared the sealers, and then reinstalled the trim strips. Wanting to get her roadworthy again, I laid down three layers of the caulk strips around the passenger-side fresh air opening followed by the careful placement of the vent. Then on went the sill strip and she was ready for her commute duties. This weekend, I’ll draft Victoria into helping me test for any leaks I may have missed.
A morale booster was the sight of just two small spots of oil under Glinda’s rearend and no oil on top of the engine. Looks like the JB Weld is doing its job.
A morale booster was the sight of just two small spots of oil under Glinda’s rearend and no oil on top of the engine. Looks like the JB Weld is doing its job.
Wednesday, November 17, 2010
CPotD #182 (They Build Hi-Rises from LMs Too)

My two previous postings of lifted ‘vairs were both EMs. The CorvairCenter forum thread on customs is a rich repository of photos worthy to be Wacky Wednesday CPotDs, and that’s where today’s came from. The build of this vehicle, with pictures, is presented by the owner at this website. Enjoy – or not.
Wet Rug Woes
Yesterday was the first rain we’ve had since Glinda was evicted from the garage. Sadly and frustratingly, my efforts at sealing were inadequate. The front floor was soaking wet. With light in hand I peered up under the dash to find any and all telltale drops and trails. What I saw was disheartening. There is a seam far up and from it hung a significant number of drops. The seam is so far up and buried that getting silicone RTV along its entire length is not feasible. It will have to be sealed from above – above being the windshield channel. In preparation for that, I pulled the chrome trim strips off. I need to let everything dry, so application won’t occur until this evening.
I couldn’t see any evidence of leaking around the air vent panels, but I needed to pull the passenger one off anyway to route the stereo wires. Even though I destroyed the caulk I’d just put the other day, it was worth it with the verification that no water got by. I pulled the door sill and the rear seat sill off, and will finish the routing and the reinstallation once everything is dry.
In order to get the rear seat sill off, I needed to remove the rear seat bottom. That’s when I found more puddles. I did some close examination and discovered some water trails from the bottom corners of the backlight. More caulk will need to go in that channel too, so I pulled those strips off as well.
I brought the caulk and silicone into the house with me when I quit for the evening. Now it will all be warm and squeezable tonight.
Tuesday, November 16, 2010
CPotD #181 (Such A Funny Car)
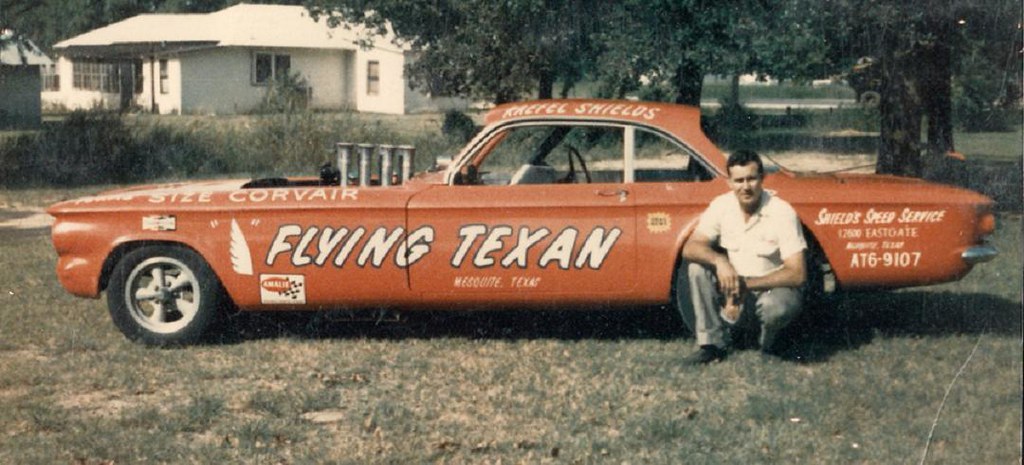
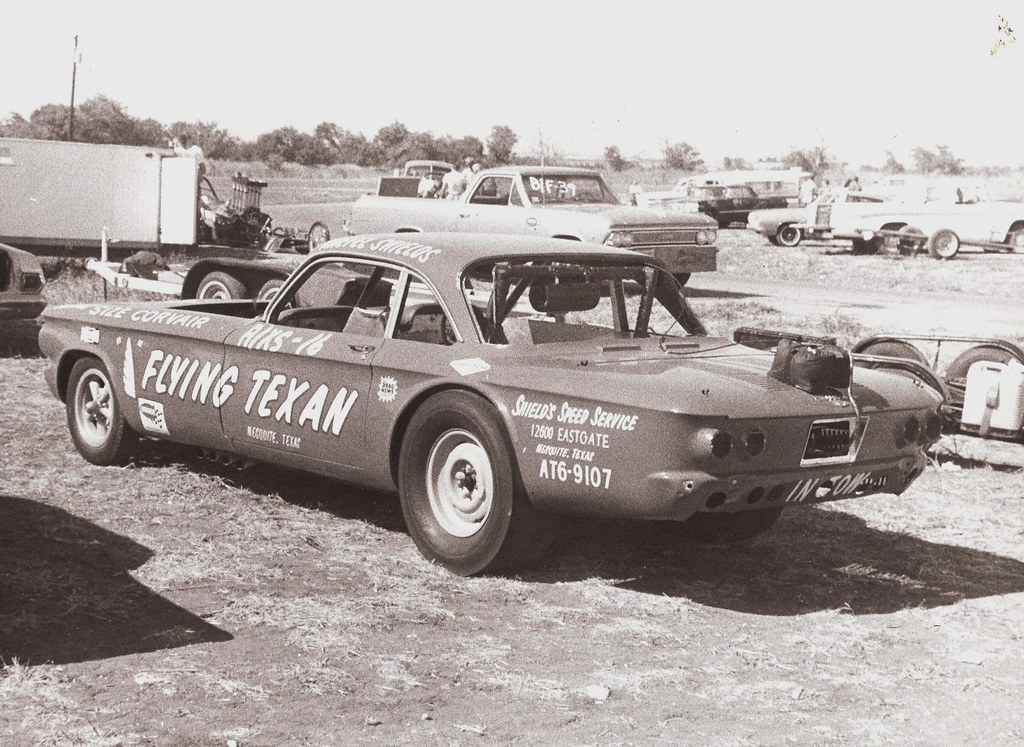
With the cold months comes race car preparation. Many builders will be making some significant modifications, but I bet, come spring, no one will unveil anything like the Flying Texan. I’ve seen quite a few photos of LM funny cars, but never an EM before today. This one is definitely CPotD worthy for Track Day Tuesday. The H.A.M.B. forum on JalopyJournal.com has an awesome thread filled with Corvair funny car photos. Check it out.
Two things prompted me to post an EM drag car. First was a recent upload of a bunch of vintage Corvair photos to the Fastvair Yahoo group. A photo of this car was one of the only EMs in the batch. Second was a reminder of next year’s Corvair Olympics. This will be my one track event for the 2011, and I’m counting the months. I’ll have my first opportunities at autocross and drag racing. The latter of which, I’ll be entering with much trepidation. While I’d love to really push Lucy, my preservation instinct will take over and there won’t be any clutch dumping at 3500 rpm. That way I can be assured of having a drivable car the next day at the road course event.
Monday, November 15, 2010
The Garage Is Empty
I'm sure I'm jinxing myself with this post's title, but it's true. I didn’t have a very productive weekend car-wise, but that’s okay. Friday evening, I installed and wired up the speaker system I’d bought for Victoria’s birthday. I ended up mounting the two midranges and two tweeters onto a thin piece of plywood and just setting the assembly on Glinda’s package tray. The cables ran under the passenger door sill. I zip-tied the jack for her mp3 player to the underside of the dash, pulled 12 volts from the auxiliary radio terminal at the fuse block, and connected up the ground wire to successfully complete the installation. No more boom box for their school commute.
Saturday, I completed the JB Weld patch job on Glinda’s rear engine cover. With the hole closed, I reinstalled the harmonic balanc er, raised the engine into place, and torqued the two rear engine mount nuts. While working on the engine, I’d noticed the right-side thermostat (the bellows that controls the opening of the lower shroud door) had failed, so I pulled lower shroud off, replaced the bad part with a GUP off the shelf, and put everything back together. After pressing the engine seal rubber into place around the perimeter, I lowered the car off the jackstands. Victoria drove her a few times over the weekend as well as back and forth to school today, and all went well. TYL!
Saturday, I completed the JB Weld patch job on Glinda’s rear engine cover. With the hole closed, I reinstalled the harmonic balanc
er, raised the engine into place, and torqued the two rear engine mount nuts. While working on the engine, I’d noticed the right-side thermostat (the bellows that controls the opening of the lower shroud door) had failed, so I pulled lower shroud off, replaced the bad part with a GUP off the shelf, and put everything back together. After pressing the engine seal rubber into place around the perimeter, I lowered the car off the jackstands. Victoria drove her a few times over the weekend as well as back and forth to school today, and all went well. TYL!
CPotD #180 (Turbo in an FC)
Squeezing a regularly aspirated motor into the engine bay of an FC is tricky business. The lid sits lower, so space is at a premium compared to the cars. Russ Thulen’s Rampside powerplant has done tricky and gone a couple steps beyond. It’s got a turbo AND an air-conditioning compressor. This install is so cool. It must be a blast to open the hatch and show off this exquisite example of shoehorning.
Many thanks to Bryan Blackwell and his extensive Corvair website for hosting this photo and the page on turbocharging Corvairs.
Friday, November 12, 2010
JB Weld Runs
Last night I mixed up a batch of JB Weld to plug the hole in Glinda’s rear engine housing and applied it. It promptly did what I was warned it would do. It slowly succumbed to gravity. Using a piece of duct tape, I formed a dam to keep it somewhat in place. I only put enough to partially cover the hole. I got the slow-curing kind per the recommendations of those who posted responses to my thread on the CorvairCenter forum, so it would be a few hours before a subsequent amount could be put on.
Since I was already dirty, I went ahead and disassembled the two carburetors I’d bought from the guy in Frostburg back in June. With liberal applications of my 50/50 penetrating concoction, I was able to get all the fasteners out except for the tiny ones that hold the throttle and choke plates on. They are too small for me to mess with. Each carb’s throttle shaft is seized, but I’m hoping that an overnight soak in carb cleaner will free them up. If not, more 50/50 will be used until they’re freed up. One of the carbs major pieces went into the can of cleaner before I called it a night.
This morning, I put some more JB Weld on, and it looks like a couple more sessions will be required.
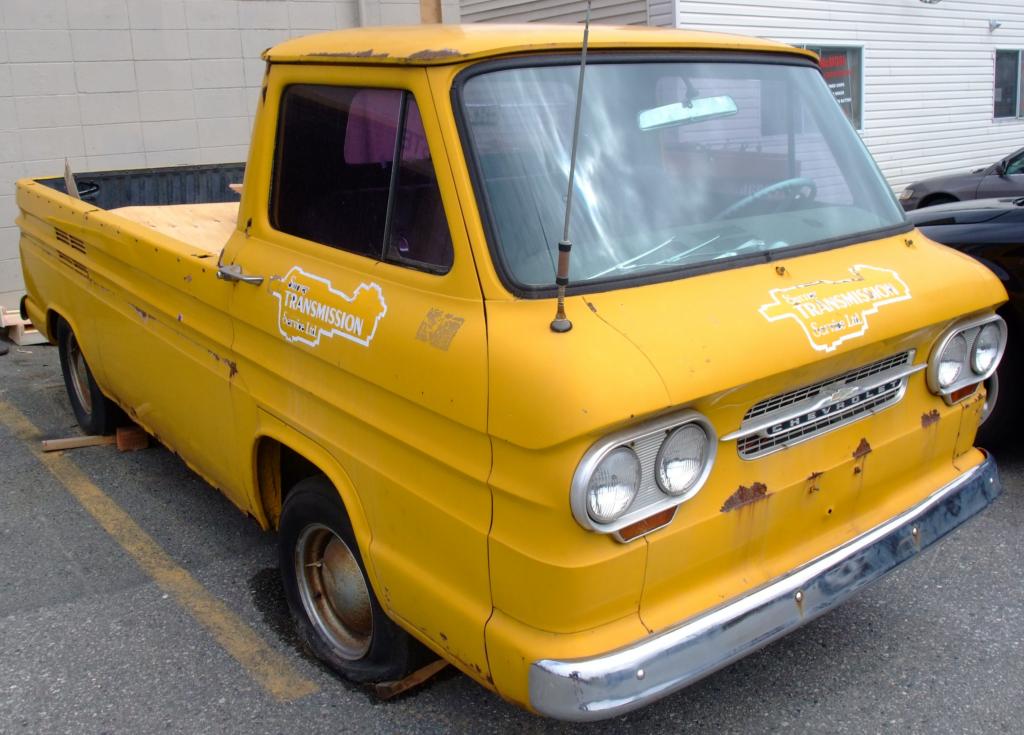
CPotD #179 (Tuck-and-Roll – Loadside Style)
It sounds like what you should do if you fall out of the back of a moving pickup. Tuck your head in and roll. In this case, it’s what some enterprising upholsterer did to the seat back of this Corvair Loadside. This yellow FC was photographed by Flickr user D70 in his Canadian neighborhood. Photos of the outside are in this Set.
Thursday, November 11, 2010
CPotD #178 (Two-tone is Too Awesome)
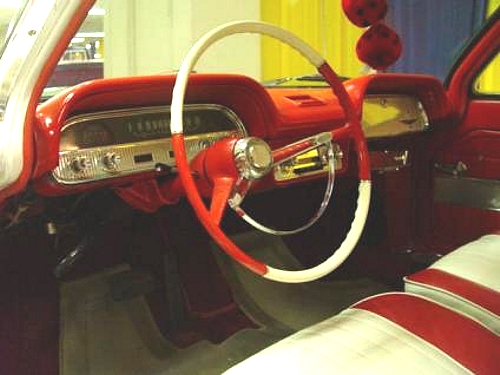
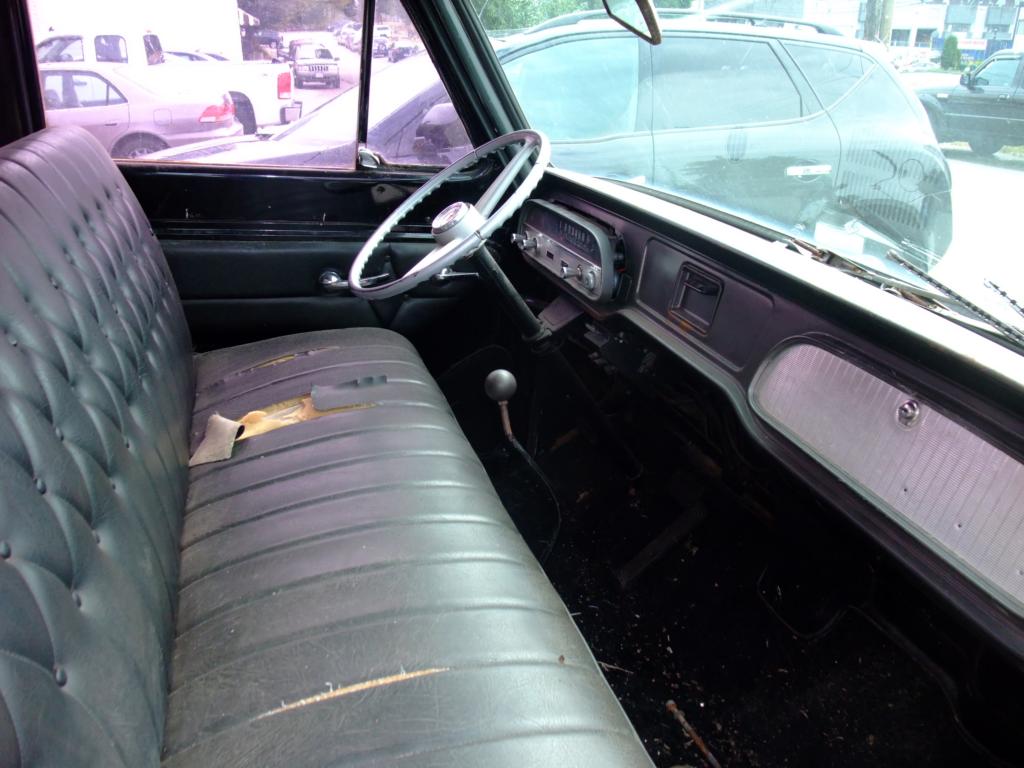
Ah, the fin-filled 50s. Two-tone, even tri-tone, was all the rage in this decade of chrome excess. Some of it extended into the 60s as illustrated by today’s CPotD. I found this series of photos on a site trying to sell a 1962 2-door. I’ve always been a huge fan of the two-tone steering wheel, but, sadly, I’ve never owned a Corvair with one.


A Couple Days of Catch-up
 I’ll start with Lucy. As I reported a couple days ago, the TEMP-PRESS light came on while I was cruising on I-70 to rescue Glinda. I thought it was a short in the wire since the light stayed on the next morning when the engine was fully cooled down and the oil level was well above ADD until I drove over some bumps in the road. Then, yesterday on my lunch hour, again while driving at 75 mph on the highway, the light came back on. It stayed on and I parked the car at my destination and went around back to check on the thermostat doors. The one on the left was partially open, while the right one (the side with the temp switch) was still fully closed. A half-hour or so later, I start the car back up and the light goes off a second later - just like normal - when the oil pressure comes up. I drove back to work at 65 and the light stayed off. I know the thermostat is supposed to fail open, so I’m still thinking it’s a short, but I may replace the right side thermostat anyway. I’ll be in that area checking out the wire to the switch.
Now on to Glinda. Evening before last I reassembled her original carburetors. My plan is to install one, verify proper operation, and then install the other. This way, if one still has issues, I’ll know which one.
After seeing the oil drops coming from behind her harmonic balancer during my leak sleuthing, I’d decided to install the new crank seal since it was the suspected culprit. Last evening I put her rear up on jackstands and lowered the engine until I had access to the harmonic balancer. The impact wrench removed the main bolt, but when I went to bolt on the hub puller, I discovered whomever had previously pulled the balancer off its original engine (finger pointing at me) broke a bolt off in one of the tapped holes. I remember now. I’d used two bolts in the balancer to pry the engine I’d bought last autumn. One of the bolts broke off, and now I was paying the price for my lameness. Out came the drill and after carefully centerpunching the sheared fastener, I was able to remove enough of it to get the puller bolt turned in. With the harmonic balancer off, the seal easily pried out of its bore. Before putting in the new, I decided I’d give the bolts that retain the rear engine housing a slight torquing. It was then I discovered the hole. When the harmonic balancer had broken last month, the pulley ring had spun up against the housing and ground a small hole through the housing wall. Since I had a spare sitting on the shelf, I immediately set about cleaning it up in preparation for swapping it onto Glinda’s engine. As I was scrubbing, it occurred to me that a hole like this could be patched using JB Weld - it's not structural, nor is it under high pressure. Sadly, I couldn’t find any amongst my supplies, so that repair will wait until this evening. Once completed, I’m highly confident the constant spraydown of the engine with oil will cease. I’ll like that.
Tuesday, November 9, 2010
CPotD #177 (A Perfect Blend)

Daniel’s got a beautiful LM that he’s made some modifications to improve the handling. In today’s CPotD (found on this CorvairCenter forum thread), it appears, at the least, he’s installed a rear swaybar. He’s probably also done some work to the engine to increase the horsepower. And those non-stock front bucket seats look like they provide all sorts of lateral support.
It’s these tasteful, yet effective, alterations that make for a wonderful blend of old and new. A car like this would be comfortable in around town or long-distance cruising while still providing quite the thrill on any track or autocross course.
Someday Betty will make me say these same things.
Bad Things Come in Threes
Yesterday afternoon I got the dreaded phone call from Victoria. “Daddy, the GEN/FAN light is on.” Okay, it could have been FAR worse than a thrown fanbelt, but it was still not a pleasant interruption to my work day. She’d immediately shut the car off and parked far off the interstate before calling the lovely Loriann to “bring them a ride” (there’s a story behind that phrase that I’ll someday share). Wanting to deal with the car in the daylight, I left work a little early yesterday. After getting home, changing clothes, and grabbing some tools, V and I hopped into Lucy and headed to her car. During the drive, as we were cruising down I-70, Lucy’s TEMP-PRESS light came on. I immediately turned off the engine and coasted off onto the shoulder. I hopped out and opened the engine lid expecting to smell burning oil or something equally nasty. Nothing. Everything looked, felt, and smelled normal. I let the car cool down for about five minutes and then checked the oil level – above the Add mark. Okay, must be a short in a wire somewhere. With the radio off and us listening for pinging, I cautiously drove the rest of the way to Glinda. We arrived uneventfully - TYL - and about five minutes later the new replacement belt was installed and we were both on our way home.
As I was installing the belt, I noticed there’s still way too much oil leaking out, so after dinner I went leak-hunting again. I finally found a small spray coming from between the harmonic balancer and the block. The drops would be blown against the back of the balancer and immediately shot up and into the engine compartment. I’m going to replace the crankshaft seal Wednesday evening (Girl Scout night).
Then I took a look at Lucy’s wiring to see if I could get the idiot light to go off. I tugged and pushed and then fired up the engine – light still on. I decided to call it a night at that point. This morning I started up the engine and the light stayed on. I drove about a half-mile and went down a street that’s notoriously bumpy and pot-hole ridden. Lo and behold, the light flickered a while and then went out and stayed out. We’ll see how long that lasts.
The third automotive issue is the Suburban is leaking coolant. What an annoyance!
Monday, November 8, 2010
More Glinda Missives
 The Hughes’ household had a VERY busy weekend, so little time was available to maintain the fleet. I was, however, able to spend yesterday evening in the garage working on Glinda. Victoria was delivering her older sister back to school, so I was on my own. That meant I had control of the music selection – always a good thing.
Victoria had reported Glinda was smoking some on Friday, and I figured it was one of two things (or maybe both) – fluids still burning off the surfaces we’d touched when working on the engine or roasted pieces of insulation being blown out of the heater box. After putting her up on jackstands, I removed the two tunnel covers before pulling off the long heater duct and cleaning out a few bits of insulation. With the heater stuff all back together, I went to work on the sealing project. I started by fashioning a patch from the plastic of water bottle and, using Silicone RTV, attached it to cover the rusted hole above the right-side fresh air inlet vents. I used duct tape to hold the patch against the sheetmetal while the RTV sets. Then, with new strips of caulk, I reinstalled the two vents followed by the door sills. More RTV went into as many of the seams as I could find, both under the dash and in the outside air plenum at the base of the windshield. That little project was completed when I reinstalled the front air grill and the wipers. Finally, I replaced the headlight switch since the one that was in the car would not turn on the gage lights. Unfortunately, the new switch doesn’t work perfectly either – it won’t turn on the dome light when you rotate the knob. I think it’s a ground issue, but it’s not a show-stopper. At that point, it was 10 and time to call it a weekend.
The last two parts that need reinstallation are the engine mount cover and the rear grill. Then I can make the hard choice between Ringo’s rust repair or Lucy’s.
CPotD #176 (Heavily Modified Motor for Monday)
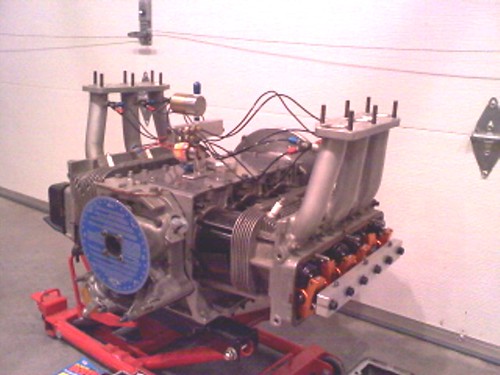
A guy posted a For Sale ad on the CorvairCenter forum the other day for a drag engine. I’m studying the photo, and I’m at a loss as to what portion is stock Corvair. Maybe none of it. Quite the investment with all those custom machined parts.
Thursday, November 4, 2010
CPotD #175 (Interiors Warrant Exposure)

It’s a shame there aren’t more nice photos of Corvair interiors on the web. I’ve been remiss in that the interior shots that have graced my CPotD postings could be counted on one hand. The last one coming nearly five months ago. Pretty sad.
Some would say, “You’ve seen one ’62 Monza interior, you’ve seen them all,” but there are subtle differences even within the same year that warrant some exposure. Starting today I’m going to try and give interior shots the respect they deserve over the next few months.
Other than yesterday’s muy feo custom, I’ve been on a blue kick, so I’ll stay with that. Today’s feature photo was included in the Corvair of the Month thread over on CorvairForum.com. If you click on this link, you’ll see that the outside of this 1961 Lakewood is as beautiful as the inside. I really hope that someday I’ll be able to give the lovely Loriann a Lakewood for her very own, just like the story behind this car and its current owner.
Long Overdue Roasty-Toastiness

 is better than
I spent a very satisfying evening in and around the garage last night. I worked on three cars, all with successful outcomes. First, I poured oil into Glinda’s engine and took her for her first spin around the neighborhood since I did the head gasket R&R – first time running the engine for that matter. When it fired up there was a noisy lifter, but since it was on the side opposite where I’d done the work, I wasn’t worried. Sure enough, by the time I got back from cruising the nearby streets, the engine was purring. It’s especially nice not to hear the puff-puff-puff that precipitated the latest teardown. I even ran her heater and, after bits of insulation blew out, it ran cleanly without that motor oil fragrance we’re so used to. I didn’t get to the leak-proofing project because stupid Napa screwed up my order for caulking strips. I went there on my lunch hour and while their computer indicated they had none in stock there, there were some at their local warehouse. The counter guy said they’d have my order available for pickup that afternoon. I left work early and drove a half-hour out of my way to make the pickup only to be told, “I’m sorry, it’s back-ordered. It’ll be here tomorrow morning.” Oh well, I should’ve called. It’s there now, and the lovely Loriann we’ll pick it up for me while she’s out running errands this afternoon.
Back to last night. With Glinda out of the garage, I pulled the Suburban up to the open door to install the new heater core and properly set the timing that’s been out since I replaced the intake manifold gaskets months ago. Since this blog is about Corvair maintenance: no leaks, plenty of heat, and better engine response sum up this segment of the evening.
At that point it was only 9 PM, so I decided to continue. When I went in the house to get Lucy’s keys, the lovely Loriann teasingly told me, “You’re not allowed to complete projects on three cars in one evening.” Ignoring her ribbing, I backed Lucy up onto the ramps, pulled a pair of shrouds off the shelf (with mounting hardware still smartly bagged and tie-wrapped to each piece), and less than forty-five minutes later, Lucy was parked back on the street. Glinda then went into the garage so she’d stay dry during today’s rain.
This morning’s commute was much more tolerable since I didn’t have to peer through my own steaming breath to see the road. Also, given the wet conditions, it was especially nice to have the functioning defroster clearing the windshield. No more wipe marks from the rag that was used to constantly clear the condensation.
Wednesday, November 3, 2010
CPotD #174 (Custom Muy Feo)

This custom ’60 from Cuba could be the basis for a great game: What’s Not Stock?
Here’s my list.
Here’s my list.
- It’s not a uni-body anymore sitting on a framed chassis.
- Looks like it’s running a front engine.
- Wheels
- Running boards
- Bumpers
- Front grill
- Panel behind grill
- Hood
- Side marker lights
- Rear spoiler
- Front seats
- Flames
Did I miss anything? Feel free to leave me a comment.
Off The Stands
With morning temps in the thirties, it’s a chilly ride without a heater so part of last night was spent making sure Glinda’s occupants won’t go numb. First, I installed the new heater hoses, and then, with great optimism, I bolted on the bottom shrouds. I’m being optimistic that we’ve gotten all, or at least most, of the oil leaks because if oil drips on the inside of those shrouds, the hot air will carry the wonderful fragrance inside the car and into clothes and carpet. The daugthers love to complain, "We always smell like old car.”
With the heater components on, I proceeded to install the exhaust system. My tranny jack supported the muffler while I attached the “logs” to the heads. The muffler hanger went on and that task was checked off. The rest of the engine components went on in the following order: fan with pulley wheel, top cover, oil cooler cover, alternator, vacuum balance tube, distributor cap and wires, fuel pump with supply lines, PCV hoses, choke rods, carburetors, throttle linkage, fanbelt, and air cleaner. The rear wheels went on and the car was lowered off the jackstands. Finally, the negative battery cable was connected to the battery. I decided to remove the fanbelt guards since they just make it more difficult to replace the belt and I really haven’t had a problem with belts coming off.
I didn’t have any motor oil to top off with, so startup will have to wait until this evening.
I went to Napa on my lunch hour to get the recommended strip caulk to re-seal Glinda’s fresh air doors. Sadly, they had none in stock, but will get my order in by closing time, so there will be a slight detour on my evening commute. While out and about at lunch I bought some Rotella 30 weight oil for the fleet. I really should’ve bought more than a gallon, but hey, I’m an optimist.
With the heater components on, I proceeded to install the exhaust
system. My tranny jack supported the muffler while I attached the “logs” to the heads. The muffler hanger went on and that task was checked off. The rest of the engine components went on in the following order: fan with pulley wheel, top cover, oil cooler cover, alternator, vacuum balance tube, distributor cap and wires, fuel pump with supply lines, PCV hoses, choke rods, carburetors, throttle linkage, fanbelt, and air cleaner. The rear wheels went on and the car was lowered off the jackstands. Finally, the negative battery cable was connected to the battery. I decided to remove the fanbelt guards since they just make it more difficult to replace the belt and I really haven’t had a problem with belts coming off.I didn’t have any motor oil to top off with, so startup will have to wait until this evening.
I went to Napa on my lunch hour to get the recommended strip caulk to re-seal Glinda’s fresh air doors. Sadly, they had none in stock, but will get my order in by closing time, so there will be a slight detour on my evening commute. While out and about at lunch I bought some Rotella 30 weight oil for the fleet. I really should’ve bought more than a gallon, but hey, I’m an optimist.
Tuesday, November 2, 2010
CPotD #173 (Keeping Four on the Floor)

In living with and being around teenagers, I’ve many opportunities to say, “Four on the floor.” What I’m talking about is keeping all four legs of a chair on the ground - no tipping allowed.
The right front of Bob Petlow’s Yenko is pulling some serious air in today’s CPotD. With what must be a sizable front swaybar, he’s unable to keep four on the floor during this autocross turn.
The right front of Bob Petlow’s Yenko is pulling some serious air in today’s CPotD. With what must be a sizable front swaybar, he’s unable to keep four on the floor during this autocross turn.
Monday, November 1, 2010
So Close
I was hoping to have Glinda back on the road, but it wasn’t to be. I spent a significant portion of Saturday working on house projects, so garage time needed to wait. Yesterday afternoon, I put most of her engine back together and got it reinstalled in its proper location. Next I tackled removing a stubborn hose clamp that held one end of the 4” heater hoses to the air box. It was a tough task with stuff in the way, a long arm reach, two hands required, etc. - all the elements that make for a frustrating job. Thirty minutes later (seemed more like an hour), I had the clamp off. At that point, other priorities pulled me away from finishing.
CPotD #173 (Another Engine in Blue)

This time it's actually a Corvair engine. I really like the looks of extending the body color to the engine cover on this Motor Monday CPotD. Sometimes it doesn’t look right to me, but this light metallic blue is spot-on. Speaking of spots, I'm amazed by how clean this engine is. I could only dream about this level of grease-free-ness.
Friday, October 29, 2010
Brakin’ and Chasin’ and Polishin’ Too
Yesterday I had to slam on the brakes to prevent Lucy from running into a cube van driven by an oblivious moron who, driving 20 mph slower than the flow on I-195, decided to make a hard right into my lane directly in front of me. While the brakes whoa’d us down swiftly enough to prevent contact, the front ones shuttered and emitted a very nasty screeching sound. Must be time for a brake job.
So last night I put her front end up on jackstands and pulled the right front wheel and brake hub. Sure enough, the liners had worn down to the rivets. Fortunately, there were no grooves in the hub, just a circumferential scratch. Also fortunately, I had a new set of shoes on the shelf. Less than an hour later both fronts had been renewed and she was off the stands.
Since I was already dirty, I decided to do some Glinda tasks. I started by mounting my cone-shaped polishing head on my die-grinder and smoothing combustion chamber surfaces on the pulled head. Below are the typical results (click for hi-res). I still want to go back and grind some of the tiny bumps and imperfections. Also pictured is the cause of all this work – the burnt #6 head gasket (click for hi-res).
Bored with buffing, I dug out my tap-and-die set and chased the 3/8-24UNF threads on the top set of studs and nuts. These are the ones that sit out and typically get pretty rusty. When I was through each nut easily spun on and off of each stud. One less thing to fuss with during reassembly. Which, by the way, I hope goes on tomorrow. I’m still waiting on the new head gaskets, but if need be, I can bum a set off local Corvair guru Gary.
So last night I put her front end up on jackstands and pulled the right front wheel and brake hub. Sure enough, the liners had worn down to the rivets. Fortunately, there were no grooves in the hub, just a circumferential scratch. Also fortunately, I had a new set of shoes on the shelf. Less than an hour later both fronts had been renewed and she was off the stands.
Since I was already dirty, I decided to do some Glinda tasks. I started by mounting my cone-shaped polishing head on my die-grinder and smoothing combustion chamber surfaces on the pulled head. Below are the typical results (click for hi-res). I still want to go back and grind some of the tiny bumps and imperfections. Also pictured is the cause of all this work – the burnt #6 head gasket (click for hi-res).


Bored with buffing, I dug out my tap-and-die set and chased the 3/8-24UNF threads on the top set of studs and nuts. These are the ones that sit out and typically get pretty rusty. When I was through each nut easily spun on and off of each stud. One less thing to fuss with during reassembly. Which, by the way, I hope goes on tomorrow. I’m still waiting on the new head gaskets, but if need be, I can bum a set off local Corvair guru Gary.
CPotD #172 (Blue on Blue Rampside)
It’s been a while since I featured a Rampside as a CPotD, so I went looking for a blue one for today. Google hooked me up with a nice one that was on BringaTrailer.com last year. Five grand would get you a rust-free, VERY stock appearing, California specimen. It’s fun reading the comments that were left under this listing. My favorite is, “The Corvair was one of GM’s most misunderstood cars.” How true!
Subscribe to:
Posts (Atom)