My two daughters that still own Corvairs joined me in the driveway Saturday to work on their respective convertibles. About 3 PM, the nice-and-sunny turned into windy-and-more-windy - a cold front swept into our driveway and almost swept away the portable garage and Scarlett’s tarp. In the midst of the gale, the girls soldiered on with their tasks.
Mikhaila was removing broken bits from Scarlett’s left front and cataloguing all the pieces we’ll need to replace. When she finished that, she undid the two bolts holding the trunk-lid latch in place and the turnk was open. She emptied it out and we then worked together to try and push some of the mashed metal back out. I’m not thinking I’ll get away with not replacing large sections of sheetmetal, but I do want to make it easier to cut out the bad and make patches and only with the body in some semblance of straight can that happen. We used the tire jack and an assortment of blocks of wood to push on the front panel. It worked somewhat, but we’ve got a ways to go. After she’d turned into a Popsicle, I released her to go inside and thaw out.
Victoria’s goal was to get Luna running again. She started by installing a pair of recently rebuilt ’68 vintage carburetors including reinstalling the linkage pieces and hooking up the fuel lines. Next, she dropped in and hooked up the battery. Finally, before turning the key, she injected fuel into each carb’s bowl using a syringe. Sadly, when she turned the key, we discovered the battery had gone dead. This is the one that was in Glinda and had gone bad, but I’d recharged it and it seemed to be holding the charge. I was wrong. The plan now is to pull the battery out of Glinda and use it to get Luna running and into the garage.

Showing posts with label Carburetor. Show all posts
Showing posts with label Carburetor. Show all posts
Monday, November 21, 2016
Friday, October 21, 2016
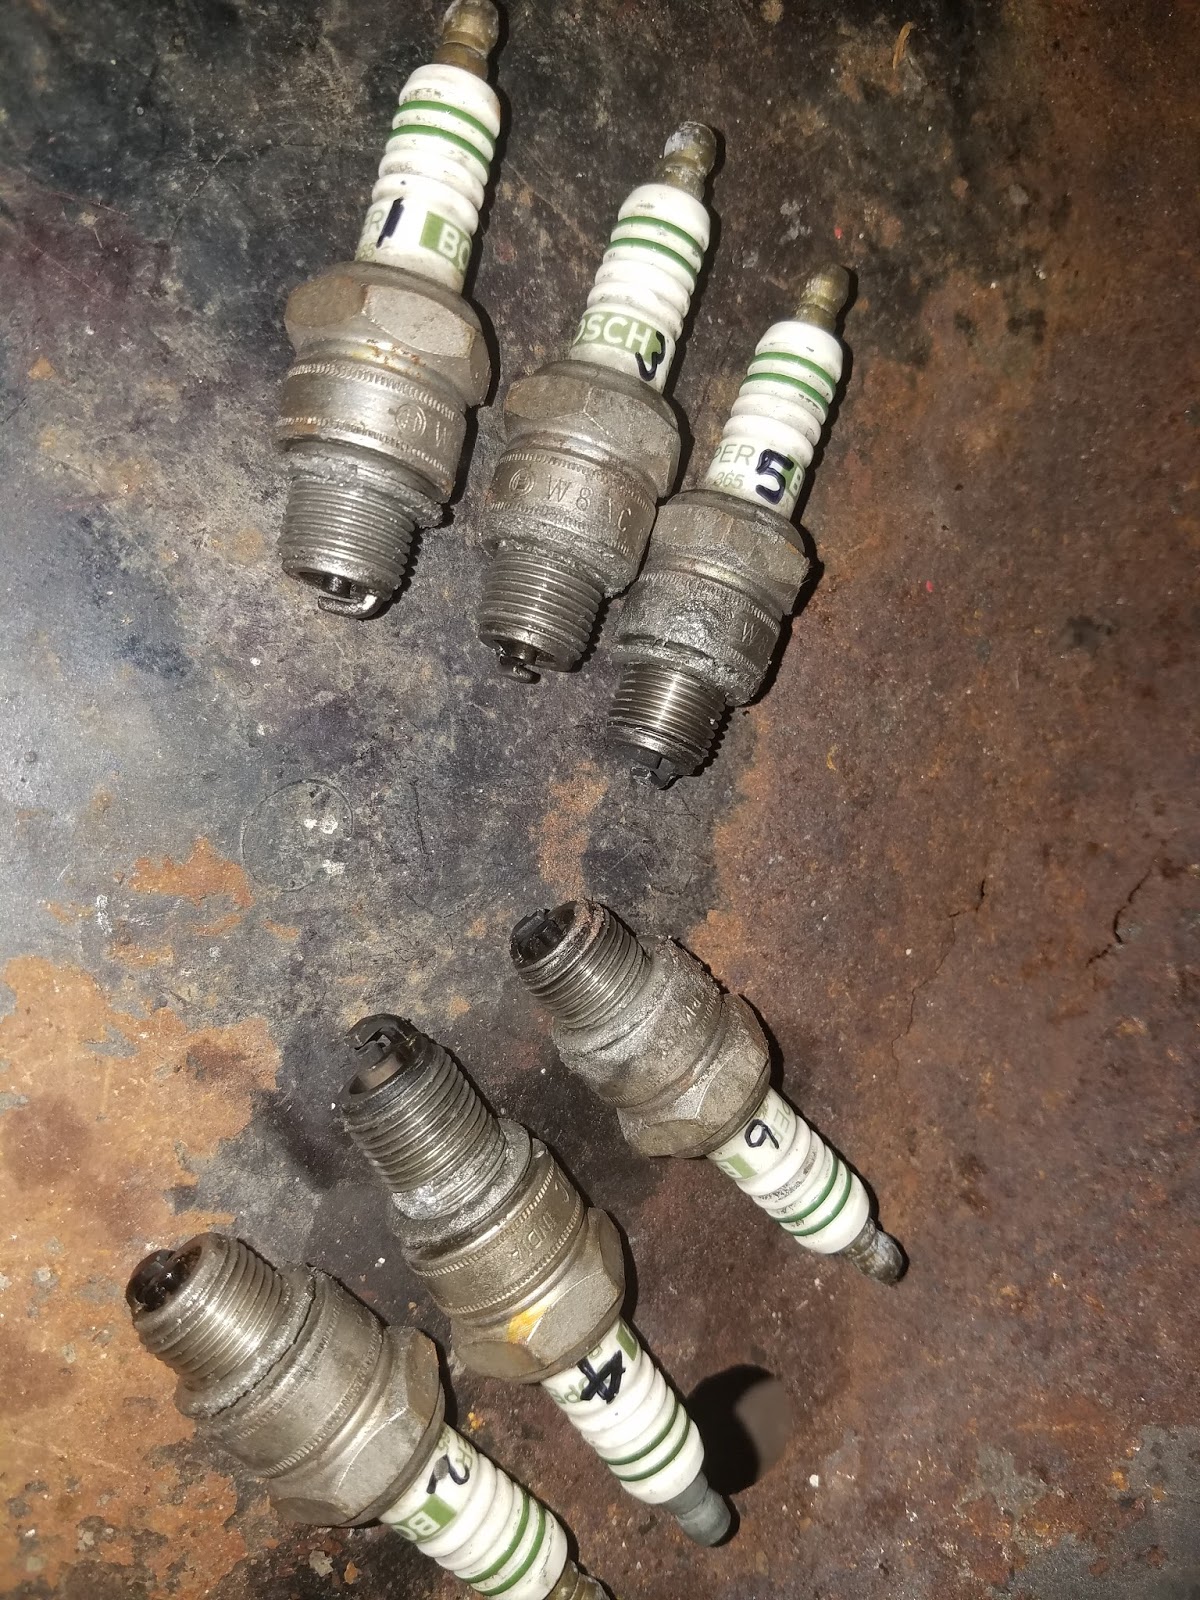
A Quick Trip to the Pick-a-Part

Yesterday evening I spent about forty-five minutes in the garage between getting home from work and dinner. Since Glinda is now running on the two racing carbs, I wanted the spark plugs to be clean so I can best determine if the fuel mixture is not too lean or too rich. I pulled all six of plugs and wire brushed them back to silver goodness. The photos below show their condition as they came out of the engine. Plugs 2,4, and 6 are on the side that had the race carb on it for a couple weeks now and they look a little sooty (rich), while the 1, 3, and 5 plugs were on a stock carb and they look like the mixture was pretty close to right on. I’ll drive her a bit and recheck the plugs. I may go to a slightly smaller jet from the #53 that’s in both carbs. With a little time left before dinner, I yanked off the stock throttle linkage assembly and starter the reinsallt of the fancy after-market setup. I didn't complete the project, but it's nearly done.


At lunch today I popped over to Crazy Ray’s to see what was available. I’ve been toying with relocating Glinda’s battery out of the engine bay, so I was looking for a BMW so I could harvest their battery cable. BMW typically puts their battery in the trunk and uses a long, thick cable to get the juice to the fuse panel. Within the first couple minutes of entering the yard, I came upon a 3-series. About a half-hour later I had a cable in my now-filthy hands. My Leatherman’s knock-off did a great job freeing the cable from its German home. I came back to my desk at work and promptly ordered a battery box off Amazon. Now it’s just the effort of the install and I can cross another item off the To-Do list.
Thursday, October 20, 2016
Nothing to See Here

Victoria has committed to spending at least four hours a week working on her convertible during the Fall and Winter, so the first step was dealing with Luna’s home. Wednesday evening she and I spent an hour or so putting a new cover on the portable garage. It was nice to rip the nasty, worn out one off and expose Luna in all her ignored glory. She’s in need of a good cleaning since the resident cats like to nap on her. The plan is to get her running first so we can drive her between the portable and permanent garages allowing us to do the work in heated comfort but not tying up the heated area when she’s not available. In order to make that happen, I first need to end the carburetor adventure I’ve been on.
That started last night when I successfully got the second modified carb functioning properly on Glinda’s engine, but not without some shenanigans. To catch up: a few weeks back I used the newly modified bases (relocated jets) and tops (vents tubes added) and put together two racing carburetors with GUPs and new gaskets. I bolted them on to Glinda and the left carb flooded – stuck float. I pulled the top, checked the float (it was fine) and needle-and-set (also fine), put it all back together, and re-started the engine. This time there was no flooding, but the left side of the engine was not working right. I swapped back on the previous carb and set the racing carb to the side. Fast forward to last night when I tore down the misbehaving racing carb and blew out all the passages before putting everything back together with new gaskets and installed it onto Glinda’s engine. This time the engine fired up without any gas geysers. I blipped the throttle a few times while looking down the throat of the left carb to see if there was a squirt from the accelerator pump, but there didn't appear to be any. I shut off the engine and tried to blip the throttle again only further this time, but the throttle wouldn’t go past halfway. Irr. I investigated and discovered the linkage rod was hanging up on the tip of the tab that rides on the fast idle cam (see the surfaces indicated by the purple arrows in the above photo; the upper surface is the tab while the lower one is the surface the throttle rod sits against). Off came the carb so I could bend the tab back into place. Once I was convinced it was out of the way, I reinstalled the carb and made sure I could get full throttle travel. I also verified that the accelerator pump was squirting as it should. With those two hurdles crossed, I re-started the engine and happily felt that the engine was finally behaving properly. This was confirmed by both chokes opening simultaneously. I shut off the engine and hooked up the clear tubing to each carb’s vacuum port. With the engine running again, it only took a couple turns of the left carb’s idle speed screw to stop the bubbles from moving in the tube.
By that point, bedtime was fast approaching so I put away the tools, reinstalled the air cleaner, and called it a day.
Tuesday, October 18, 2016
Carburetor Issues Again

Friday evening Mikhaila drove back home from visiting friends and I got the following text,” I'm almost home. Scarlet is driving weird also so I don't want to be broken down. “ Since we had a 10 AM appointment at Gary’s, I was up early the next morning to see what’s what. I climbed behind the wheel, started Scarlett’s engine, and took her for a quick spin around the neighborhood. While she seemed to idle okay, she was definitely sluggish under acceleration. I felt, however, we could still get her to and from Gary’s, so Mikhaila climbed in and we headed out. We did not even get to the corner before we noticed further power reduction and significant pinging. We limped her back to a parking spot in front of the house and took Glinda to Gary’s instead.
Gary came through on all fronts – door lock retainers AND gaskets, the blower bearing greasing tool, and a bare convertible door to take sideview mirror measurements off of. Once we got back home, we immediately went to work on the car. First, we started Scarlett’s engine and, by pulling spark plug leads, determined the right side of the engine was not functioning. So, I grabbed the proven ’68 carb, swapped it for the bad one, and restarted the engine. It fired right up and idled and revved nicely once the new carb had filled with fuel. I didn’t take the time to balance it since we had other tasks I wanted to get to before running out of time.
We then disconnected the linkage so we could mount the blower bearing greasing tool. I pumped grease into the tool's Zerk fitting, but wasn't sure any was making it into the bearing. After removing the tool, I noticed a gob of grease on top of the shaft, but none around the seal. I tried the process again, but the result was the same. Irr. Giving up, we put everything back together and started the engine. The howl wasn't gone, but it did seem somewhat quieter as we backed the car down the driveway for a successful test-drive.
Since the lovely Loriann returned and parked the awesome Challenger in the driveway, we parked Scarlett at the curb and moved onto the next items on the to-do list. While Mikhaila swapped courtesy light bulbs, I installed the two door locks. The trick was getting the finger of the mechanism into the slot in the latch. Pushing the retainers in place took some tapping on the end of a flathead screwdriver, but they eventually were seated.
Finally, we carefully measured and marked and re-measured the location of the two screws for the side-view mirror retaining plate before drilling the two holes. The plate was installed followed by the barely GUP gasket and attaching the mirror with its Phillips screw finished the job. At that point, it was time to quit for the day.
Monday, Mikhaila took her car out for a drive and came back informing me it wasn’t idling nicely. I believe she used the terms “rumbling” and “rough.” She and I then headed to the curb with a flathead screwdriver, dwellmeter (with tachometer), and the length of clear plastic tubing. The engine was already warmed-up, so I unhooked the throttle linkage to the left carburetor thus isolating the two carbs from each other. Then I hooked both ends of the tubing to the vacuum ports of the carbs and had Mikhaila fire up the engine. Watching the small amount of fluid in the tube, I adjusted the idle speed screws until it the fluid didn’t move. Then I spun the left side linkage until it just lined up with its hole in the carb and secured it into place. Blipping the throttle didn’t cause the fluid to move, so I considered the carbs synchronized. With the engine off, I put the proper vacuum hoses back into place and hooked up the dwellmeter. Mikhaila restarted the engine and put it into Drive, so I could fine-tune the idle speed and mixture. I slowly turned the idle mixture screws in and out until I’d maximized the rpms. Then, I turned each idle speed screw out in equal increments until the engine was turning at a smooth 550 rpm. A spin around the block showed all was operating satisfactorily.
Then, yesterday, she shared with me that things were still not right with the sluggish acceleration. I confirmed the symptoms this morning before I left for work. The car seems to have decent power everywhere other than acceleration from stop. I checked the ATF level and it’s right on. I also pulled plug leads and both sides seem to respond, so I’m thinking there’s still something amiss with the right carb. My plan is to pull the non-modified carb off Glinda and swap it onto Scarlett. Then I’ll deal with carbs on Glinda instead of Scarlett.
Thursday, October 13, 2016
A Short Shift in the Garage

I scored a little garage time last night, so what did I do? I worked on the truck (aka Tow Vehicle). I purchased a replacement power door lock switch for the driver’s door months ago, but never got around to installing it – until last night. I pulled the door panel off after removing the three screws behind the two pop-off panels, disconnected the plug from the switch, popped out the frame from the panel (with switch), and took it to the work bench where I pried the switch out of said frame. I pulled out the replacement and noticed right away it wasn’t going to be a direct drop-in. Irrr. The toggling parts didn’t match, nor did the switch bodies. The toggles just popped off and I swapped new for old, while the frame was hacked down to accept the new, larger switch. I needed to replace the now-missing retention feature of the frame, so I applied some RTV and crossed my fingers. I plugged the switch back into the cable and tested the buttons and they worked. The reassembly was a breeze and I was on to working on a Corvair.
Since Scarlett (and Mikhaila) were off somewhere, I worked on Glinda, and, of course, the task I chose wasn’t even on the To-Do list. I decided to swap off the stock front wheels for the Camaro wheels so the wheels now all match. In doing so, I also put on the replacement center cap (replacing the one that went lost sometime while Mikhaila was using the car). I now need to buy the CHEVROLET insert (another $10 to Amazon). With Glinda now properly shod, I put together the last of the carburetors. This one is the second of ’68 vintage and is earmarked for Luna since I stole Luna’s ’66 bases to be modified. With that done, I called it a night.

Thursday, September 29, 2016
So Close
Last weekend was a busy one, but Mikhaila and I did spend some quality time in the garage. Friday evening I pulled the right-side carburetor off Glinda and installed on the right side of Scarlett’s engine. I also removed the front bucket seats and laid down two coats of shiny black Rustoleum on Glinda’s floor.
The next morning, Mikhaila and I started up Scarlett’s engine and, finally, the right side was getting hot (meaning it was working), so the choke on that carb opened at roughly the same rate as the left side. This proved that the carb that has twice shown some sort of vacuum leak still leaks.
Now I needed to get a functioning carburetor to fill the now empty spot on Glinda’s engine. I recently received the modified carb bases in the mail, so using them to make whole carbs was the next project. I’d put all the pulled parts from the pre-modified bases in a container and I was actually able to locate said container and put the carbs back together. Part of that effort was to drill out one of the tiny brass screws that holds the throttle plate to its shaft. That went better than expected thanks to my drill press, a sharp bit, and the softness of the screw. Also part of the reassembly was installing the o-rings, washers, and springs that serve to seal the joint between a worn throttle shaft and the holes in the base. With both carbs complete, I installed the closest one to hand in Glinda and fired up her engine. Within a few seconds fuel was gushing out the vent holes on the top of the carb – stuck needle-and-seat. I yanked the coil lead from the distributor cap killing the engine and stopping the geyser show. Before pulling the top off the carb to fix the issues, I did a quick blip of the throttle to see if the old accelerator pump was working – it wasn’t. With the top off, I cut off the old pump cup and popped a new one in its place. I also, blew through the inlet of the carb with the float in the up position to verify it would close, and then, right before reinstalling the top, I checked the float and all looked good. With everything back together, I fired up the engine hoping all was good – it was not. The new carb was still misbehaving, so off went the engine and I had another choice to make – put on the other modified carb, or put together one of Glinda’s original-style carbs (earmarked for Luna) and install it. I opted for the latter and fifteen or so minutes later, Glinda was running smoothly again.
The next day I had some time before Mikhaila got off work, so I swapped on the second modified carb and, lo-and-behold, it worked fine. So, for those keeping score, it’s one modified ‘66 carb and one stock (LM, but not original) carb working on Glinda; one recently rebuilt LM carb and one stock (also LM) on Scarlett; a non-functioning stock and a non-functioning, a recently rebuilt ’68 carb, and an unassembled ’68 carb all sitting on the workbench. The last two Glinda activities of the weekend were squirting beads of high-quality caulk into all the joints around the new floor patches and then bolting in the front bucket seats.
Once Mikhaila was home from work, we headed out to the garage to work on installing Scarlett’s rear window. We carefully removed the staples holding the trim strip to the rear bow allowing us to remove that, but before we did, we used masking tape to mark exactly where the strip went on the top. With the strip out of the way, we removed the staples at the same bow holding the top in place. With those gone, we peeled back the top allowing us to move on to the next step – installing the rear window piece. In addition to its top edge being stapled to the bow, its bottom edge is stapled to the three trim sticks and that’s what we tackled next. Using marks that were already on the vinyl, we located and stapled the window to only the center, long trim stick and then, using only three bolts, installed said trim stick. After checking that the window was even on the bow, we pulled out the stick and stapled to the two, shorter, side sticks and then, using just enough bolts, we installed the sticks to the car. We then pulled the bow back as far as we dared and put in a few staples. The next check was pulling the top back over the bow and seeing if everything lined up – it appeared to be right on. With confidence we went ahead and completed stapling the window to the bow. At that point, it was dinner time and we called it a day.
So, we are so close to getting Scarlett on the road – just need to remove the trim sticks, staple the top’s bottom edge to the sticks using the existing holes as guides, reinstall the sticks, re-staple the top to the bow, and install the new leading edge weatherstrip. Okay, maybe not so close.
Wednesday, September 21, 2016
Second Seat In

This time I decided to actually follow directions when setting the locations for the two clevises (or is that clevii?). After putting Glinda up on the ramps, I slid under the rear and disassembled both clutch linkage pivots. I tugged on the cable with roughly 15 pounds of muscle and spun the first clevis down the thread until the pin lined up with the hole in the fork (z-bar). All this with the fork set as close to 7/8ths of an inch from the cross-member as I could measure. With the fork engaged with the clevis, I then pulled all the slack out of clutch and spun the second clevis until the pin lined up with the corresponding hole in the other end of the z-bar. The final instruction was to, “Back off (3) Adjusting Rod three turns and assemble to lever with (2) Clip.” When something’s underlined, I tend to think it’s important. Well, I backed it off three from being inline and now the clutch grabs as soon as it’s off the floor. I think three should be two. Since the rear was up on the ramps, I
Having given the primer some time to dry, I decided I could install seatbelts and the front passenger seat. The seat bolted right in, so now I've got the ability to transport a passenger.
Before calling it a night, I started Scarlett’s engine to see if my vacuum blocking had fixed the right side’s cool running. The engine fired right up and there’s now a significant amount of vacuum at the right carb’s air horn and no hissing when I put my hand on top. However, the choke still didn’t move much from cold, but I can attest to the exhaust manifold putting out the heat. Not sure what the deal is – maybe the thermostat is bad. I’m thinking of investing in a new tool – an infrared gun to compare right and left sides. Also, thinking I’ll swap right with left carbs to see if the problem stays with the side or follows the carb.
Monday, September 19, 2016
Oily Mess

It was a very busy weekend car-wise. It all started Friday evening with the hitching and re-hitching of Ringo to the truck. After gathering all the parts that were going with Ringo to his new home as well as the parts destined for the Corvair Ranch, I loaded them all in the bed of the truck. Next, I hitched Ringo to the truck, and as I was finishing Ariel drove up. As she rolled down her window, I could see the disappointment on her face - she’d hoped to drive her car one last time. I quickly offered to unhitch him, but she insisted it was okay. As she drove away and I went to the garage to close up for the night I couldn’t get her disappointment out of my head. So, I decided it was early enough that I had time to give her that one last drive. I called her and told her that I was on my way over with her car, so be ready to take him on your last ride together. I went back to the curb and undid the towbar from Ringo’s front bumper and the chain and wiring for the lights from the back of the truck. Knowing it would just be a short drive on neighborhood streets, I didn’t bother climbing under the car to disconnect the chain from the crossmember, but, instead, put the loose end with a good bit of length in the trunk and closed the lid to the first catch making sure nothing was dragging. After driving over a speed bump, I started to hear the chain dragging. Using my cellphone as a flashlight I found the chain hook dragging under the crossmember, so pulled it out and added that end to the end already in the trunk and continued to Ariel’s. After she and her fiancé, Jeff, drove off, I sat down on their front stoop and reached into my pocket for my cellphone, but it wasn’t there. Must’ve fallen out in Ringo – no worries. When they returned a few minutes later, I climbed behind the wheel and drove home where I grabbed a flashlight to find the phone, but it wasn’t there either. Okay, maybe it fell out when I climbed out of the car at Ariel’s. Using Brianna’s phone I called Ariel and she did a quick search but found nothing. Not good. It then occurred to me I didn’t remember having the phone with me after I used it to deal with the loose chain, so I wandered out to the spot where I’d used it as flashlight. I fully expected to find a smashed phone lying on the pavement, but saw nothing there or along the first few blocks of the drive after that corner. Big time not good. Fuming at my stupidity, I re-hitched Ringo to the truck and called it a night.

As I mentioned in a recent post, I needed to get Glinda back on the road, so putting in the floor was next on my agenda. I measured out and cut a large patch from an old LM hood and tacked it into place along the edge and with some plug welds where the u-beam ran under the floor patch. A smaller patch covering the forward part of the missing floor was cut and welded in as well. With the floor whole again, I coated all the added metal with primer and left the windows down so the primer could dry. Dinner time was fast approaching at that point, so I put the welder and the rest of the tools and supplies away for the day.


The final (I thought) fleet activity for the day was bolting in Glinda’s driver’s seat so I could put her back into daily-drivership. That went easily enough, but when I fired up the engine I noticed the oil gauge stayed on zero. Since the idiot light was not illuminated, I knew the issue was with the switch not the engine, so I backed the car out to the street. After helping my future son-in-law change the oil in his car, I went back to the street to put Glinda up on the ramps to adjust the clutch. As I approached the car, I noticed a shiny puddle under Glinda. I stuck my finger in it and the cause of the non-functioning gauge became apparent – a break in the nylon tube. For once I was actually prepared for such a failure. I opened the tool bag I pack for my trips to the track, dug out the small plastic bag with the pipe plug. With plug and wrenches in hand, I removed the fitting at the engine and filled it to keep any more oil excaping from the engine. Then, instead of backing onto the ramps to access the clutch linkage, I pulled forward onto them so I could remove the tunnel cover and clean up the oily mess I was sure the tunnel’s inside surface was coated with. A bunch of screws later the pan was loose and leaning against the fence where I coated it with Purple Power and brushed and rinsed the oil away. Thinking it was one of the splices on the clutch cable that had caused the tube to fail, I also removed the inside cover so both splices were exposed. Neither of them appeared to be rubbing on anything critical, but the upper splice was catching on a zip tie causing the catch near the end of the pedal travel. I cut it off and put on a new just out of reach of the moving splice. I also wrapped both splices completely with vinyl tape before putting the covers back on. I decided I’ll buy a whole new length of tubing with the fittings since I also needed to deal with the leak at the back of the gauge. Then I drove off the ramps, moved the ramps to rear of the car, and backed up onto them so I could move the clutch clevis a few turns out. Back down off the ramps and it was time to put away all the tools.
Tuesday, August 30, 2016
The Inevitable Rust Repair Commences

The last opportunity to go time trialing is quickly coming up. The NECC moved its end-of-summer event to the twenty-fifth of September. While I’m not sure how I’ll swing it financially, I need to get the car track-ready or it’s all a moot point. What are the track-ready tasks? Put in the bucket seats, adjust the clutch linkage, and get modified carburetors (jets relocated to prevent cutout on long turns) are the two major ones. I can probably get away with just that. Other nice things would be to get the trunk welded and relocate the battery, but I don’t see that happening with the short time I have left coupled with the house and car projects that are currently on my plate.
To start the ball rolling, I spent some time in the driveway with Glinda this weekend. Friday evening I pulled out the front bench seat and the front section of carpeting. Doing this necessitated removing the gas pedal. With the carpet gone, a rusty mess was exposed. After I went after all the loose stuff with a wire wheel, I could see fully what work I had ahead of me. Not too bad. For the most parts isolated to the front passenger footwell area.
With a cutoff disc on the grinder, I removed the rotted steel being careful not to cut through any fuel lines (been there once, don’t want to go back again) or into the channels under the floor that weren’t rusty (GM spent the money to have them galvanized). Next, I put the flapper wheel on the grinder and cleaned up all the edges where the patches will go as well as surfaces of the channel where I’ll be plug-welding the patches. The plan is to butt-weld the patches at the perimeters which requires the patch to perfectly follow the contour of each opening. That’s the next part of the job – making patterns from paper, transferring the outline to sheetmetal, and cutting out the patches. That’s for another day.

Thursday, August 18, 2016
Too Tight?

Mikhaila and I had a few goals to attain last night, and we got to most of them. First, we wanted to return Ringo’s borrowed parts. While Mikhaila removed Ringo’s carbs, fuel lines, and throttle linkage, I finished rebuilding two carburetors I’d started on months ago. We bolted them onto Scarlett along with GUP fuel lines and linkage. We started the engine and I adjusted the idle speed screw. I was so intent upon the two screws, I missed that right carb’s fuel fitting was not tight enough and gas was spraying all over the front of the engine compartment. I immediately pulled the coil lead from the distributor cap. We wiped up the gas and tightened the fitting before moving on to Ringo. I found a fuel pump that did not have the word BAD marked on it, and we installed it into its hole in Ringo’s engine. Fuel lines went in next while Mikhaila bolted the carbs in place. We retrieved the batter from Scarlett’s engine compartment , dropped it into place, and attached the leads. A push of the “start” button and Ringo fired right up. I kept waiting for the engine to stall due to a bad pump, but, instead, I was rewarded with some spewing fuel from another loose fitting. Actually a good sign since it indicated the pump was still good.
Monday, January 4, 2016
Two Steps Forward; Blah, Blah, Blah

Yeah, I like making strides forward, but I abhor going backwards. That, however, is how the last couple days have been.

On to Ringo’s and his frustratives (see sidebar).
About a week ago, I went out to the driveway to tackle two issues. First, the maddening driver’s door. It took a few minutes to remove the fresh air grill and carpet from the left front footwell exposing the door-hinge bolt heads. I loosened all six of them, but not so much as to let the door move. A rubber mallet provided the impetus to adjust the door in its opening. I was trying to bump the lower hinge slightly forward, but all I accomplished was knocking loose some rust from the bottom rear corner of the door. With each hinge bolts a turn looser I was able to get the door moved where I wanted it. I screwed the latch plate back into place and now the door closes without slamming. We’ll see how long that lasts. Out came the power grinder with a wire brush on to clean up the rust mess I’d just made. After getting rid of all the loose stuff, I liberally applied a coat of POR-15 to stem the rusty tide.
On to the second issue – no choke on the left carburetor. I backed Ringo’s rear up onto the ramps and, after exhaustively (pun intended) trying to get the coil and rod out, I ended up having to lower the left exhaust manifold to provide passage. A spare head gave up a new rod and the stash gave up a set of three GNP exhaust donuts. A few minutes later, the engine was running and I was listening to make sure the exhaust was leak-less. With that confirmed I reinstalled the dangling lower shroud, rolled the car off the ramps, put away the tools, and called it a day.
Now, jump to this morning – the first time I’ve driven Ringo in a week and a half. While his engine started right up and settled into a proper idle, pulling on to the beltway a few minutes later seemed to require more effort than usual. As we neared the end of my ten mile commute, the engine started stumbling, and as I made my last turn into the parking lot a steady stream of backfiring ensued. I dropped the transmission into Low and matted the gas pedal to ensure I’d make it into a parking spot. That maneuver was rewarded with a very loud backfire, but I did barely make it into a spot. As soon as I braked to a stop, the engine died. I got out and surveyed the damage – yep the entire seam of the muffler had been blown out. I quickly pulled the tops off the two air cleaners to see the state of fuel. The right side seemed okay, but the left side seemed to have two problems. One, the throat had a cloud of gas in it (stuck needle and seat perhaps – running rich = exhaust backfiring), and two, I couldn’t see a shot of gas when I blipped the throttle. Good thing the towing equipment’s in the bed of the truck.
Tuesday, December 22, 2015
A Short Post
Last evening after faithfully getting me home from work, I rewarded Ringo with a carb tweak. Frustrated that the choke wouldn’t open all the way even after freeway jaunts, I finally broke down and did something about it. I pulled the to-be-mounted tire from his trunk, tossed it into the temporary garage, yanked the spare tire from the engine compartment and rolled it into the trunk. With it out of the way and the engine still up to temp, I removed the right side air cleaner assembly and disconnected the choke rod from the carb. About four twists out and the end of the rod lined up with the carb linkage with the choke wide open. I still need to replace the thermostat on the left side, but at least, once hot, both carbs are fully un-choked.
Tuesday, October 27, 2015
Ringo’s Ready to Roll
Last Sunday afternoon I took Ringo for spin around the block and found that, once they were bedded in, the new brakes seem to work fine. The tires squealed a little, so I checked the pressures and found the fronts needed a few psi to get them up to 22 (to go with the 32 psi in the rears). I found that the idle speed, once the engine had warmed up, was a bit higher than desired. I popped the engine lid, and noticed the choke on the left carb was binding. I tried adjusting the rusted rod and broke it. Irrr. I’m sure the engine will still start with only one carb being choked, but we’ll see. I then pulled a wheel off Scarlett to temporarily use as Ringo’s spare. After bolting it into its mount in the engine compartment, I shut the lid and moved on to Glinda.

She needed me to fix her wipers. Starting with the easiest thing to do, the first step in troubleshooting was to look at the schematic in the ’68 manual and test the switch. It checked out, so I moved on to the drive end. To access it, I removed the air grill at the base of the windshield which also required me to remove the wiper arms from their shafts. Two loosened nuts after that and I’d disconnected the arm mechanism from the drive. Three Phillips-head screws held the drive assembly to the firewall and they came out easily. Once I removed the two long bolts holding the motor to the rest of the assembly I could tell the bushing at the far end of the motor shaft was not turning freely. Knowing I had a GUP drive assembly on the shelf, I decided to not repair Glinda’s, but bolt in the GUP. Everything went back together easily, and I remembered to adjust the at-rest position of the wiper arms before pushing them down on their splines. Everything now works and Glinda’s daily-driver-ness has been improved.
She needed me to fix her wipers. Starting with the easiest thing to do, the first step in troubleshooting was to look at the schematic in the ’68 manual and test the switch. It checked out, so I moved on to the drive end. To access it, I removed the air grill at the base of the windshield which also required me to remove the wiper arms from their shafts. Two loosened nuts after that and I’d disconnected the arm mechanism from the drive. Three Phillips-head screws held the drive assembly to the firewall and they came out easily. Once I removed the two long bolts holding the motor to the rest of the assembly I could tell the bushing at the far end of the motor shaft was not turning freely. Knowing I had a GUP drive assembly on the shelf, I decided to not repair Glinda’s, but bolt in the GUP. Everything went back together easily, and I remembered to adjust the at-rest position of the wiper arms before pushing them down on their splines. Everything now works and Glinda’s daily-driver-ness has been improved.
Monday, September 28, 2015
I'm So Sorry Ariel
Had a nice time Sunday afternoon working on Ringo. I was able to get the engine to start by hotwiring to the purple solenoid wire, but not with the key. Looks like a replacement ignition switch in on hit to-do list. With the engine stuttering along, I put the hand over each carb. The right one behaved properly basically killing the engine by starving it for air, but the left one just made a hissing noise when blocked - a bad vacuum leak. I pulled off the carb and put on a new base gasket, bolted it back on, and refired the engine – no change. I looked and felt carefully around the carb’s mounting area. My fingers and ears told me the leak was between the carb base and top. Remember these carbs were the ones Mikhaila and I hastily rebuilt when Ringo’s original pair were swapped onto Scarlett in anticipation of the “great starting” that never happened. Off came both carburetors and put back in place were Ringo’s original pair. After a few seconds of cranking to fill the bowls with fuel, the engine started up and settled into a nice, smooth, but somewhat high idle. After warming up, the idle still wouldn’t come down until I cleaned the throttle shaft of the right carb which allowed it to close fully and drop the rpm down into the 1000 range with the transmission in Neutral.
I then settled behind the steering wheel, made sure I had a good brake pedal, and dropped the trans lever into D. A few maneuvers to get the car away from the fence, and I pulled the parking brake to keep him from rolling. Much to my frustration the handle pulled much farther that it should and brakes were never applied – broken cable. Irr.
Ringo’s driver’s door has been stuck shut since about a month or so before Ariel stopped driving the car, so that was the next focus of my attention. While still sitting in the driver’s seat, I pulled back on the inside lever hard and slammed my shoulder into the door – lo and behold it popped open. TYL. I got out of the car and looked closely at the engagement of the latch to striker plate – the striker plate was obviously too low. Loosening the three Phillip’s head retaining screws allowed me to slide the latch up. I tightened the screws and attempted to close the door – it wouldn’t fully latch. Moving the plate out about a quarter of an inch did the trick though. Now the door latches nicely with the expected amount of closing force. I feel SO badly that Ariel struggled with this door for far too long. I know I adjusted the plate when the problem first arose, but was never able to get it into a spot where a normal closing force would get it to fully latch – she really had to slam it to get it to fully close. Now it’s fixed – just a few months late.
Back to the brakes. To check out the issue, I backed the rear of the car up on the ramps and blocked the wheels to keep it there. I slid under and immediately found the cross-cable was much longer than it should be. The cable had broken near the right rear wheel, and the only way to replace it is to disassemble both rear brake assemblies which I started to do with the right side.
Running out of time, I needed to take apart the racing carbs so the bases could be sent back to the guy that modified them for replacement. Once the bases were completely bare, I closed up the garage and called it a day.
I called Jeff at the Corvair Ranch and I should see a GUP cable assembly by the weekend.
Friday, September 25, 2015
Okay, I’ll Break The Silence
By my lack of posts over the last few weeks, one can surmise not much is going on with the fleet. Glinda is still reliably motoring down the road getting her 17.5 mpg as my mostly daily-driver. The guy that modified the racing carburetors for me has agreed to exchange the bases of these apparently faulty ones for new modified ones at no charge, but I still need to tear down the ones I’ve got and ship them off to him before new bases will be sent to me. Today I scored two nearly new bucket seats out of Chevy Cobalt. I’d been watching for these during my sporadic visits to Crazy Ray’s and today I found them. The serendipitous part of this find was that someone had recently removed them from the car and just left them sitting on the ground. It was like I’d called ahead and ordered them. While these seats are not as form-fitting as the racing seats I’ve got, they are much more comfortable and far more practical for a daily-driver. Now I’ll sell the two racing seats and hopefully make back most of the $65 I just spent. Permanently installing these two buckets is already on this winter’s to-do list.

Ringo has gotten some attention too. I’ve sanded the Bondo and applied a few coats of sandable primer. I’ve remounted the right rear wheel and attempted to start the car. Even though the batter shows a good voltage, he won’t crank. I need to clean the terminals before he can be fired up. Last Sunday I hosted an informal gathering of Corvairs. I’d been e-mailing and talking with two new owners and invited them to stop by Sunday after lunch. I also sent out a group e-mail to all the Baltimore club members as well as a Facebook invite. The two new owners showed up (one brought along his enthusiastic wife) and one of the Baltimore owners joined us. We had a great time looking over cars, talking about Corvairs, and getting to know each other.
This gathering (even with its lack of Baltimorean attendance) has prompted me to organize a driving tour for next month. I’ve mapped out a convoluted route on country roads between a Maryland cidery (just south of Frederick), and three northern Virginia wineries. In addition to inviting the Baltimore folks, I’m going to put out the word to the Northern Virginia Corvair Club to see if some of them want to join in.
Friday, July 17, 2015
Ninety-nine Percent Positive
The other day, as I previously posted, I swapped out Glinda’s modified carburetors for the newly rebuilt ones that were meant for Scarlett. Since that change, she’s been running wonderfully for Mikhaila’s in-town trips. Yesterday morning I couldn’t resist claiming Glinda as my day’s ride. During my brief test drive of a couple weeks back (right after swapping carbs), I could tell that the throttle response was significantly better, but it still a thrill as I headed down the beltway’s on-ramp, transmission in third and pedal to the metal. The tachometer climbed above 4000 rpm with no hesitation and very little needle jiggling. A shift into fourth gear and back to WOT and soon after I was going eighty. What a huge difference. Later that day I pulled into a gas station and put less than seven gallons of high-test into the tank. According to fuelly.com Glinda had averaged over 17 mpg since the carb swap - where she’d been before the swap.

When I got home, I pulled the #1 and #6 plugs and checked them for fouling – nice and clean tip and ground electrode. #1 looked clean all over, while #6 had a little black buildup around the face of the plug body. I didn’t clean them, but put them right back in and will check again after another couple hundred miles. If, after that, the mileage is still good and the plugs are still clean, I’ll be asking the source of the modified carburetors to replace them. I’ll also, at some point, put back the Pertronix Ignitor and coil since they weren’t causing the rough-running.

When I got home, I pulled the #1 and #6 plugs and checked them for fouling – nice and clean tip and ground electrode. #1 looked clean all over, while #6 had a little black buildup around the face of the plug body. I didn’t clean them, but put them right back in and will check again after another couple hundred miles. If, after that, the mileage is still good and the plugs are still clean, I’ll be asking the source of the modified carburetors to replace them. I’ll also, at some point, put back the Pertronix Ignitor and coil since they weren’t causing the rough-running.
Monday, July 6, 2015
Three Cars, Three Updates
Glinda: No Racer No More
A couple weeks ago I hopped into Glinda for a quick evening drive. I started her up, and pulled away from the curb. Since it had been raining, I turned the wiper knob to clear the windshield, but nothing happened - at least nothing wiper-wise. Some other things DID happen though. The radio shut off, the tach needle went to zero, and so did the voltmeter. I immediately turned off the wiper switch and everything went back to working. Since I didn’t want to get stuck somewhere, I pulled her back to the curb, with the intent of dealing with the problem later. The following morning, before turning on the car, I pushed in the wiper switch rather than turned it as a test – the wipers worked as normal. I turned them off, and, thinking the previous evening’s gremlin had moved on, I started the car and drove away. A few moments later, I checked Glinda gauges and found the voltage sitting at 10.8 rather than the normal 14+. Not having a spare vehicle available to me this morning, I continued on to work minimizing my use of electrical stuff. By the time I pulled into my parking spot at work, the gauge was now reading about 10.2. I shut off the car, and then turned the key to the ON position – the gauge needle was now pointing at slightly above 12. The drive home, however, was business as usual. The voltmeter needle pointed back to where I was used to seeing and all seemed fine.
The lovely Loriann and I decided that Mikhaila needed a car to drive while waiting for us to finish Scarlett. Glinda drew the short straw. To facilitate Glinda’s new duties, Mikhaila and I swapped out the racing seat and harness for the stock bench and belts, and we put back the skinny tires in place of the wide racing wheels. I rode with Mikhaila giving out instructions as she wheeled the car around the neighborhood. She did quite well getting used to the heavier steering and relearning the manual transmission skills she’d not had to put into practice for months.
Yesterday, after recording another tank-full of atrocious gas mileage, I gave up on the modified carburetors and swapped on Scarlett’s pair. With the recently rebuilt carbs hooked up and some gas poured down each throat, the engine reluctantly fired. After a few moments, gas started squirting out of the vent holes of the right carb. Off went the engine and off came that carb top, but not until I checked the accelerator pumps – no squirts in either carb. Inspecting the removed top assembly, I found that the wire needle retainer was preventing the needle from easily seating itself. So, I removed and re-set the float levels to ’65 setting (1-1/16” full up and 1-1/2” for full drop). I then dug out some new accelerator pump cups and a couple GUP pump assemblies from my stash. I found that the two assemblies both had pliant cups that worked perfectly in their associated bores, so one went on in place of the right top’s non-functioning one. After reinstalling that side, I pulled the left top assembly off made the same changes. Next, I needed to again clean all the filthy, fouled spark plugs (this is getting old). With everything installed and connected back up, jumping 12 volts to the purple wire contact got the engine running right away. No gushing gas and blips of the throttle were met with immediate rpm responses from the engine. I climbed in, belted up, and took her for a spin around the neighborhood. She ran better than she had in months – coincidentally the same number of months the racing carburetors had been on the engine.
Needless to say, I was quite happy as I backed her up to the garage opening. I got out my length of clear tubing, shot some water in, hooked both ends up to the appropriate vacuum ports, and balanced the carbs. With the air cleaner back on, I adjusted the idle fuel screws per the manual before setting the idle speed to 800 and shutting the engine lid convinced all woes with that car were now behind me. That euphoria lasted less than twenty-four hours ended by a single text from Mikhaila: “Glinda keeps stalling and the gas gauge went from full this morning to half full when I ran an errand.” CRAP! I thought I’d get to work on the house this evening, but NO!
Scarlett Brakes Won’t Bleed
During the last week Mikhaila and I have had a couple productive sessions in the garage. Scarlett now has all her new brake lines in place as well as her exhaust system completely hooked up. With the last brake line fitting tightened, she and I spent at least an hour and went through over a pint of brake fluid trying to get a solid pedal. With all the components of the system being new, there was a lot of air that had to be bled out. After running out of fluid, we were still getting air with each opening of a bleeder valve. Part way through the task, I got smart and adjusted the pedal rod making it longer so it would push the pistons in the new dual master cylinder deeper. This seemed to get more fluid pushed out with each stroke. I hope we’re right around the corner from an air-free system.
The muffler hanger arrived in the mail Saturday morning, so we bolted it to the engine. A new strap held the GUP muffler in place and a new 2” muffler clamp solidified the exhaust pipe to muffler joint. The engine is ready to start up other than the fact that 1) I took the carbs for Glinda, and 2) I put battery back in Ringo (see more below).
Mikhaila also took advantage of the seats being out and more thoroughly scrubbed the years of dirt from each of the front bucket seats. We also stripped the old rear window material from the three trim sticks in preparation of a new top getting installed (a ways off from happening).
Ringo Readies for Upcoming Sale

Yesterday, I pulled the tarp off Ringo with the intent of deciding what I would do to this car before I put it on the market. Instead, I jumped right into the fray by swapping back in the battery he’d so graciously loaned to Scarlett. A bit of gas poured into each carburetor and a few revolutions of the engine by the starter and the engine was running smoothly like he’d been on the road a week ago not a year ago. Next on the checklist was bodywork made necessary by the destructive right rear tire. I bent and pounded the sheetmetal behind the wheel into some semblance of its original shape. Grabbing the grinder fitted with the wire brush attachment, I attacked the mess along the front edge of the wheel-well as well as the inside of the wheel-well (is that too many wells?). I also brushed away the flaking paint and surface rust on straightened out section. Next, I pulled a jar of rusty metal primer and brushed over all the exposed steel.
I remembered that the last time I’d seen Ariel drive away in this car, one of the rear taillights wasn’t working. It took some cleaning and bulb replacement, but after a half-hour or so I had all essential lights operating properly.
With all this progress, I decided I’d move him out into the middle of the driveway so I could access the stuck driver’s door. I climbed behind the wheel, put my foot on the brake pedal, and it went all the way to the floor. I climbed back out, popped the trunklid, spun off the master cylinder cap, and stared down into an empty master cylinder reservoir. Hoping against all hope I filled the reservoir with fresh fluid and crossed my fingers. Maybe, I though, the seals will magically rejuvenate themselves after a good soaking with DOT 3.
This morning though, I went ahead and made the call to the Corvair Ranch and ordered a rebuild kit. I also asked Jeff to send me a Powerglide re-seal kit, two carburetor rebuild kits (so I rebuild the two EM carbs on the shelf to put on Scarlett’s engine), and a muffler strap for Glinda.
Wednesday, June 3, 2015
Better, But Not Great
Going against the best evidence (crappy gas mileage, sooty spark plugs), I decided I’d focus on ignition (Ignitor II) over the fuel (rich carburetors).
Last night I backed Glinda up to the open garage door with the intention of reverting back to stock points to see if the poor performance can be remedied. After removing the distributor cap, rotor, and dust cover, I took out the two screws holding the Ignitor II in place, and zip-tied it out of the way. The stock points plate took its place and the rest of the distributor assembly was buttoned up. I borrowed the new-looking coil from Scarlett and zip-tied it to the engine for temporary testing purposes. With the leads in place, I fired up the engine and checked the timing. Since it was close to twelve degrees BTDC, I called it good enough for my purposes.
The subsequent test drive indicated the engine would pull in first and second gears without hesitation. Problem solved. Back to the driveway.
I removed and stored the Ignitor II and Flame-thrower coil and bolted the stock coil into place. After re-hooking up the wiring, I shut the engine lid and went inside for dinner.
This morning, once on the highway, I did a few WOT runs in 4th. Sadly, all was not well. As the rpms went up, the tach needle started occasionally bouncing around and the engine didn't seem to be pulling as hard. I was, however, able to get up to around 4000 rpm, but not much more. I still need to check the plugs (sooty or not) and tweak the timing, but I'm disappointed. I'll be taking different carburetors with me to the track. I don't want to swap carbs while at the track, but I'll try anything now.
Monday, June 1, 2015
A Fork In The Road
Saturday morning I was out in the driveway early attacking Glinda’s carburetors. I pulled the right one off the engine first. A hex wrench twisted out the plug giving me access to remove the jet. Once out, I could read the “52” stamped on the head. I’d thought I’d see a “53”. Knowing I needed to make a significant change, I screwed in a #50 jet, reinstalled the plug with some pipe sealant, and placed the carb base back on then engine. The same operations were performed on the other carb before pouring some gas into both bases. The the lids in place and the linkage all connected, I turned the key and the engine started right up and settled into a 600 rpm loping idle. Throttle response seemed acceptable with each blip of the throttle, so I left the engine running while I lowered the front end off the jackstands. Unusually, the driveway was clear, so I rolled Glinda off the ramps and out onto the street for a quick spin around the neighborhood. Sadly, the wide-open-throttle performance is still lacking – won’t pull strongly above 3500 rpm. I’ve driven the car a few times since (about 40 miles) and the gas gauge needle is already indicating I’ve burned about 4 gallons. Easy to do the math to see that estimated ten miles per gallon isn’t acceptable.
What to do now? I could still try to go against my belief that the carburetors are to blame and focus on the ignition. That would mean swapping out the used Ignitor II and new Flamethrower coil for the stock points and an old coil – roughly an hour of my time. Or I could go with all the evidence and replace the modified carbs with either Ringo’s proven ones or Scarlett’s recently rebuilt ones – again about an hour of work. Neither of the replacement sets of carbs have had the jets relocated. If the swap cures the mileage and WOT issues, I’ll still be faced with fuel cutout after high speed turns – and there are seven of them at the track I’m heading to in a few days. With rain in the forecast for this evening, I’ve got another day to make the decision.
What to do now? I could still try to go against my belief that the carburetors are to blame and focus on the ignition. That would mean swapping out the used Ignitor II and new Flamethrower coil for the stock points and an old coil – roughly an hour of my time. Or I could go with all the evidence and replace the modified carbs with either Ringo’s proven ones or Scarlett’s recently rebuilt ones – again about an hour of work. Neither of the replacement sets of carbs have had the jets relocated. If the swap cures the mileage and WOT issues, I’ll still be faced with fuel cutout after high speed turns – and there are seven of them at the track I’m heading to in a few days. With rain in the forecast for this evening, I’ve got another day to make the decision.
Friday, May 29, 2015
What A Ride

It was just a few days ago I was on a high since I’d just learned about the Power Enrichment Needle and was convinced the lack thereof in Glinda’s carburetors was causing the super-rich running of the engine. Yesterday the mailman delivered an envelope from the Corvair Ranch containing two needles. As soon as I was home from work, I excitedly donned some grungies and raced out to the driveway. A few minutes later I was utterly deflated.
I’d removed the two screws and pulled off the venture cluster from the right carb only to discover the hole where I was to place an all-important needle was filled with JB Weld (see image above). A subsequent e-mail to carburetor guru informed me that: 1) filling that port is necessary to allow moving the jet, and 2) the needle only makes a difference at wide-open-throttle.
Oh well, it was fun while it lasted.
In digging around my stash of carb parts last weekend, I found a small envelope containing five carb jets. All are stamped with 51, so I’ll be swapping the 53s that are currently in Glinda for these smaller ones. I’ll also make sure the floats are set at the highest settings resulting in the lowest level of fuel in the bowls. A quick test drive and a subsequent inspection of a spark plug will tell me if I’m still running rich. If that doesn’t make any difference, the modified carbs will come off and Ringo’s pair will be installed, but I hope it doesn’t come to that.
I ended the evening by pulling out Glinda’s front bench seat and stock seatbelts and bolting in the racing seat and harness. Other than the carb issue, she’s ready to hit the track.
Subscribe to:
Posts (Atom)