Showing posts with label seat. Show all posts

Friday, November 18, 2016

So Much To Do, So What Do I Do?

There’s a guy here in Maryland who recently posted on Facebook that he’s looking for a daily-driver Corvair. Given all the work ahead of me with Scarlett and, probably, Luna, I’ve been toying with the idea of trading Glinda for something more modern – like a mid-90s MX-6. So, after some thought I messaged him that I’d sell Glinda for $2200. He says he’s interested, but nothing’s happened.

If Glinda didn’t need so many little issues dealt with, I wouldn’t even consider giving her up, but she does, so I am. In addition to the items on the To-Do list (see sidebar), here’s a mostly complete list in no particular order.

Install the Cobalt rear seat

Clean and reinstall the carpet
Fix the courtesy light
Repair and install the GUP driver’s door panel

Replace the rear bumper

Install the GUP steering box
Splice the broken oil pressure gauge tube and replace the ferrule at the rear of the gauge
Remove the heater fan and clean and lube the motor
Replace the package tray cardboard with something that will accommodate speakers
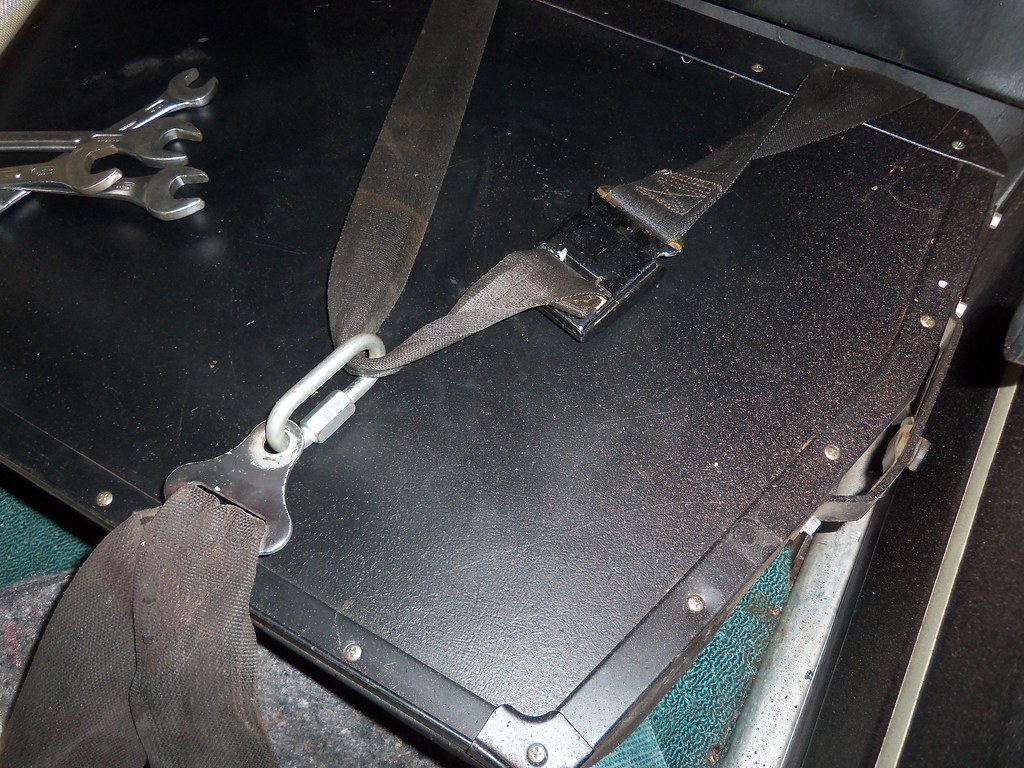
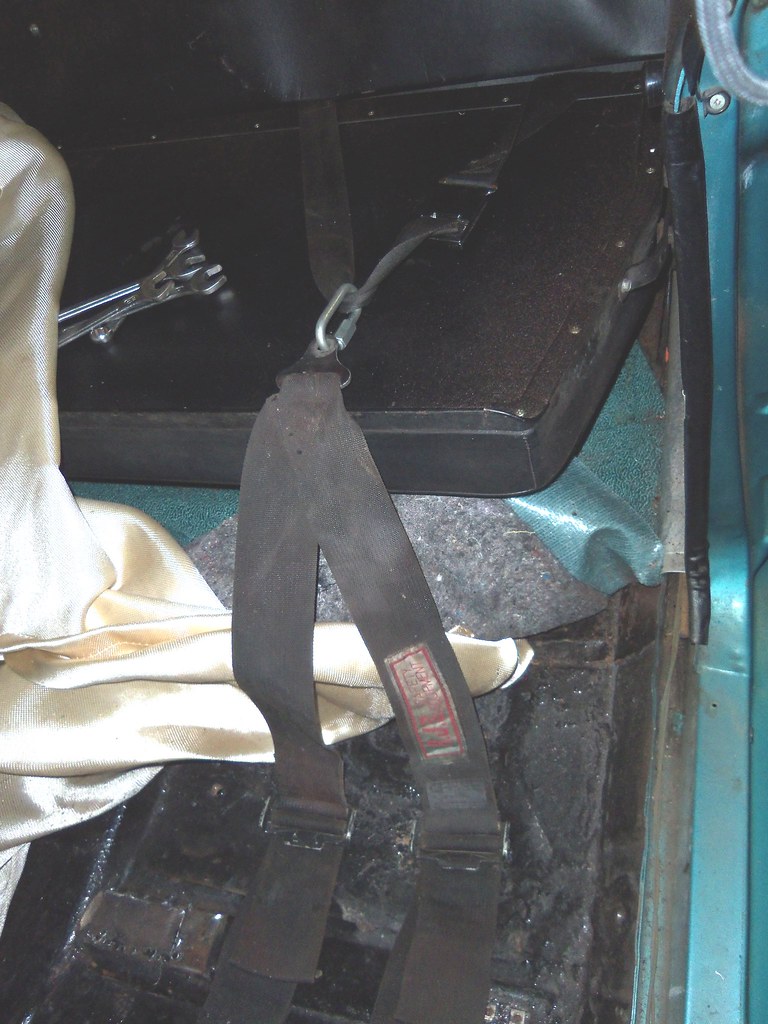
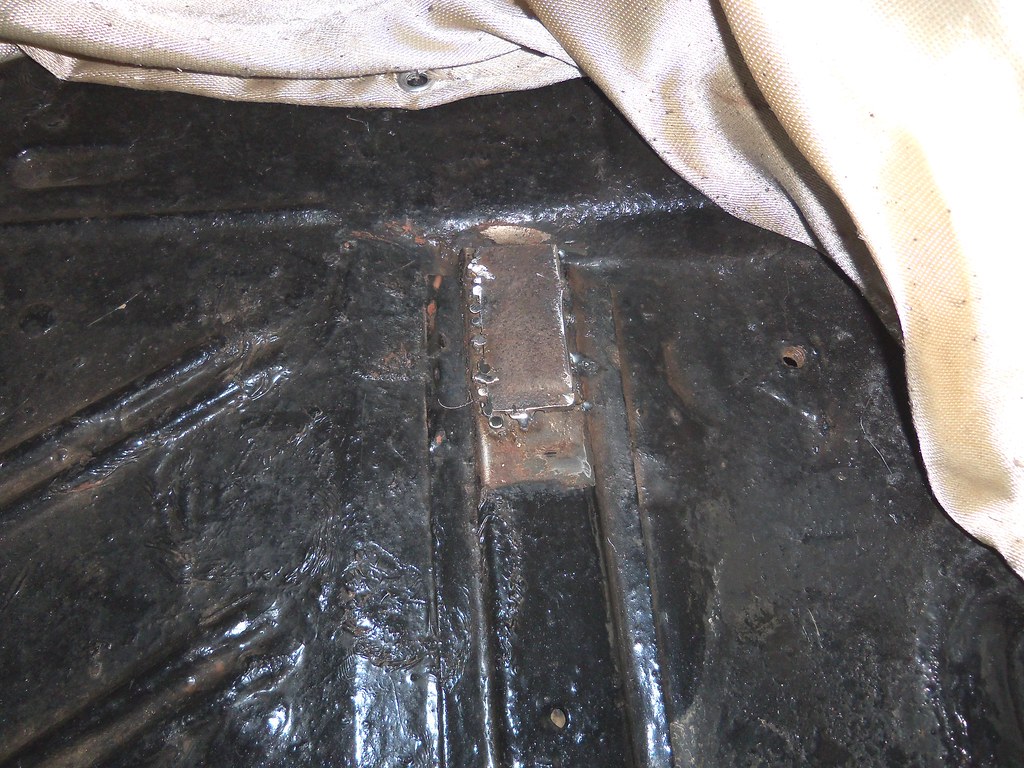
Install a good mount for the racing harness shoulder belts
Bolt down the fourth hole of the each Cobalt front bucket seat
Weld in a new trunk bottom

Rebuild the blinker switch
Plug the smog hole and AT dipstick hole in the engine bay

Replace the gauge panel with a GUP I’ve got from a manual shift car (need to choose 500 or Corsa style)
Replace the hood with a GUP I’ve got

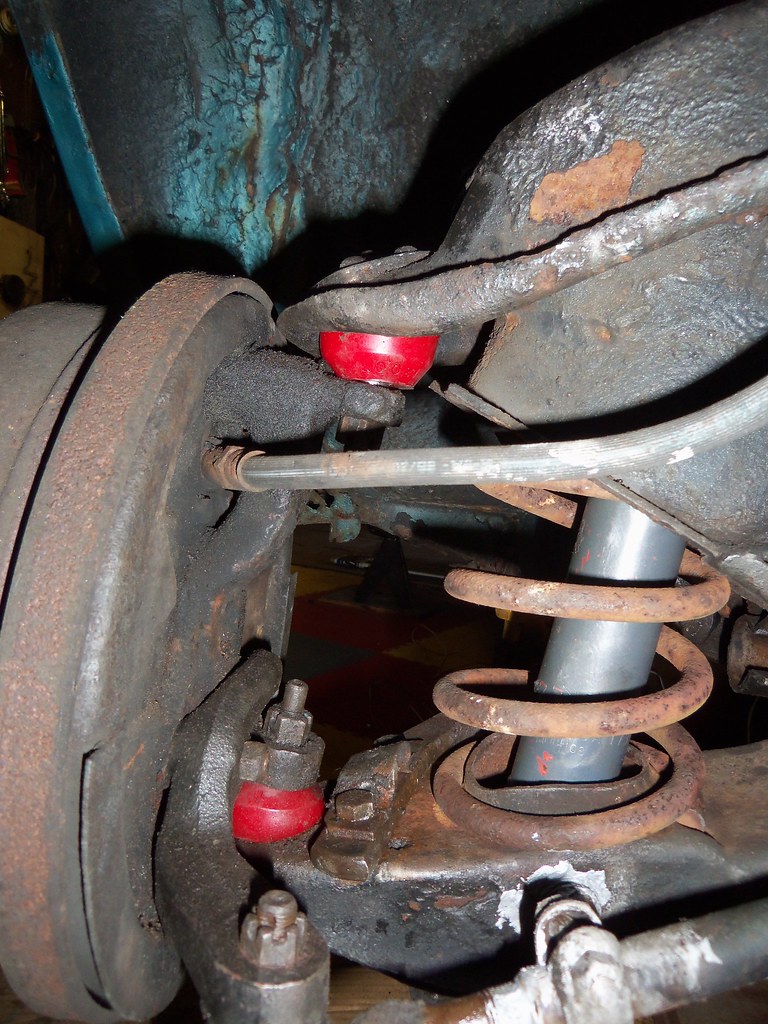
Eradicate rust: rear shock towers, multiple body locations


Paint the car orange

Kinda’ daunting given all my other commitments (put big sad face here). She runs really well right now, so I do love to drive her.

Thursday, November 3, 2016

Scarlett’s Gonna’ Get Safer

I started this blog post on Tuesday the 27th. Due to a busy schedule I never got farther than the first paragraph. Sadly, the title of this post and the initial paragraph were a bad omen. Here’s that paragraph.

I have been extremely fortunate that none of my daughters (or myself for that matter) have been injured while driving our Corvairs. Glinda has been the only ‘vair we’ve owned that had shoulder belts. Well, that’s gonna’ change. Today, I bought a pair of front bucket seats out of a Chrysler Sebring convertible. I want to make sure that Mikhaila doesn’t hit the steering (or anything else) if she has an accident.

Now jump ahead to last Thursday when, on slick pavement, Mikhaila lost control of Scarlett and drove her into a guardrail. Mikhaila is pretty banged up, but thankfully nothing that won’t heal in a few weeks. Impacts of note were: the right knee to the heater controls resulting in a flap of skin that should have gotten a few stitches, but she refused; her chest and under her chin collided with the steering wheel and left some nasty bruises and painful breathing, but fortunately negative x-rays; and a bump on the back of the head where a speaker flew up and whacked.

Scarlett did not come through the incident nearly as well as Mikhaila. Amazingly, the bumper is basically still in its stock location and the front wheels still point in the same direction, so I was able to hitch the towbar to her front end once I pulled some of the fender away from the right front tire. The flat-tow home from the tow-yard was, thankfully, uneventful.

So, what are we to do? I’ve not been in the mood to evaluate all the damage, but at the very least she’ll need a new front panel (Clark’s doesn’t sell a replacement) and valence ($126 from Clark’s), as well as a right front fender from at least the center of the wheel forward ($110 from Clark’s) and a trunk bottom ($113). A visit to the Corvair Ranch will be required to get a used front panel, wheel-well, and a replacement bumper. Since the steering and alignment seem to be working properly, I’m thinking the damage is just to body panels. Mikhaila and I have a lot of cutting and welding and bodywork in our future before the car is ready for the road again.

And those Sebring seats? They will go in before Mikhaila gets behind the wheel again.

Wednesday, September 21, 2016

Second Seat In

Yesterday, after dinner, I donned grungies and proceeded to do what had to be done to get the front passenger Cobalt seat installed in Glinda. I placed the seat in the car lining up the outboard rear mounting screw, and marked the locations of the four feet on the floor. The angle grinder with a wire brush made quick work of removing all coatings from the areas to be welded to, while the bench grinder’s wire wheel cleaned up the four pieces of square tube. The angle grinder, now with a cutoff wheel installed shorted the feet so they’d fit into the tube pieces. After rolling the MIG welder out to the car, I welded the four pieces of tubing to the floor. For some reason the welding was not a nice as the driver’s side even after adjusting the feed rate a few times. I remembered that I’d put the heat setting on C, but I’d forgotten what had worked for the speed before. It also could’ve been that the connection to ground was farther away than last time. So while it didn’t look as good, the weld was still complete enough to provide good anchors. Once the four tubes were attached and the welds had cooled, I covered all the exposed steel with primer and let things dry while I turned my attention to the clutch again.

This time I decided to actually follow directions when setting the locations for the two clevises (or is that clevii?). After putting Glinda up on the ramps, I slid under the rear and disassembled both clutch linkage pivots. I tugged on the cable with roughly 15 pounds of muscle and spun the first clevis down the thread until the pin lined up with the hole in the fork (z-bar). All this with the fork set as close to 7/8ths of an inch from the cross-member as I could measure. With the fork engaged with the clevis, I then pulled all the slack out of clutch and spun the second clevis until the pin lined up with the corresponding hole in the other end of the z-bar. The final instruction was to, “Back off (3) Adjusting Rod three turns and assemble to lever with (2) Clip.” When something’s underlined, I tend to think it’s important. Well, I backed it off three from being inline and now the clutch grabs as soon as it’s off the floor. I think three should be two. Since the rear was up on the ramps, I

Having given the primer some time to dry, I decided I could install seatbelts and the front passenger seat. The seat bolted right in, so now I've got the ability to transport a passenger.

Before calling it a night, I started Scarlett’s engine to see if my vacuum blocking had fixed the right side’s cool running. The engine fired right up and there’s now a significant amount of vacuum at the right carb’s air horn and no hissing when I put my hand on top. However, the choke still didn’t move much from cold, but I can attest to the exhaust manifold putting out the heat. Not sure what the deal is – maybe the thermostat is bad. I’m thinking of investing in a new tool – an infrared gun to compare right and left sides. Also, thinking I’ll swap right with left carbs to see if the problem stays with the side or follows the carb.

Wednesday, September 14, 2016

I Like Welding ... or How To Put a Bucket Seat in a LM 500


With my semi-daily-driver Ringo soon to be parked in someone else’s garage, I needed to get Glinda roadworthy again. Currently, she’s occupying the driveway with her interior in disarray. Before last night the only front seat that would quickly bolt in was sitting in one of the Corvair Ranch’s buildings, so something had to be done, and quickly, to get the Cobalt bucket seat bolted in a space where no bucket had gone before.

I tried to find a good photo online of the front foot of the Cobalt’s seat track, but was unsuccessful, so the following, poor enlargement with red highlighting will suffice to enlighten what I needed to deal with. Coincidentally, this configuration is somewhat like an EM with hooks on the front of each track that go under a __|~~~~|__ shaped bracket bolted to the floor.

In preparation for installing these seats, I bought a piece of 1” square steel tube from Home Depot. My plan was to weld inch-an-a-quarter long sections of the tube (cut with the a disc in the angle grinder) to the floor and slide the feet into the open end. Since the foot was taller than the ¾” opening of the tube, I cut down the feet to fit. This also slightly lowered the seat in the car. LM 500s with their front bench seat only came with threaded mounting holes in the floor for the outboard ends of the seat – no inboard holes. I lined up the rear mounting hole of the new seat’s track with the outer threaded hole in Glinda’s floor and, fortunately, the center of the seat matches up with the center of the steering wheel – TYL. Using masking tape, I marked where the two tube pieces needed to be welded to the floor and then removed the seat. Out came the wire wheel and off came the paint in the areas where the welds would be. The sections of square tube made a visit to my bench grinder’s wire wheel to remove any external coatings that would impair the weld. I placed the first section on the floor holding it in place with a block magnet, connected the ground cable of my MIG welder to the nearby center seatbelt fitting that’s bolted to the body, and proceeded to lay down a bead of molten metal. The welder was set for melding sheetmetal, so I bumped up the heat and feed since the tube was significantly thicker than the car’s skin. While the first line was not that pretty, the next two looked pretty good (see below – you be the judge). I welded in the third and fourth sections replicating the spacing I’d measured from the actual seat. The moment of truth came when I hefted the seat back in, slide the front of the tracks into the ends of the square tubes and happily saw the outer rear hole line up perfectly with the threaded hole in the floor.

I haven’t figured out what I’m going to do with the rear inboard hole yet since it sits partially on top of the tunnel. I’m leaning towards welding in a piece of 5/16ths threaded rod. All in all, a good night in the driveway.

Tuesday, August 30, 2016

The Inevitable Rust Repair Commences


The last opportunity to go time trialing is quickly coming up. The NECC moved its end-of-summer event to the twenty-fifth of September. While I’m not sure how I’ll swing it financially, I need to get the car track-ready or it’s all a moot point. What are the track-ready tasks? Put in the bucket seats, adjust the clutch linkage, and get modified carburetors (jets relocated to prevent cutout on long turns) are the two major ones. I can probably get away with just that. Other nice things would be to get the trunk welded and relocate the battery, but I don’t see that happening with the short time I have left coupled with the house and car projects that are currently on my plate.

To start the ball rolling, I spent some time in the driveway with Glinda this weekend. Friday evening I pulled out the front bench seat and the front section of carpeting. Doing this necessitated removing the gas pedal. With the carpet gone, a rusty mess was exposed. After I went after all the loose stuff with a wire wheel, I could see fully what work I had ahead of me. Not too bad. For the most parts isolated to the front passenger footwell area.

With a cutoff disc on the grinder, I removed the rotted steel being careful not to cut through any fuel lines (been there once, don’t want to go back again) or into the channels under the floor that weren’t rusty (GM spent the money to have them galvanized). Next, I put the flapper wheel on the grinder and cleaned up all the edges where the patches will go as well as surfaces of the channel where I’ll be plug-welding the patches. The plan is to butt-weld the patches at the perimeters which requires the patch to perfectly follow the contour of each opening. That’s the next part of the job – making patterns from paper, transferring the outline to sheetmetal, and cutting out the patches. That’s for another day.

Friday, September 25, 2015

Okay, I’ll Break The Silence

By my lack of posts over the last few weeks, one can surmise not much is going on with the fleet. Glinda is still reliably motoring down the road getting her 17.5 mpg as my mostly daily-driver. The guy that modified the racing carburetors for me has agreed to exchange the bases of these apparently faulty ones for new modified ones at no charge, but I still need to tear down the ones I’ve got and ship them off to him before new bases will be sent to me. Today I scored two nearly new bucket seats out of Chevy Cobalt. I’d been watching for these during my sporadic visits to Crazy Ray’s and today I found them. The serendipitous part of this find was that someone had recently removed them from the car and just left them sitting on the ground. It was like I’d called ahead and ordered them. While these seats are not as form-fitting as the racing seats I’ve got, they are much more comfortable and far more practical for a daily-driver. Now I’ll sell the two racing seats and hopefully make back most of the $65 I just spent. Permanently installing these two buckets is already on this winter’s to-do list.


Ringo has gotten some attention too. I’ve sanded the Bondo and applied a few coats of sandable primer. I’ve remounted the right rear wheel and attempted to start the car. Even though the batter shows a good voltage, he won’t crank. I need to clean the terminals before he can be fired up. Last Sunday I hosted an informal gathering of Corvairs. I’d been e-mailing and talking with two new owners and invited them to stop by Sunday after lunch. I also sent out a group e-mail to all the Baltimore club members as well as a Facebook invite. The two new owners showed up (one brought along his enthusiastic wife) and one of the Baltimore owners joined us. We had a great time looking over cars, talking about Corvairs, and getting to know each other.

This gathering (even with its lack of Baltimorean attendance) has prompted me to organize a driving tour for next month. I’ve mapped out a convoluted route on country roads between a Maryland cidery (just south of Frederick), and three northern Virginia wineries. In addition to inviting the Baltimore folks, I’m going to put out the word to the Northern Virginia Corvair Club to see if some of them want to join in.

Monday, August 17, 2015

It's Been Way Too Long

Wow, nearly a month since I last posted. Pretty sad. Anyway, what’s been happening? Well, Mikhaila and I are pretty close to dropping Scarlett off the jackstands, Ringo’s had some work done, and Glinda’s been a reliable daily driver.

More specifically, Scarlett has a re-sealed Powerglide, a Safety-taped shifter cable, two borrowed carbs from Ringo (since I’m sure they work), a solid brake pedal, a coated and installed gas tank, a new in-line fuel filter (by the left rear wheel), hooked up throttle linkage, front seat belts, and all four tires bolted on. In addition to coming off the jackstands, all she needs to get out of the garage under her own power is some gas in the tank, ATF in the transmission, and some ignition system adjustment.

I closed off the opening created by the shredding tire with a membrane tape carpenters use to seal around house windows. It has a strong adhesive backing, is plenty tough, and comes in a roll that’s four inches wide. I also applied Bondo to the treated rust-through around the right rear wheel well. I’ve decided that I will spend my car time this winter working on Glinda. With Mikhaila off to college, Scarlett will vacate the garage and Glinda will take her place. My current list of prioritized projects is:
  • Treat body rust appropriately
  • Get replacements for the racing carburetors and install
  • Paint and install the correct dash (no transmission shifter)
  • Replace the ignition switch
  • Tighten up the front steering (maybe replace the box with a quick-steer unit)
  • Weld in floor patches
  • Weld in the trunk bottom
  • Relocate battery
  • Dye the gray racing seat black to match
  • Install both racing seats in place of the front bench
If the kitchen project goes well, I may even prep and paint the car. I’m torn between Summit Racing’s Teal Green Metallic and Bright Aqua Pearl. Then again I may go crazy and shoot the car with Orange Pearl.
 
Regarding Glinda’s ongoing carburetor saga, she’s still showing far better mileage with the stock carbs, so I’m on the verge of sending the modified ones back for replacement. The next fill-up and spark plug inspection will tell the tale.

Friday, August 1, 2014

Empty Handed

Since the THRaF is still flush with funds, I headed over to Crazy Ray’s to see if I could find a pair of bucket seats to bolt into Glinda. I wove my way around the lines of both imports and domestics for about forty minutes. Since access to the back seat is still required, I was able to walk by more than eighty percent of the candidate cars - seatbacks of four-doors don’t tilt far enough forward. While I found a pair of light gray seats in a Cobalt that I came close to getting, all the other coupe and convertible seats were too beat, worn, and nasty to even be considered. One of the Cobalt seats had a small hole in the fabric of one bolster. Since they were actually clean enough to sit in, I tried it out to verify it’s acceptable. While it’s not nearly as effective as my racing seat at restraining side-to-side movement, I’ll remember it’s there in case all other avenues are exhausted. It appears what I really want are the Cobalt SS seats in black (see below photo). Now I’ll just have to find them. Could be tough – and pricey.

Monday, July 8, 2013

Will She Be Ready?

A brief post to update what I’ve accomplished since my last posting and what’s still left to do in the next four and a half days.

Done:
  • I’ve got three-quarters of the suspension assembled. That includes cutting a coil out of each heavy duty spring, koni shocks set at halfway between soft and firm, new ball joint boots, and new bushings throughout except for the ones in the rear trailing arms and the outer ones in the rear strut rods. I’m waiting for a special washer to arrive in today’s mail before I can finish the left front. The hardest task was removing the two large nuts on the stabilizing rods. I ended up cutting them off.
  • With help from the lovely Loriann and Mikhaila, the backlight was installed, sealed, and trim sticks snapped into place.
  • My new tachometer is installed to the steering column with a hose clamp. I first wrapped electrical tape around the column to protect it from scratches.
  • The modified carburetors have been rebuilt and installed onto the engine. I’ll need to balance them once the car is back on the ground.
  • Once I found out the old Sun oil pressure gauge I’d planned on installing had broke, I went online and bought a three-gauge set (oil pressure, voltage, and temperature) on Amazon. I’ll install the temperature sender somewhere in Glinda’s oil path and be able to monitor oil temp.
  • Using an idea I read on the CorvairCenter forum, I flipped down the rear seat back and pulled left side passenger seat belts up and over the seat back. I latched them which provided an anchor for the shoulder harness belts of my 5-point racing harness. I drilled a hole in front of the driver’s seat for the anti-submarine belt and then bolted the lap belts in using the stock weldnuts in the floor.
  • I spent a long time fiddling with the location of the racing seat. I wanted to make sure it was mounted so that, 1) I could get in and out of it, and 2) I could reach the shifter once I was firmly belted in. Once I set upon a location, I then figured out how to mount the seat. It took a trip to Home Depot and some more cogitating whilst standing in their Hardware aisle before I walked out with a piece of angle iron and a bunch of five-sixteenths fasteners. Once home, I cut bar to the measured lengths, drilled holes where I needed, and the mounting scheme was implemented. I still need to get some longer screws and paint the exterior bar before that item can be completely crossed off the to-do list.
Still to do:
  • Buy and install the aforementioned bolts to finish the racing seat installation.
  • Buy another chain link so I can lengthen the shoulder belts as necessary.
  • Buy and install a fuel filter.
  • Install and hookup the new gauge cluster.
  • Hook up the tachometer and finish routing the wires/tube.
  • Do a tune-up on Glinda’s engine and synchronize the carburetors.
  • Install the tubes that raise the air cleaner. This should be a cleaner installation than I attempted to affect on Lucy.
  • Adjust the throttle linkage to raise the transmission shift point.
  • Install the driver’s front suspension.
  • Break free that side’s tie-rod adjuster.
  • Find the best four stock-size tires.
  • Take the car in for an alignment.
  • Have the tire place reverse the tires to have blackwalls facing out.
Will I be thrashing Friday night or will I have this all done with packing time to spare?

Here are some recent photos.

Thursday, June 6, 2013

It’s a Nice, Comfy Seat

I made the drive out west last night and got a great deal on a very nice and comfortable racing seat. I have no idea how close the mounting holes are to Glinda’s mating bolt holes, but adapting the feet, if necessary, looks to be pretty easy – just weld on some plates. In fact, I may have to do that anyway just to raise the seat since it looks like it sits pretty low. I do want to be able to see above the steering wheel. Also, with the quick-steer arms installed, the steering effort’s gonna’ increase and I’ll need to make sure the thin-rimmed steering wheel is optimally located.