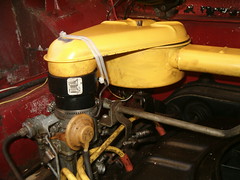
Next it was Lucy’s turn. She’s been so undemanding of my time, and I’ve greatly appreciated it. Lately, however, her gas mileage has been dropping, so I figured it was time for a tune-up. I installed the new points, condenser, rotor, and distributor cap parts I’d purchased from NAPA Friday. After setting the dwell and checking the timing, I moved on to the second project – checking out the clunking front end. I had been hearing a few clunking noises from her front steering the last few days. With the right front wheel jacked off the ground I found the wheel bearing had a tiny bit of play. I pulled the cotter pin and slightly tightened the nut before putting in a new pin. No more looseness and the wheel spun freely. Same situation on the other side. I’ll be paying attention to those bearings from now on. I don’t want to be rejected at inspection at the next NECC track event. Finally, I got to one of the improvement projects (as opposed to maintenance or repair) that’s been on my to-do list far too long. For many months I’ve been in possession of two plastic pipe couplers with the intention of using them to improve air flow into Lucy’s carburetors. Corvair stock air cleaners are low-profile forcing the incoming air to make a sharp turn right at the top of each carburetor. This results in the undesirable condition of turbulent air flow through the carburetor – not nearly as efficient as laminar flow. To allow the air flow to straighten before the carburetor, pipe couplers are inserted as spacers between the air cleaner outlets and the carb inlets. First task in the project was raising the support points for the air cleaner, and I accomplished this by cutting and installing two longer threaded rods with nuts and washers. Next I used hose clamps installed around the top of the carbs to keep each spacer centered over the venture. The final touch was zip-ties to keep the spacers snugly sandwiched in place. The final result is show in the following photos.

 Victoria and I then spent some quality time together working on Glinda. We first removed the front air grill from its home at the base of the windshield. This gave us access to vaccum out leaves, rust, and other crud before prepping exposed metal for primer. Then Victoria had her first experience with Bondo as I showed her how to mix it and had her apply it to the rear window areas that we had previously de-rusted. I know, I know. I really should do this repair properly, but I’m not inspired enough to remove the backlight, cut out the pocked metal, and form and weld in replacement channel. Since we’re not planning on a total repaint, we’ll do the best we can with Bondo and spray paint and keep our fingers crossed surface bubbles don’t appear immediately. With the Bondo left to harden, we moved on to sanding the Rusty Metal primer she’d applied during our last outing together in the garage. That was it for the day.

No comments:
Post a Comment