“I do all my own work,” I replied.
“I’ve got a Corvair and I can’t keep a belt on it,” he complained. “Can you help me?”
“Sure,” I said. “Stop by my house and I’ll take a look at it.”
“You live next to the mayor, right?”
“Yep”
By that time traffic was getting pretty annoyed with us, so we went our separate ways after exchanging names. I hope he stops by.
____________________________________________________
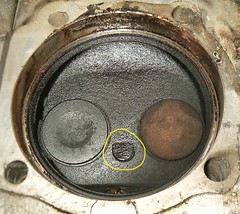
I was hoping the new head gaskets I’d ordered would have arrived by yesterday, but Mr. Postman didn’t leave a package for Glinda. Before I can reinstall the head, it needed to be cleaned up anyway, so last night I got out the die grinder, mounted a brass wire brush, and cleaned off the carbon and oil. I left the old gaskets in place to protect the sealing surfaces. Next, using my new-to-the-garage PC, I searched the CorvairCenter forum for threads about grinding in the combustion chamber. I found this one that discussed removing the bump between the valves. Since the majority recommended removing it, I exchanged the brush attachment for a small grinding stone and smoothed out the circled surface from each chamber.
 I’d read (and it makes sense) that polishing the surfaces of the combustion chamber removes the roughness that causes hot spots. It’s these hot spots that tend to cause pre-detonation (pinging). I had pulled down my polishing kit when the gals arrived back home, so I took that as a good point to stop for the evening.
I’m now searching for photos showing what a nicely ground Corvair combustion chamber should look like.
The poster on the CC forum messaged me with the address of the posting I was looking for. Beautiful work. Check it out.

No comments:
Post a Comment